How to Set Up 301 Redirects (Step-by-Step)
Learn how to set up 301 redirects for SEO. Covers WordPress, .htaccess, Nginx, Shopify, and Cloudflare. With testing steps. Updated March 2026.
Siddharth Gangal • 2026-03-27 • SEO Tips
In This Article
You changed a URL. Maybe you moved to a new domain. Maybe you consolidated 3 pages into 1. Now visitors hit a 404, and Google drops your rankings overnight.
Every broken URL leaks link equity you spent months earning. Users bounce. Google flags your site as poorly maintained. A single migration without 301 redirects can wipe out 40% or more of your organic traffic in a week.
This guide walks through 7 steps to set up 301 redirects the right way. You will learn the exact process for WordPress, Apache .htaccess, Nginx, Shopify, and Cloudflare. No guesswork. No broken links. No lost rankings.
We publish 3,500+ blogs across 70+ industries. URL changes, page consolidations, and domain migrations are things we manage every week. The steps below are the same ones we follow for our own sites and our clients.
Here is what you will learn:
- How to find every URL that needs a redirect
- How to map old URLs to their correct new destinations
- How to implement 301 redirects on 5 different platforms
- How to fix redirect chains and loops before they tank your speed
- How to test redirects before and after going live
- How to monitor redirect health in Google Search Console
Overview
- Time required: 10 to 30 minutes (depends on number of redirects)
- Difficulty: Beginner to Intermediate
- What you need: Access to your CMS, hosting panel, or server config files
What Is a 301 Redirect?
A 301 status code tells browsers and search engines that a page has permanently moved to a new URL. The browser automatically sends visitors to the new address. Google transfers the link equity from the old URL to the new one.
Before 2016, 301 redirects caused roughly 15% PageRank loss per hop. That is no longer the case. Google confirmed that 30x redirects no longer dilute PageRank. Today, a properly configured 301 passes 90 to 99% of link equity according to Moz.
That makes 301 redirects the single most important tool for preserving your SEO during any URL change. Skip them, and you start over from zero.
Step 1: Identify Which URLs Need Redirects
You cannot redirect what you have not found. The first step is building a complete list of URLs that return errors or have changed.
Start with Google Search Console. Go to the Pages report and filter by “Not found (404).” This shows every URL Google tried to crawl but could not reach. Export the full list.
Next, check Google Analytics (GA4). Look at the Landing Pages report for pages that suddenly lost traffic. A sharp drop after a URL change is a strong signal that a redirect is missing.
Run a site crawl with a tool like Screaming Frog, Sitebulb, or Ahrefs Site Audit. These tools find broken internal links, orphan pages, and 404 responses that Google Search Console might miss. A full SEO audit will surface these issues fast.
Three common scenarios that require 301 redirects:
- URL slug change — You renamed
/blog/old-postto/blog/new-post - Domain migration — You moved from
oldsite.comtonewsite.com - Page consolidation — You merged 3 thin pages into 1 stronger page to fix thin content
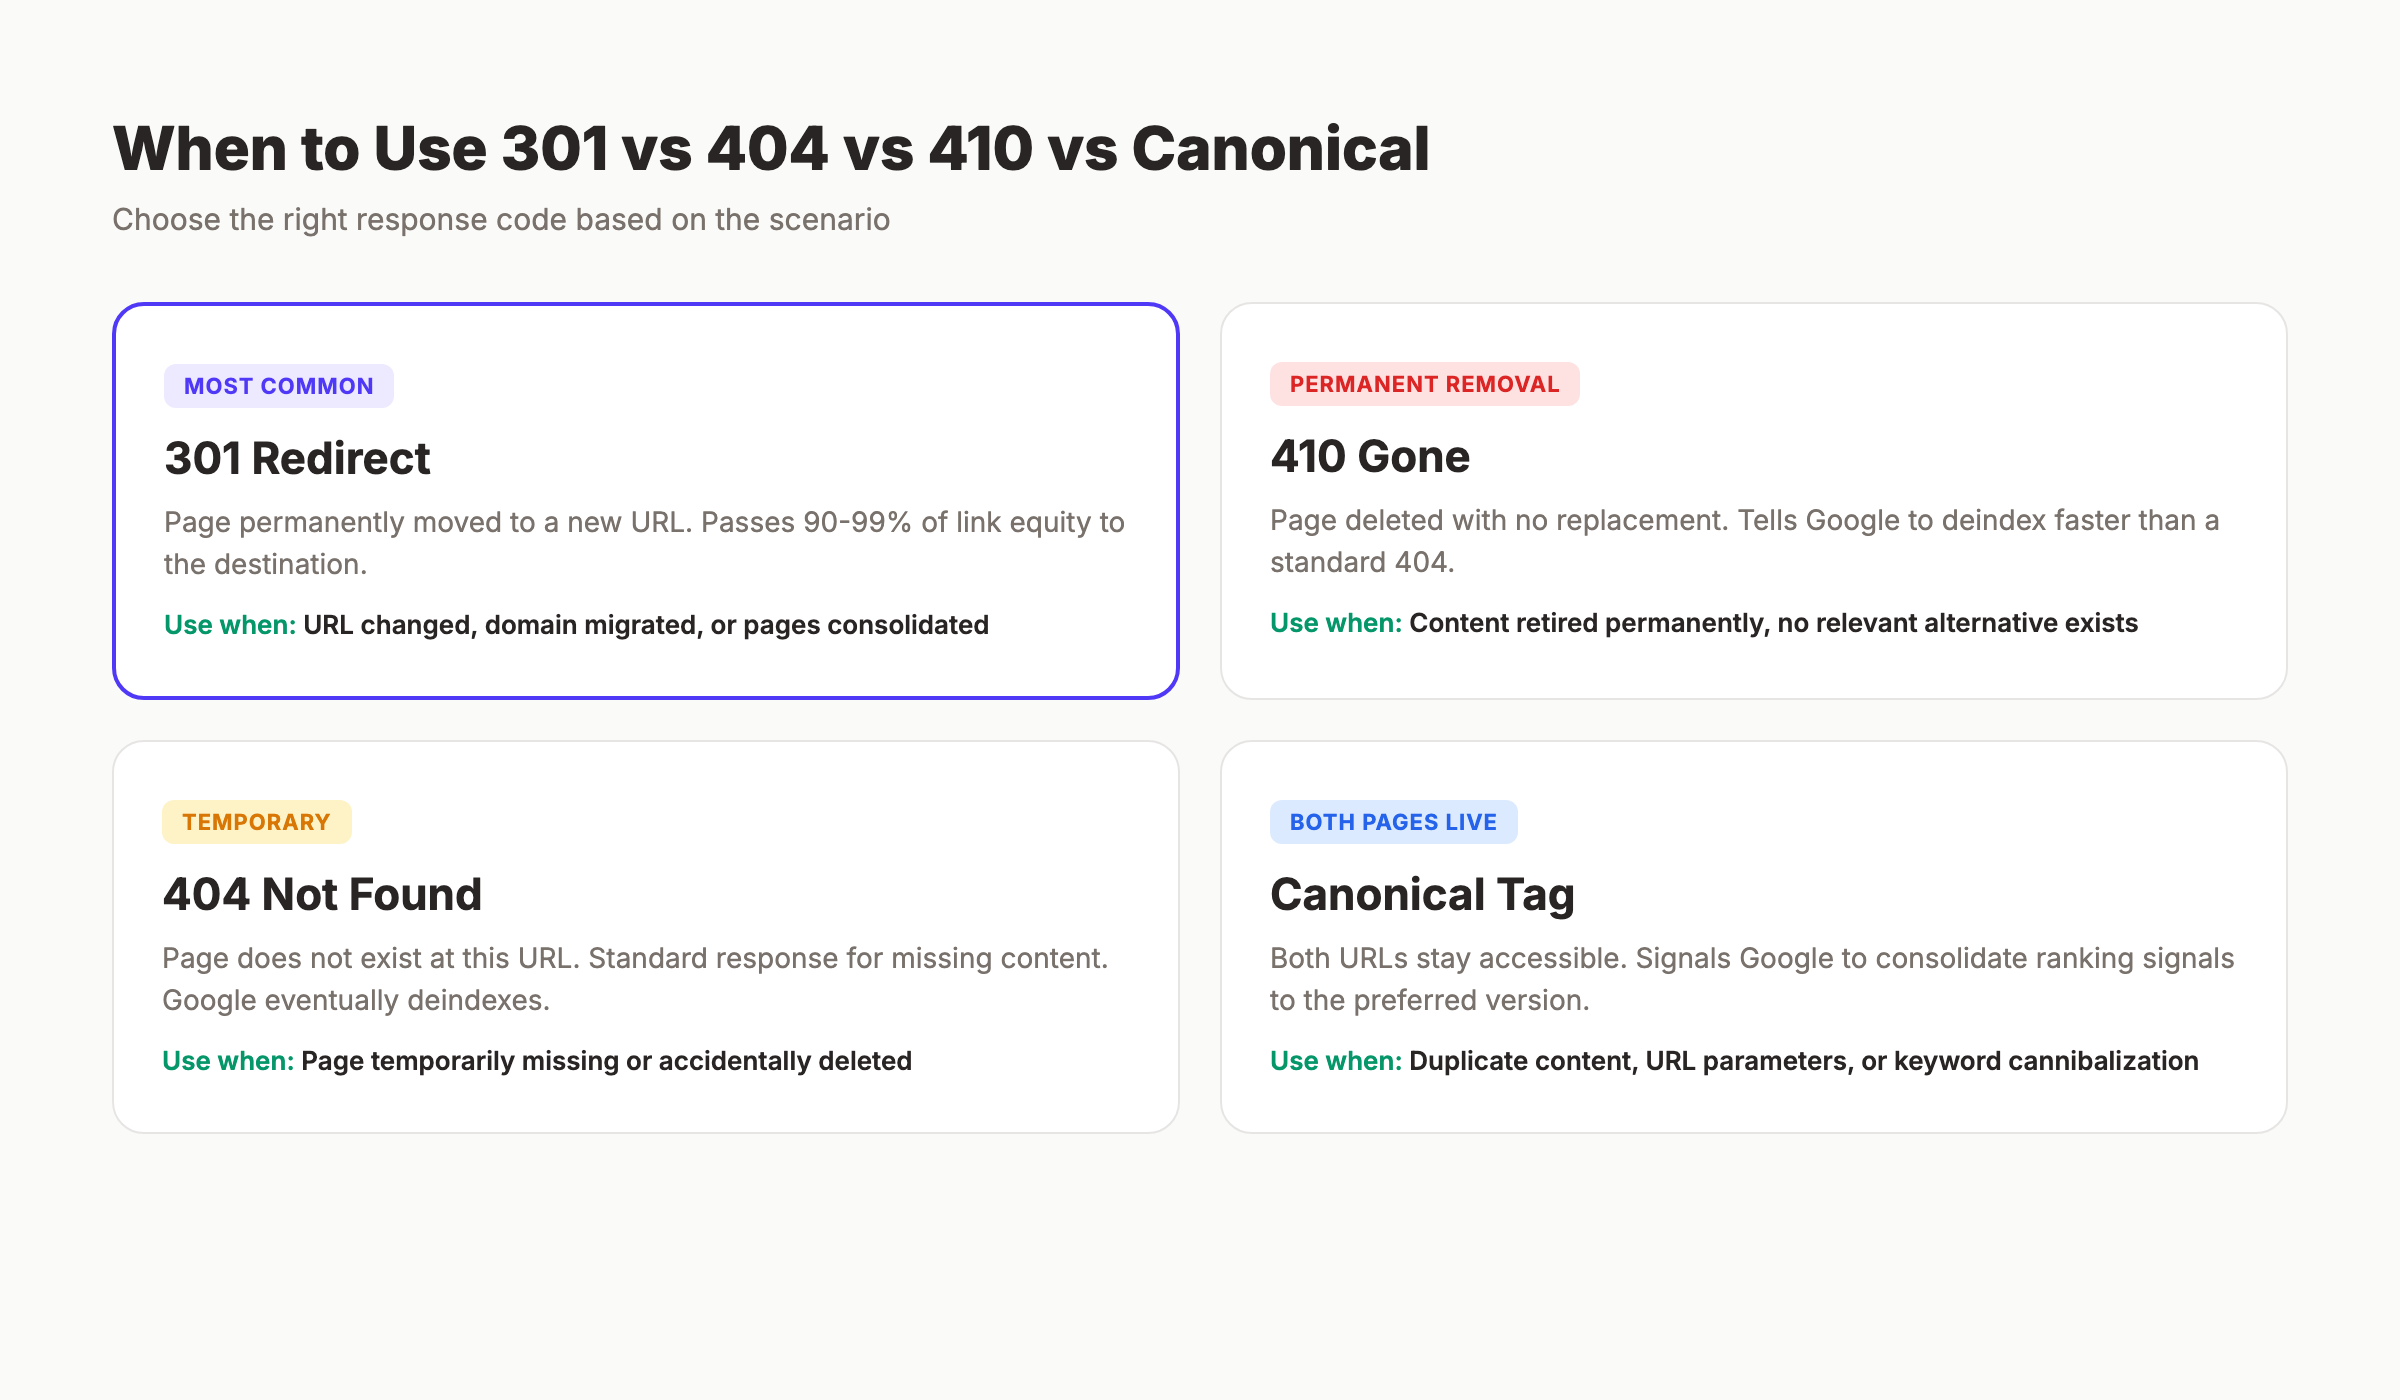
When to Use 301 vs 404 vs 410 vs Canonical
Not every dead URL needs a redirect. Use this decision framework.
| Scenario | Action | Why |
|---|---|---|
| Page moved to a new URL | 301 redirect | Preserves link equity and user experience |
| Page deleted, no replacement exists | 410 Gone | Tells Google to deindex faster than a 404 |
| Page deleted, might return | 404 Not Found | Standard response for temporarily missing pages |
| Duplicate content, both pages stay live | canonical tag | Consolidates signals without removing the page |
| Old domain to new domain | 301 redirect (domain-level) | Transfers all equity to the new domain |
Why this step matters: Missing redirects are invisible. Users see a 404 and leave. Google sees a dead URL and drops it from the index. You lose rankings without any warning in your analytics dashboard.
Pro tip: Export your full sitemap XML before making any URL changes. Compare it against the post-change crawl to catch every discrepancy.
Step 2: Map Old URLs to New Destinations
A redirect is only as good as its destination. Sending every old URL to the homepage is a common mistake. Google treats homepage redirects from deep pages as soft 404s. You lose the equity anyway.
Create a spreadsheet with 4 columns:
| Old URL | New URL | Redirect Type | Notes |
|---|---|---|---|
/blog/old-seo-guide | /blog/on-page-seo-guide | 301 | Content merged |
/services/web-design | /services/design | 301 | Slug shortened |
/blog/outdated-post | — | 410 | No replacement |
Follow these mapping rules:
- Always point to the most relevant page. Match topic and intent, not just category.
- For domain migrations, mirror the URL structure. If
/aboutexisted on the old domain, redirect it to/abouton the new domain. - Group redirects by type. Bulk URL changes (like removing
/blog/from paths) can use pattern-based rules instead of individual entries. - Flag pages with high backlink counts. Use Ahrefs or Google Search Console Links report to identify your most linked pages. These are the highest priority for accurate mapping.
A content audit helps you identify which pages to consolidate and which to retire. Run it before you start mapping.
Why this step matters: Bad mappings send users and link equity to irrelevant pages. Google notices the mismatch and may ignore the redirect entirely. One poor mapping can undo months of topical authority you built around a keyword cluster.
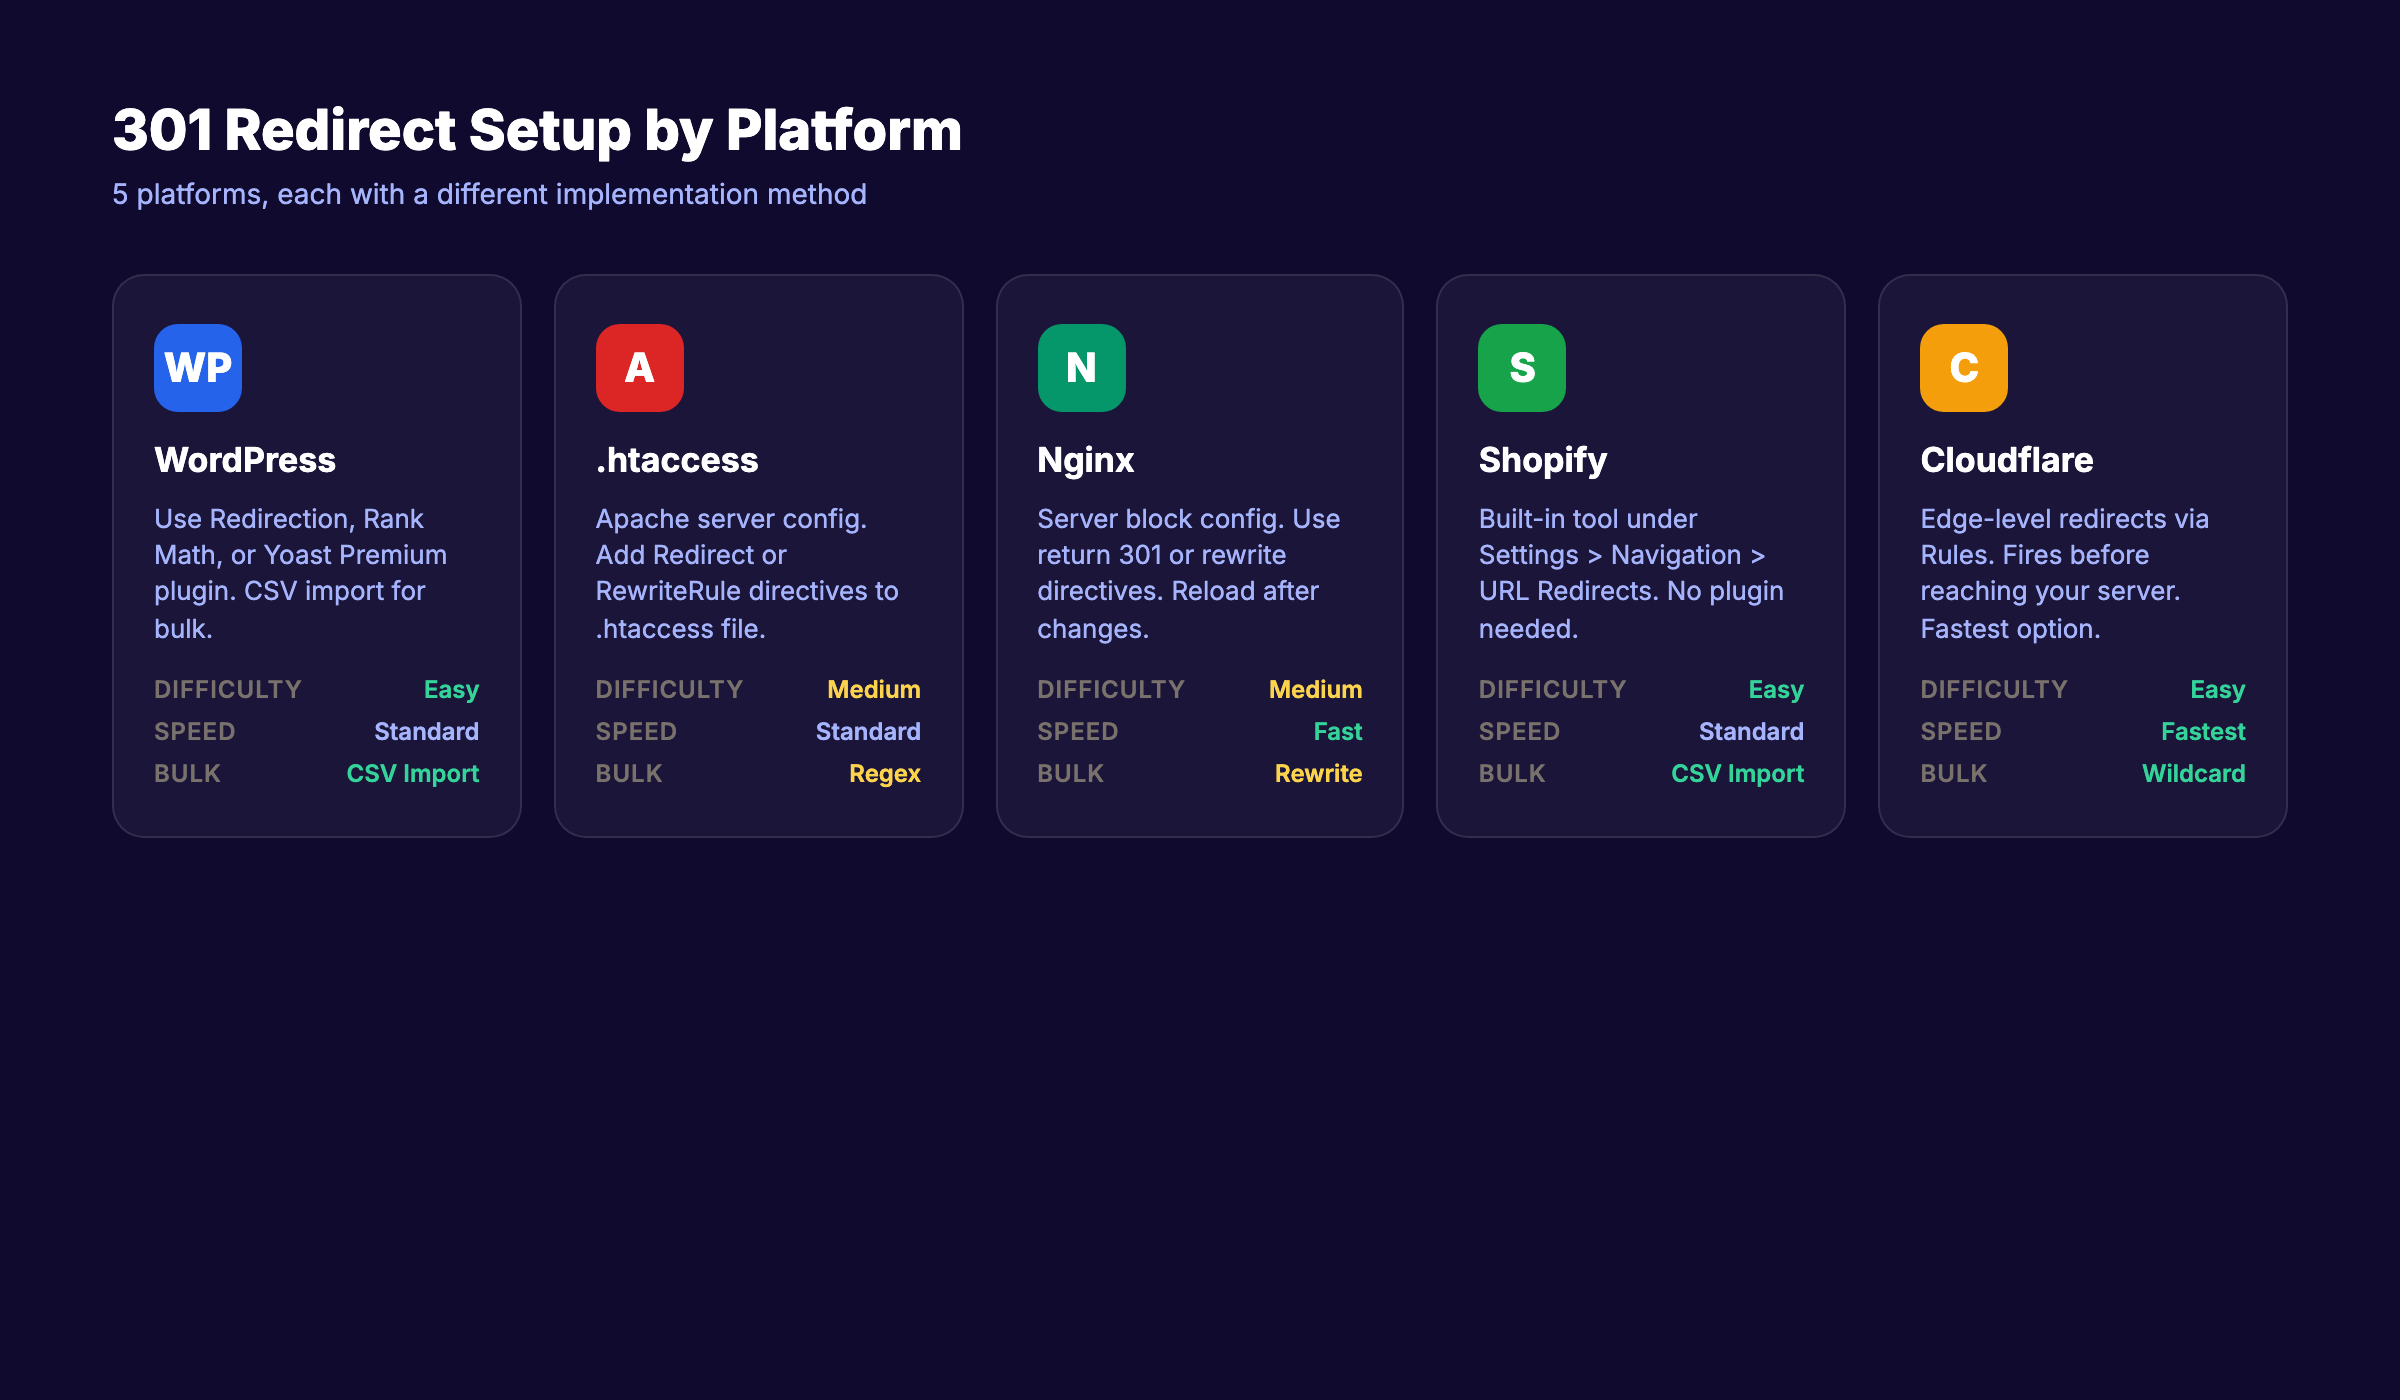
Step 3: Set Up 301 Redirects on Your Platform
Implementation depends on your tech stack. Below are exact instructions for 5 platforms.
WordPress (Plugin Method)
The fastest option for WordPress sites. Three plugins handle redirects well:
- Redirection (free) — The most popular redirect plugin. Supports regex, logs 404s, and imports CSV files.
- Rank Math (free/pro) — Built-in redirect manager under Rank Math > Redirections.
- Yoast SEO Premium — Automatically suggests redirects when you change a slug.
To add a redirect in Redirection:
- Go to Tools > Redirection
- Enter the source URL (old path)
- Enter the target URL (new path)
- Select “301 Moved Permanently”
- Click “Add Redirect”
For bulk redirects, use the CSV import feature. Format: source URL, target URL, 301.
Apache (.htaccess)
If you run Apache, add redirect rules to your .htaccess file in the site root.
Single redirect:
Redirect 301 /old-page https://example.com/new-pagePattern-based redirect using mod_rewrite:
RewriteEngine On
RewriteRule ^old-directory/(.*)$ /new-directory/$1 [R=301,L]
Domain-level redirect (full site):
RewriteEngine On
RewriteCond %{HTTP_HOST} ^oldsite\.com$ [NC]
RewriteRule ^(.*)$ https://newsite.com/$1 [R=301,L]
Always back up your .htaccess file before editing. A syntax error here takes down the entire site.
Nginx
Nginx uses the server block in your config file (usually /etc/nginx/sites-available/).
Single redirect:
location = /old-page {
    return 301 https://example.com/new-page;
}
Pattern-based redirect:
location /old-directory/ {
    rewrite ^/old-directory/(.*)$ /new-directory/$1 permanent;
}
After editing, test the config with nginx -t and reload with systemctl reload nginx.
Shopify
Shopify has a built-in redirect tool. No plugins needed.
- Go to Settings > Navigation > URL Redirects
- Click “Add URL redirect”
- Enter the old path and new path
- Save
For bulk redirects, click “Import” and upload a CSV with 2 columns: Redirect from and Redirect to.
Shopify limitation: You cannot redirect to external domains from this tool. For domain migrations away from Shopify, you need DNS-level redirects.
Cloudflare (Edge-Level)
Cloudflare redirects happen at the CDN edge. They are the fastest option because the redirect fires before the request even reaches your server.
- Go to Rules > Redirect Rules
- Create a new rule
- Set the match condition (hostname, URI path, or wildcard)
- Set the action to “Dynamic Redirect” or “Static Redirect”
- Choose
301as the status code - Deploy
Cloudflare supports wildcard patterns, making it ideal for bulk domain migrations.
Platform Comparison
| Platform | Difficulty | Bulk Support | Speed | Best For |
|---|---|---|---|---|
| WordPress plugin | Easy | CSV import | Standard | Blog and content sites |
.htaccess | Medium | Regex patterns | Standard | Apache shared hosting |
| Nginx | Medium | Rewrite rules | Fast | VPS and dedicated servers |
| Shopify | Easy | CSV import | Standard | Ecommerce stores |
| Cloudflare | Easy | Wildcard rules | Fastest | Any site using Cloudflare |
Why this step matters: Wrong syntax breaks the entire site. A misconfigured .htaccess file returns a 500 error. A bad Nginx rule creates a redirect loop. Test in staging first when possible.
Step 4: Handle Redirect Chains and Loops
A redirect chain happens when URL A redirects to URL B, which redirects to URL C. Instead of 1 hop, the browser makes 2 or more. Each hop adds 50 to 100 milliseconds of latency.
A redirect loop happens when URL A redirects to URL B, and URL B redirects back to URL A. The browser gets stuck in an infinite cycle and eventually shows an error page.
Google crawls a maximum of 5 hops in a redirect chain. Anything beyond that, Google stops following. The destination page never gets crawled or indexed.
How to Find Chains and Loops
Run a crawl with Screaming Frog or Ahrefs. Filter for redirect chains (3xx > 3xx). You can also use the free Redirect Checker by httpstatus.io to test individual URLs.
How to Flatten Chains
If the chain is A → B → C, update A to point directly to C. Remove the intermediate hop.
Before:
/old-page → /renamed-page → /final-pageAfter:
/old-page → /final-page
/renamed-page → /final-page
Both old URLs now point directly to the final destination. One hop each.
How to Fix Loops
Loops usually happen when 2 redirect rules conflict. Check your redirect rules for circular references. The fix is always the same: decide which URL is the canonical destination and make all other URLs point to it.
If you are running both server-level redirects (.htaccess) and plugin-level redirects (Redirection), check both. Conflicting rules between layers are the most common cause of loops.
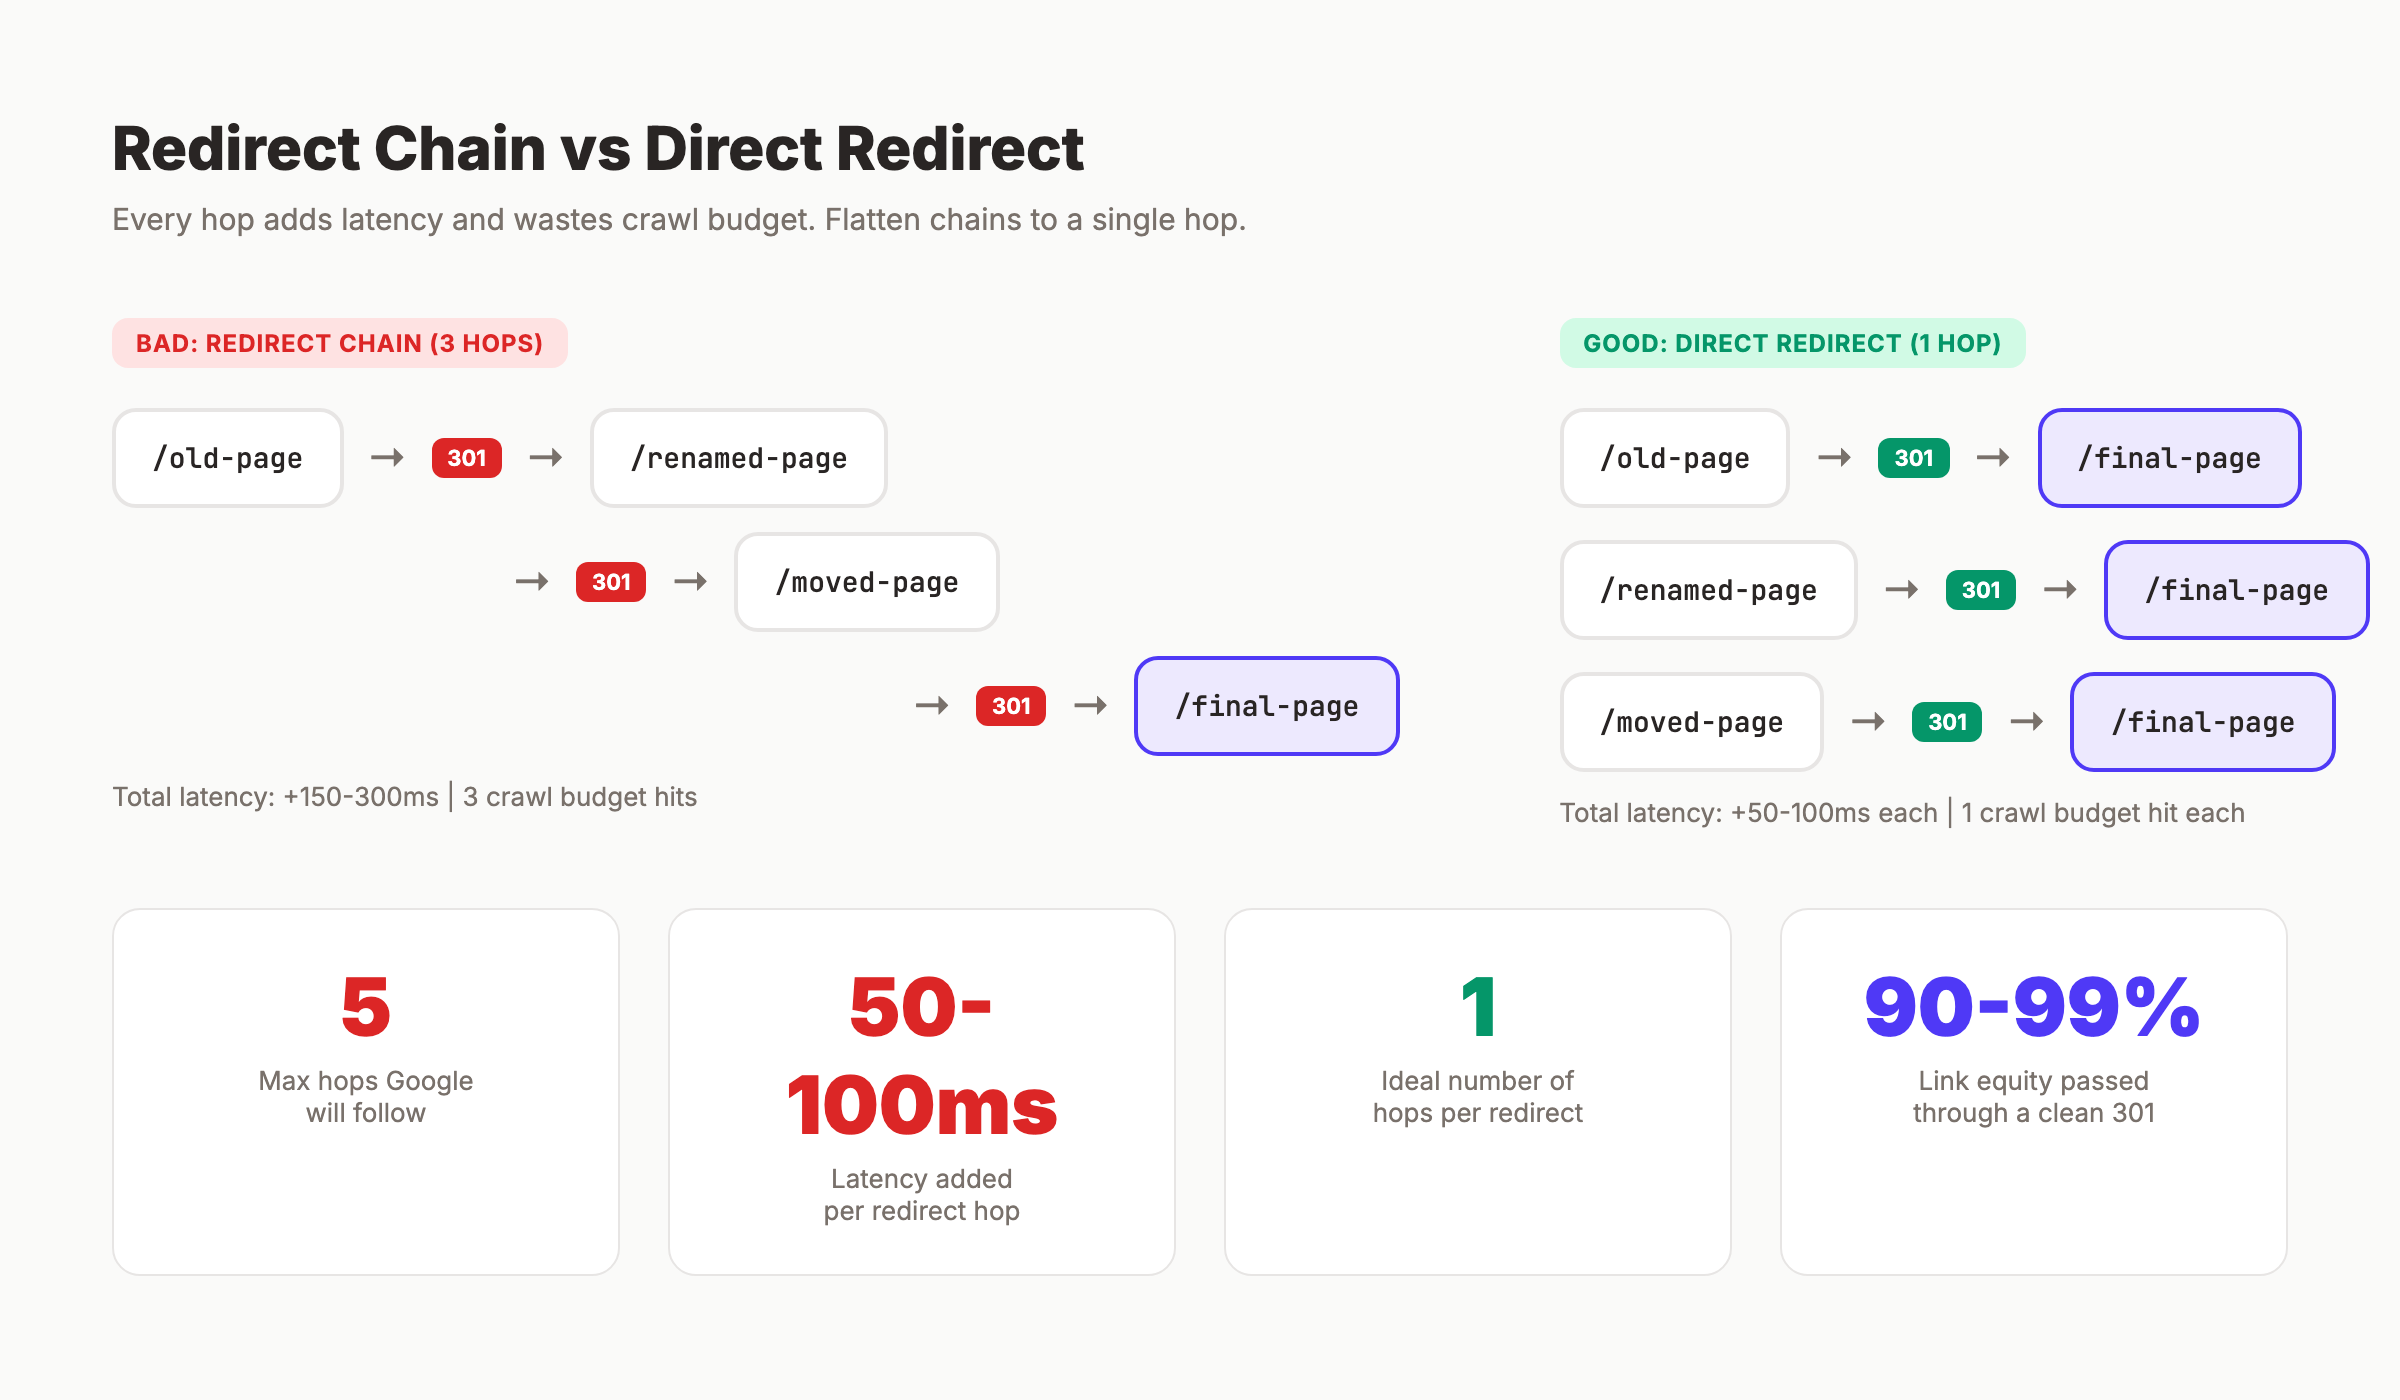
Why this step matters: Chains waste crawl budget and slow page loads. A 3-hop chain adds 150 to 300ms of latency before the user sees any content. Loops are worse. They block access entirely and burn crawl budget on pages that never resolve.
Skip the technical work. Keep the rankings. Stacc handles URL structure, redirects, and SEO maintenance for 30+ articles per month. Start for $1 →
Step 5: Test Every Redirect Before Going Live
Untested redirects cause silent ranking drops. A redirect that returns 302 instead of 301 does not pass link equity the same way. A redirect that points to a 404 is worse than no redirect at all.
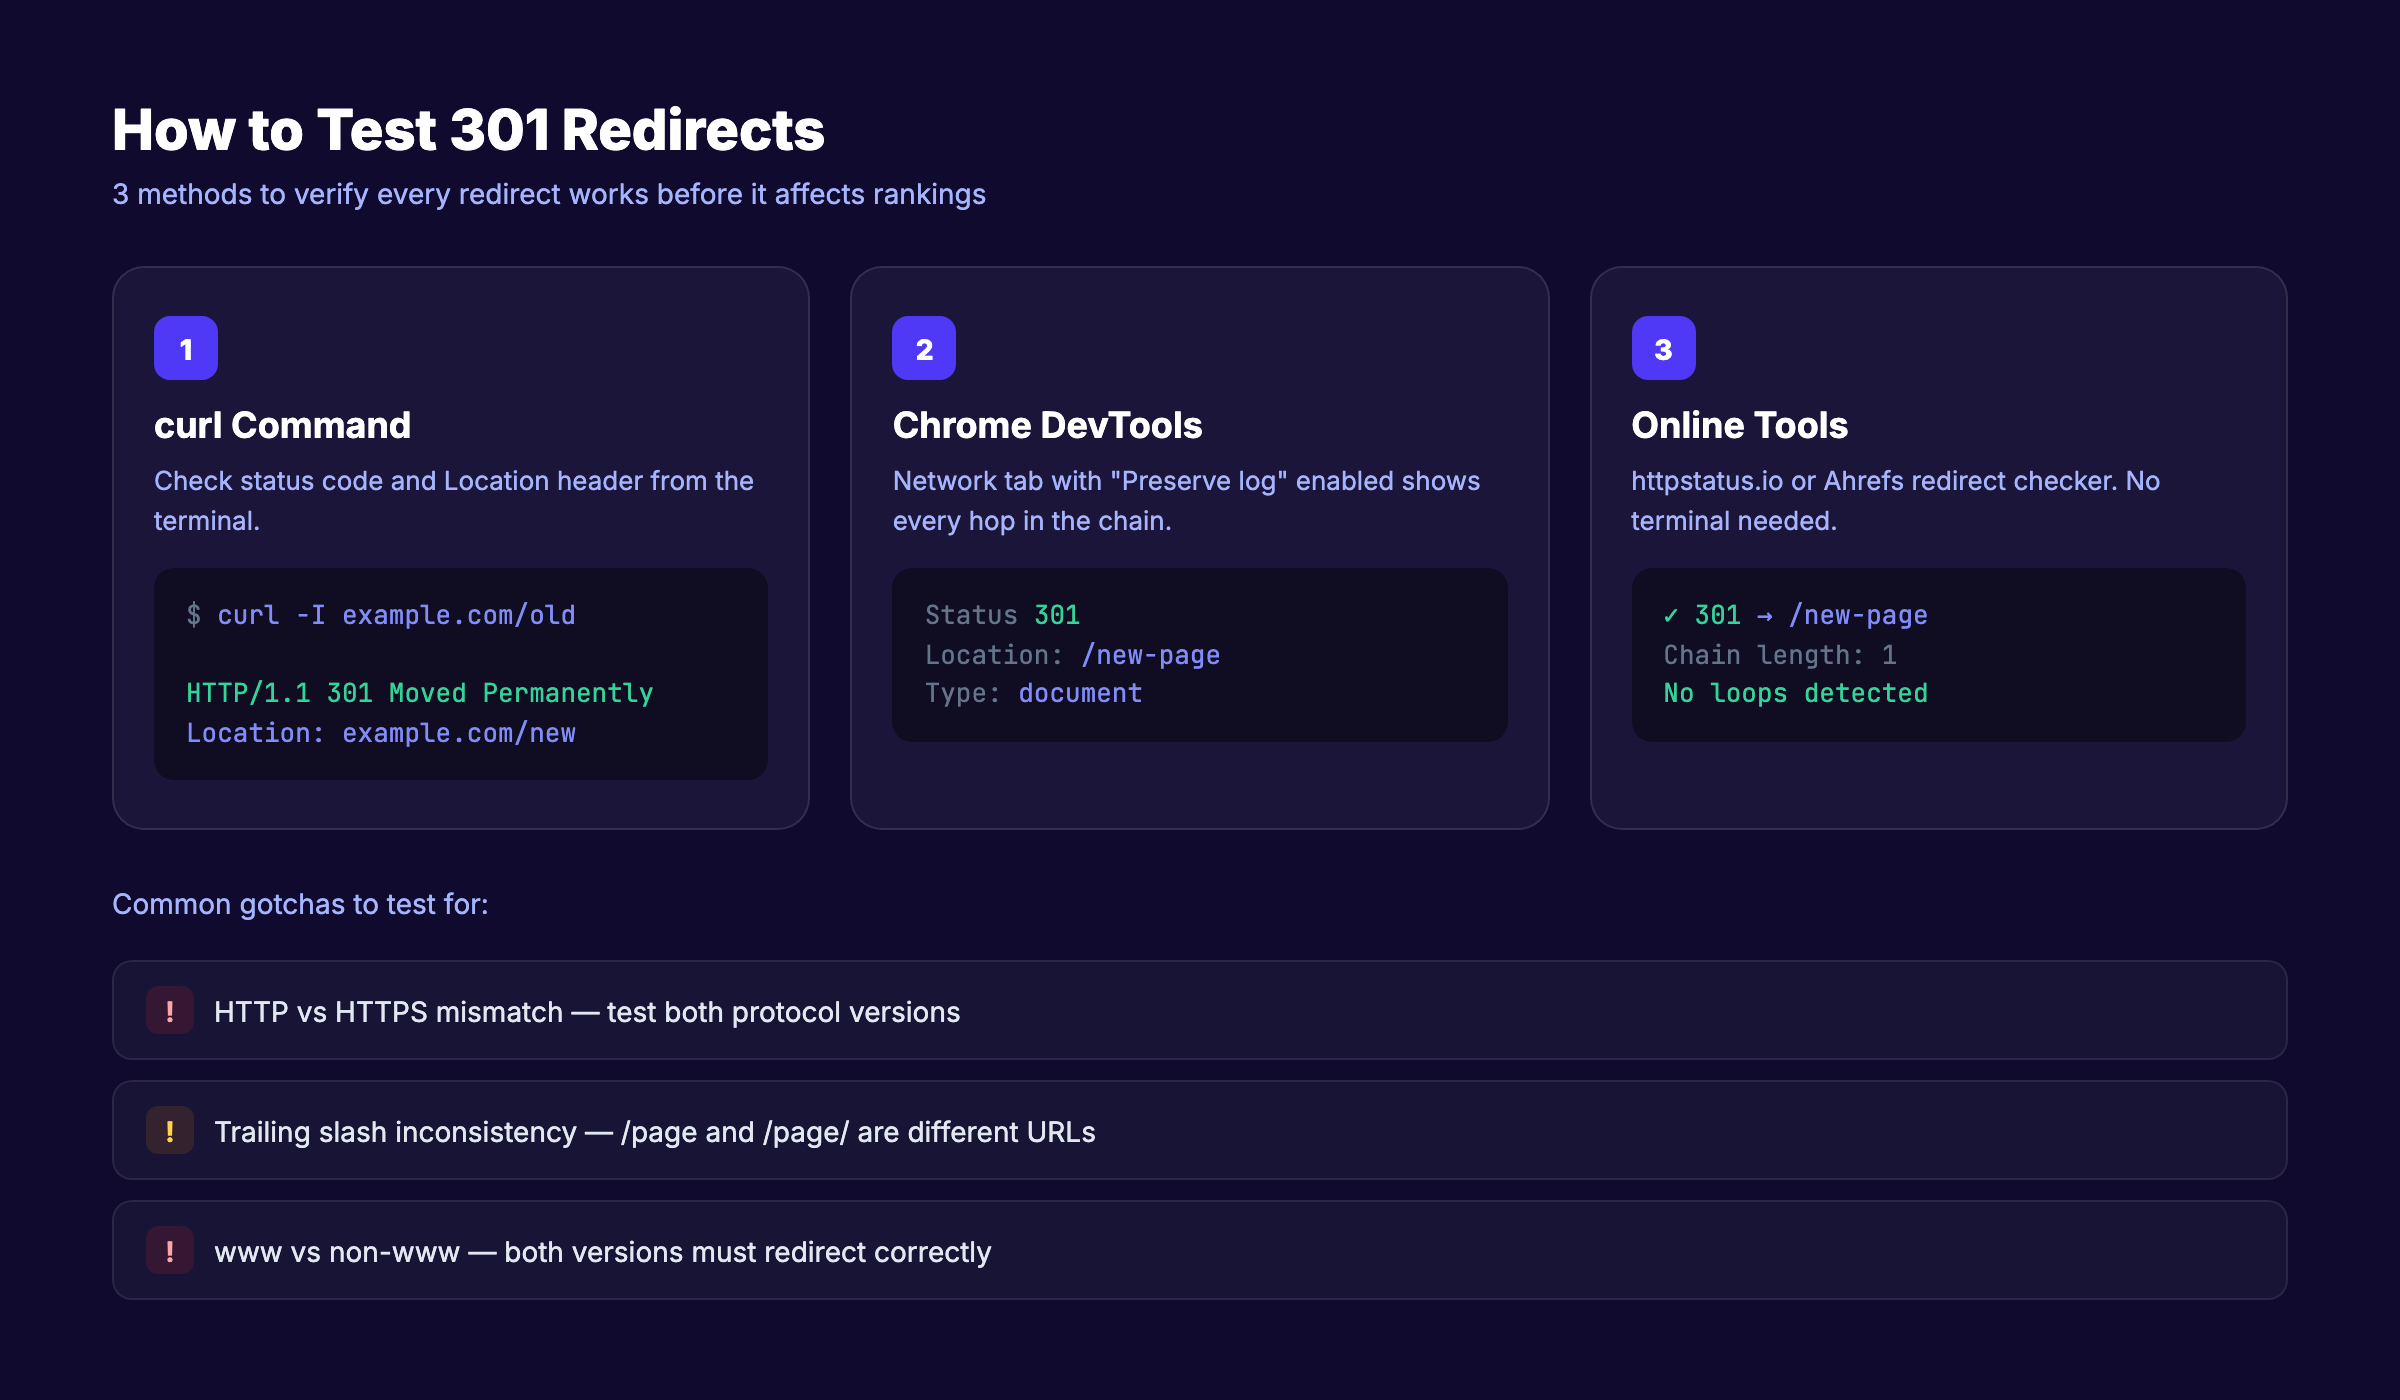
Test with curl
Open your terminal and run:
curl -I https://example.com/old-pageLook for HTTP/1.1 301 Moved Permanently and the Location: header pointing to the correct new URL.
For testing a chain, use the -L flag to follow all redirects:
curl -IL https://example.com/old-pageThis shows every hop in the chain with its status code.
Test with Chrome DevTools
- Open Chrome and press
F12to open DevTools - Go to the Network tab
- Check “Preserve log” (so redirects stay visible)
- Enter the old URL in the address bar
- Look at the first request. The Status column should show
301. The response headers should show the correctLocation.
Test with Online Tools
Free redirect checkers like httpstatus.io or the Redirect Checker by Ahrefs let you test without a terminal.
Common Testing Mistakes
- HTTP vs HTTPS mismatch. Test both
http://andhttps://versions of the old URL. Missing a redirect on one protocol leaves a gap. - Trailing slash inconsistency.
/old-pageand/old-page/are different URLs. Both need redirects. - www vs non-www. Make sure
www.example.com/old-pageandexample.com/old-pageboth redirect correctly.
Why this step matters: You cannot see a broken redirect by browsing your site normally. The old URLs are not in your navigation. Only a deliberate test or a Google Search Console alert will catch the problem. By then, you may have already lost weeks of rankings.
Step 6: Update Internal Links to Point to New URLs
Redirects are a safety net. They are not a permanent replacement for correct internal linking.
Every internal link that goes through a redirect adds an unnecessary hop. Google still follows the link, but each redirect consumes crawl budget. On a large site with thousands of internal links, this adds up fast.
What to Update
- Body content links — Any blog post or page linking to the old URL
- Navigation menus — Header, footer, sidebar links
- XML sitemap — Remove old URLs and add new ones. If you need help, follow our guide on how to create and optimize your XML sitemap.
- Structured data — Update any schema markup that references old URLs
- Canonical tags — Make sure the canonical on the new page points to itself, not the old URL
How to Do a Site-Wide Find and Replace
For WordPress, use the Better Search Replace plugin. Enter the old URL pattern and the new one. Run a dry run first to preview changes. Then execute.
For static sites or custom CMS platforms, use your code editor’s find-and-replace across the entire project directory.
After updating, submit your updated sitemap to Google through Search Console to speed up recrawling.
Why this step matters: Internal links through redirects waste crawl budget and add latency. Direct links are always faster and more efficient. Clean up the source and keep redirects only as a fallback for external links you cannot control.
Step 7: Monitor in Google Search Console
The redirect is live. The tests passed. But 301 redirects can break silently during deployments, CMS updates, or server configuration changes. Ongoing monitoring catches problems before they affect rankings.
Check the Pages Report
In Google Search Console, go to Pages (under Indexing). Filter for:
- Not found (404) — New 404s appearing after your redirect went live mean something is misconfigured.
- Redirect error — Google detected a loop, chain, or broken redirect.
- Crawled — currently not indexed — The new destination page may not be indexed yet.
Use the URL Inspection Tool
Enter the old URL into the URL Inspection tool. Google should show “Page is not in the index” with a note that it redirects to the new URL. If Google still shows the old URL as indexed, request indexing for the new URL.
Check Core Web Vitals
Redirect chains increase Time to First Byte (TTFB). After implementing redirects, check Core Web Vitals in Search Console for any latency spikes. Each hop adds 50 to 100ms. If your TTFB jumped, you likely have an unflattened chain.
You can also use this as part of a broader strategy to improve Core Web Vitals across your site.
Set Review Checkpoints
- Day 7: Check for new 404 errors in GSC. Verify old URLs resolve correctly.
- Day 30: Compare organic traffic before and after the redirect. Use the Performance report filtered by the new URL.
- Day 90: Confirm rankings have stabilized. Sites with clean 301 redirects retain 95% or more of their organic traffic within 2 to 3 months.
Why this step matters: Redirects can break silently. A CMS update might overwrite your .htaccess file. A plugin update might reset redirect rules. Without monitoring, you will not know until rankings drop.
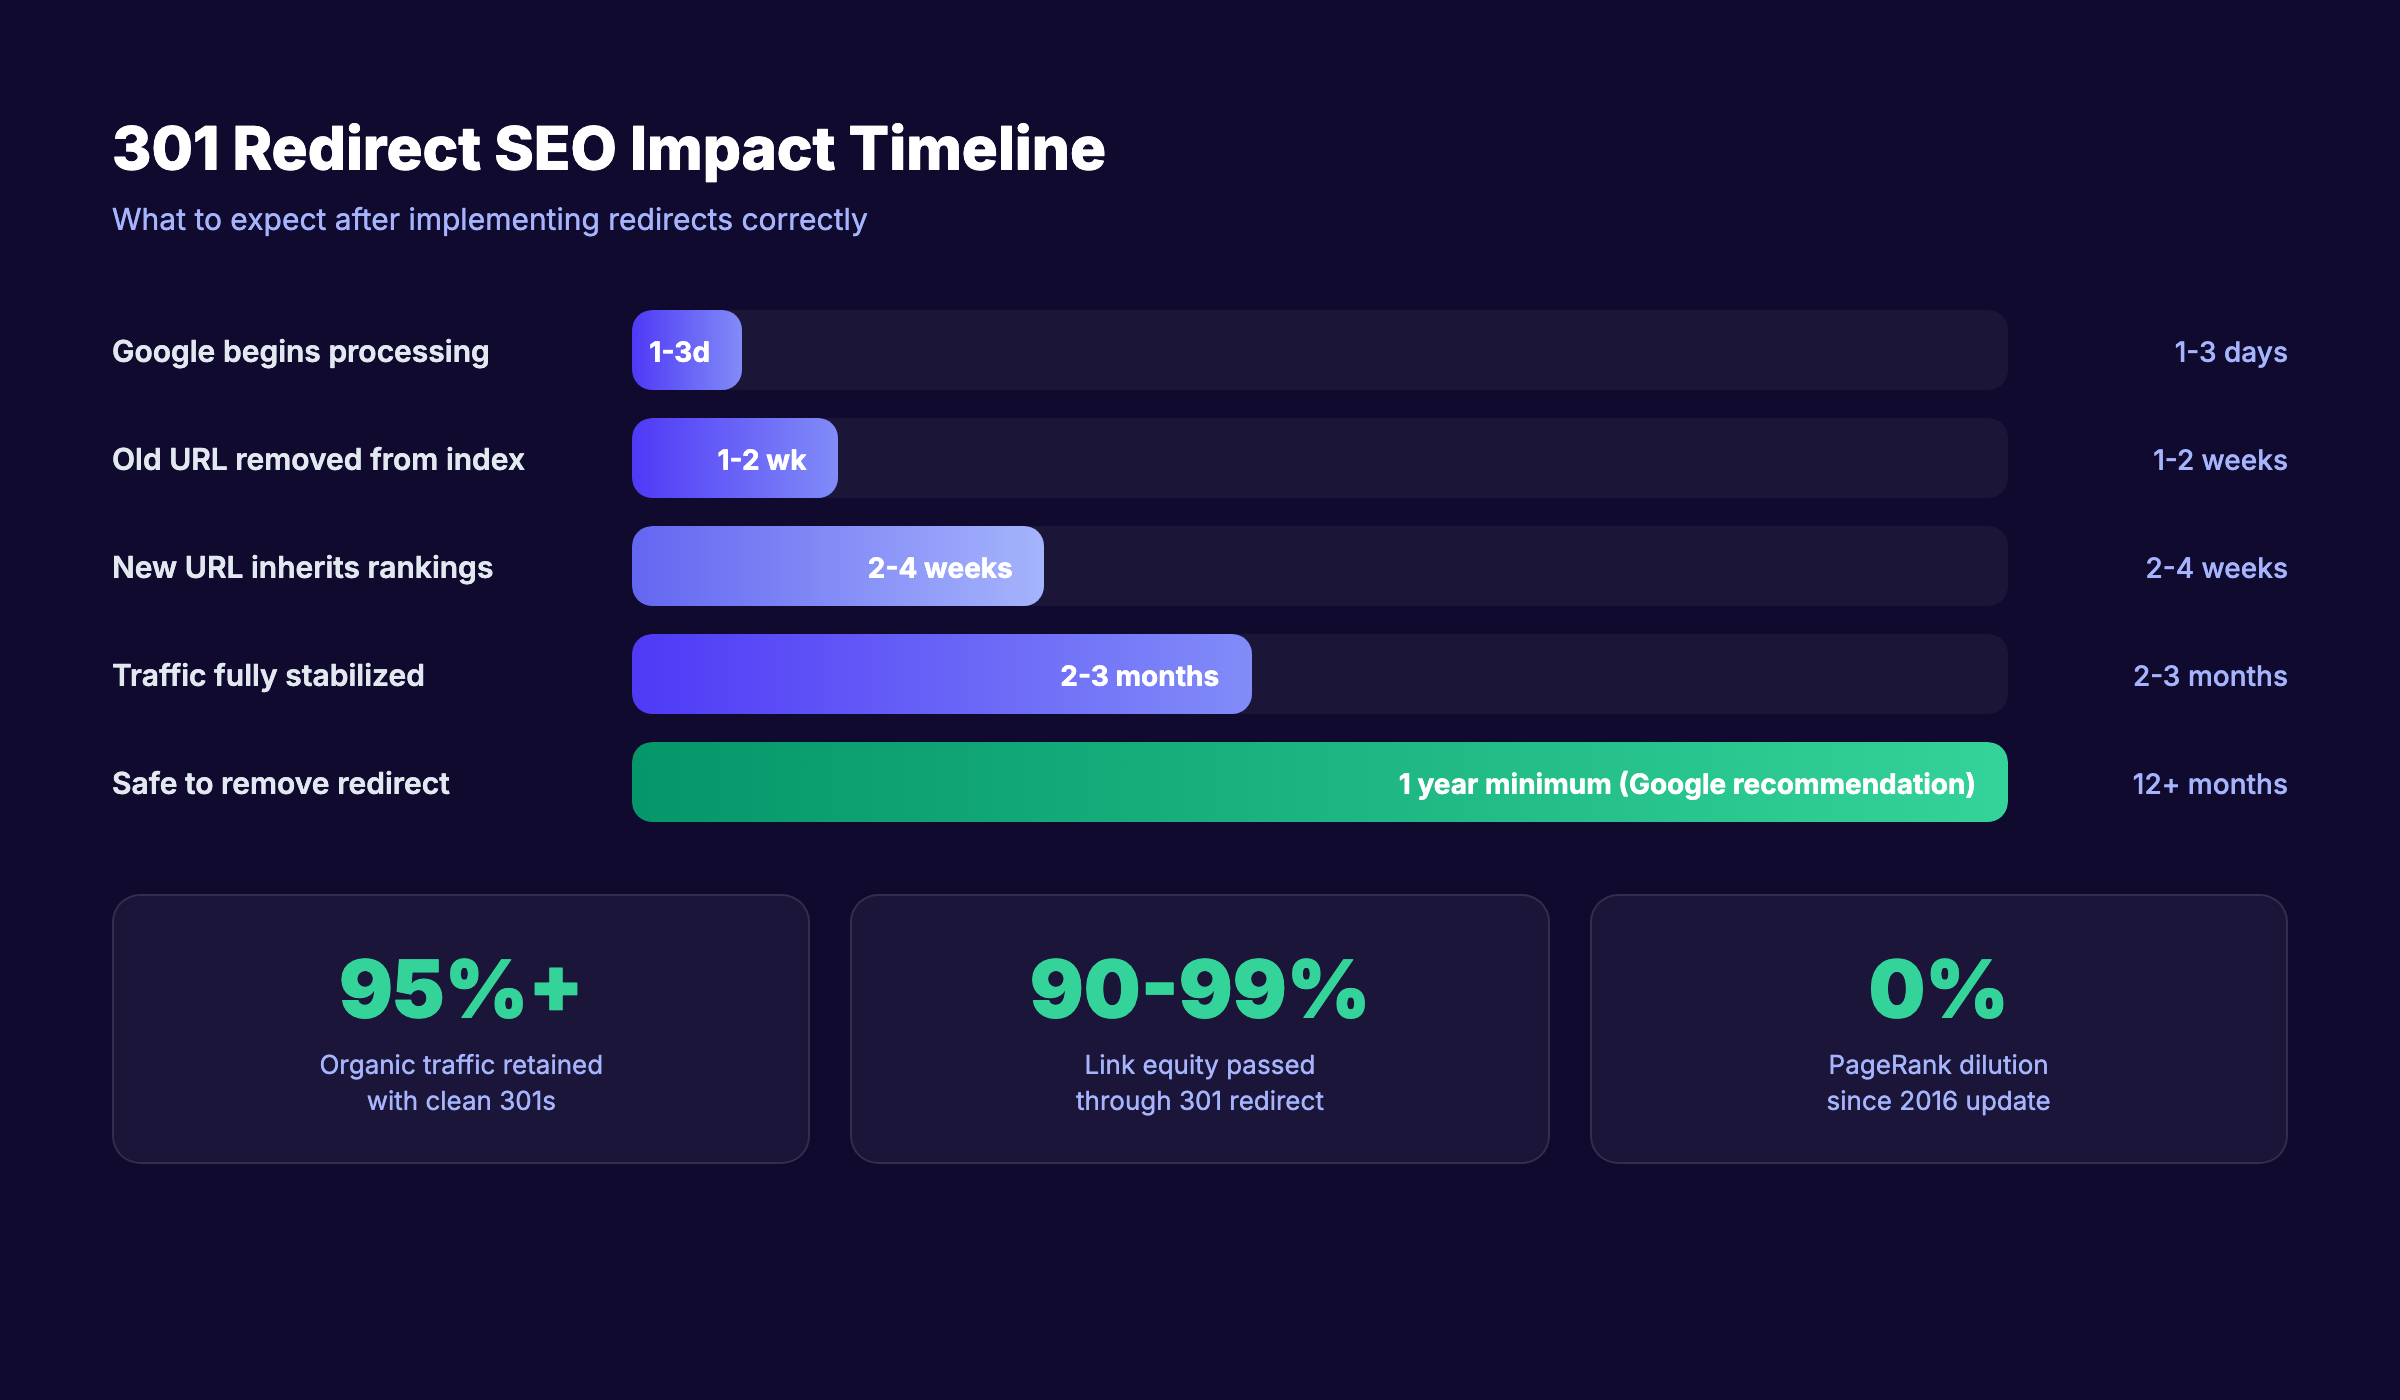
Results: What to Expect
Google processes most 301 redirects within 1 to 2 weeks. You will see the old URL disappear from search results and the new URL take its place.
Rankings typically stabilize within 2 to 3 months after a migration. Sites using clean 301 redirects retained 95% or more of their organic traffic during this period.
Google recommends keeping 301 redirects active for at least 1 year. Removing them too early sends returning visitors and old backlinks to a 404.
The full timeline:
| Milestone | Timeframe |
|---|---|
| Google begins processing redirect | 1 to 3 days |
| Old URL removed from index | 1 to 2 weeks |
| New URL ranks in old URL position | 2 to 4 weeks |
| Traffic fully stabilized | 2 to 3 months |
| Safe to remove redirect | 1 year minimum |
Pair clean redirects with consistent content publishing to increase organic traffic while your redirects settle.
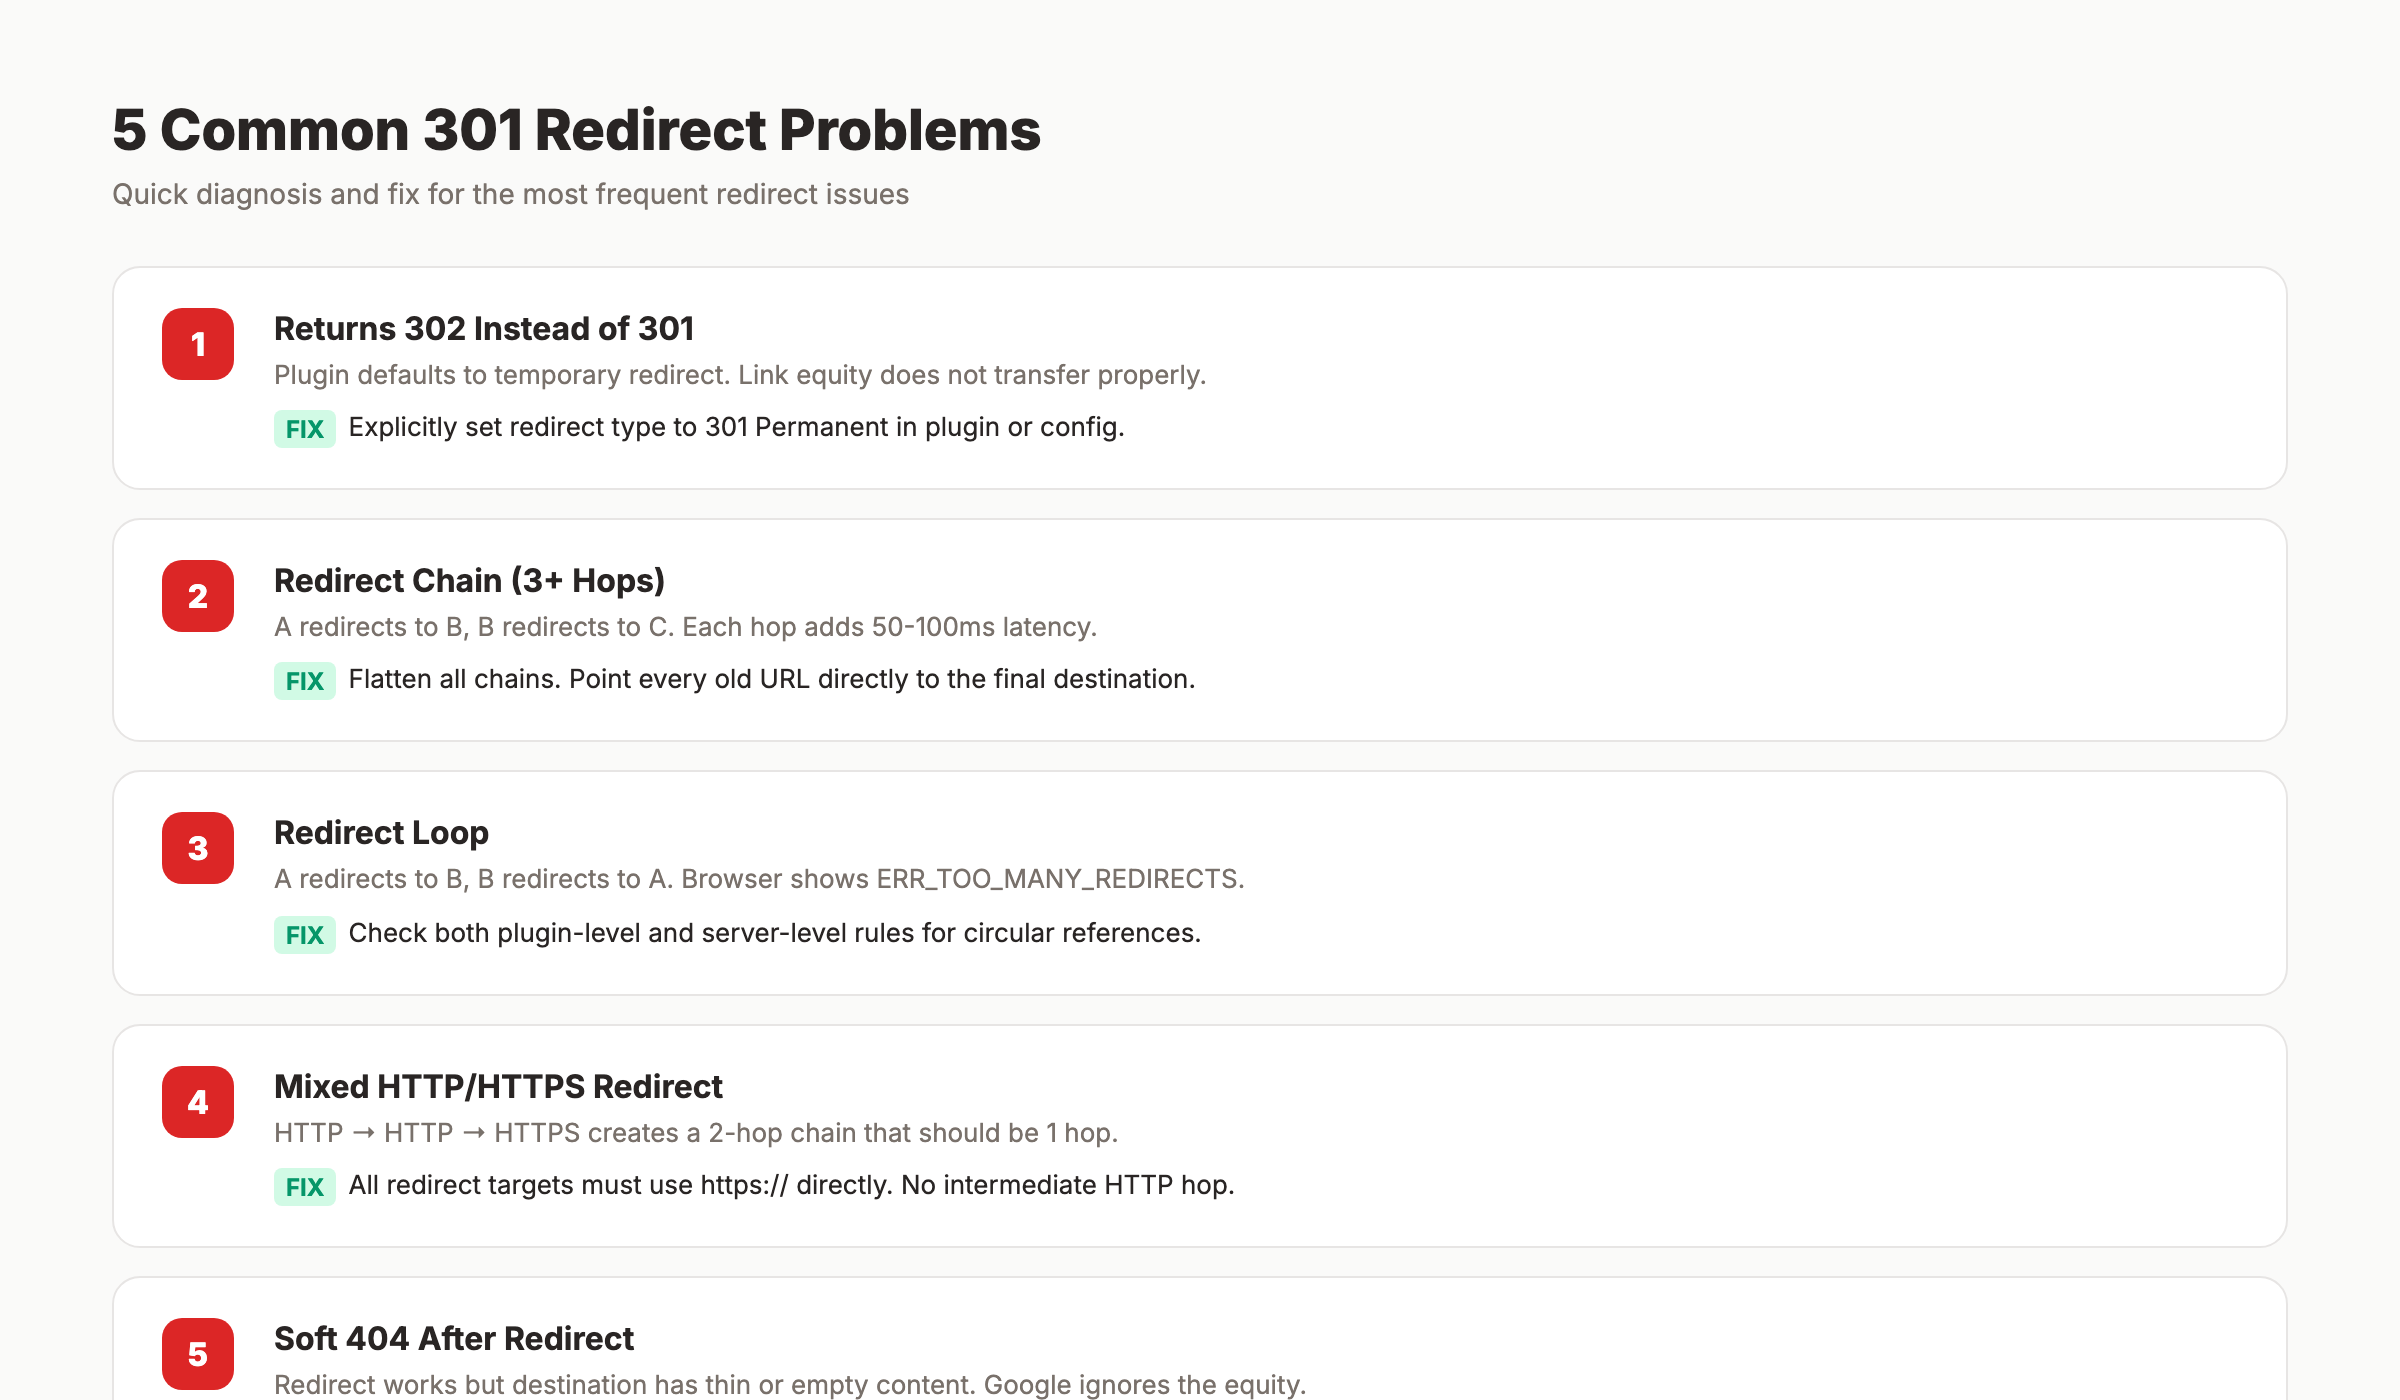
Troubleshooting: 5 Common 301 Redirect Problems
Problem 1: Redirect Returns 302 Instead of 301
A 302 is a temporary redirect. It does not pass link equity the same way a 301 does. This usually happens when a plugin defaults to 302 or when the server config uses Redirect without specifying the status code.
Fix: Check your redirect rule. For .htaccess, explicitly use Redirect 301 or [R=301,L]. In your CMS plugin, verify the redirect type is set to “Permanent (301).”
Problem 2: Redirect Chain (3+ Hops)
You redirected A to B last year. Then you redirected B to C this year. Now A goes through 2 hops to reach C. Google follows it, but the latency hurts performance.
Fix: Update the rule for A to point directly to C. Then update B to point directly to C. Flatten every chain to a single hop.
Problem 3: Redirect Loop
URL A redirects to B. URL B redirects back to A. The browser shows “ERR_TOO_MANY_REDIRECTS” and nothing loads.
Fix: Open your redirect rules and search for circular references. If you use both a plugin and server-level redirects, check both layers. Remove the conflicting rule.
Problem 4: Mixed HTTP and HTTPS Redirect
The HTTP version of the old URL redirects to HTTP version of the new URL, which then redirects to HTTPS. That is a 2-hop chain that should be 1 hop.
Fix: All redirects should point directly to the HTTPS version of the destination URL. Update every rule to use https:// in the target.
Problem 5: Soft 404 After Redirect
The redirect works. The status code is 301. But the destination page has thin or empty content. Google treats this as a “soft 404” and may not pass link equity. This often happens when you redirect to a thin content page or a generic category page.
Fix: Make sure every redirect destination is a real, substantive page with unique content. If the destination page does not exist yet, create it before activating the redirect.
Your SEO team. $99 per month. 30 optimized articles, published and maintained. Redirects, internal links, and technical SEO handled. Start for $1 →
Frequently Asked Questions
How long should you keep 301 redirects in place?
Google recommends keeping 301 redirects active for at least 1 year. External sites linking to your old URL will continue sending traffic through that redirect. Removing it before those external links update (most never will) sends their visitors to a 404. When in doubt, keep the redirect permanently. The server overhead is negligible.
Do 301 redirects hurt SEO?
No. Google confirmed in 2016 that 30x redirects no longer cause PageRank loss. A properly configured 301 passes 90 to 99% of link equity to the destination URL. The only risk is implementation errors like chains, loops, or redirecting to irrelevant pages.
What is the difference between a 301 and 302 redirect?
A 301 redirect signals a permanent move. Google transfers link equity and eventually deindexes the old URL. A 302 signals a temporary move. Google keeps the old URL indexed and may not transfer full equity. Use 301 for any permanent URL change.
Can too many 301 redirects slow down my site?
Individual redirects add minimal latency (under 100ms). The problem is redirect chains. Each hop adds 50 to 100ms. A 3-hop chain adds 150 to 300ms before the page even starts loading. Keep every redirect to a single hop and the performance impact stays negligible.
How do I check if my 301 redirects are working?
Use curl -I [URL] in your terminal. The response should show HTTP/1.1 301 Moved Permanently with a Location: header pointing to the correct destination. You can also use Chrome DevTools (Network tab with “Preserve log” enabled) or free online tools like httpstatus.io.
Should I use a 301 redirect or a canonical tag?
Use a 301 when you are removing the old page entirely. Use a canonical tag when both pages stay live but you want Google to consolidate ranking signals to one version. A common example: product pages with URL parameters. The filtered URL stays accessible, but the canonical points to the clean URL. For keyword cannibalization between 2 live pages, a canonical tag is often the better first step.
301 redirects protect the link equity and rankings you already earned. Every URL change without a redirect is a leak in your SEO foundation.
Set up redirects right, test them, monitor them, and pair the work with consistent content publishing. That is how you rank higher on Google and keep the positions you win.
Written and published by Stacc. We publish 3,500+ articles per month across 70+ industries. All data verified against public sources as of March 2026.