How to Submit Your Website to Google (7 Steps)
Learn how to submit your website to Google for indexing. 7 steps covering Search Console, sitemaps, and URL inspection. Updated March 2026.
Siddharth Gangal • 2026-03-27 • SEO Tips
In This Article
You built a website. You published content. But when you search your brand name on Google, nothing shows up.
That is not a glitch. Google does not automatically know your site exists. New websites take 2 to 4 weeks to appear in search results. Some pages never get indexed at all. According to Ahrefs, 17% of pages may never make it into Google’s index.
Every day your site stays invisible, you lose traffic, leads, and revenue. Your competitors capture the searches you should own. The longer you wait, the harder it becomes to catch up.
This guide walks you through 7 steps to submit your website to Google and get your pages indexed as fast as possible. No paid tools required. No technical background needed. Just a Google account and 15 to 30 minutes.
We publish 3,500+ blogs across 70+ industries with a 92% average SEO score. We handle indexing for every piece of content we create. The steps below reflect the exact process we follow.
Here is what you will learn:
- How to check if Google already knows about your site
- How to set up and verify Google Search Console
- How to create and submit an XML sitemap
- How to use the URL Inspection tool for priority pages
- How to submit your site to Bing and other search engines
- How to monitor indexing status and fix common errors
Time required: 15 to 30 minutes
Difficulty: Beginner
What you need: A live website, a Google account, and access to your DNS settings (optional but recommended)
Step 1: Check if Google Has Already Indexed Your Site
Before you submit anything, find out what Google already knows. Your site may already have partial indexing from backlinks or sitemaps discovered through other sites.
Open Google and type site:yourdomain.com into the search bar. Replace “yourdomain.com” with your actual domain. This operator returns every page Google has indexed for your site.
What to look for:
- Zero results means Google has not indexed your site at all. Proceed to Step 2 immediately.
- Some results but fewer than expected means Google found your site but missed pages. You need a sitemap submission.
- Results match your page count means indexing is working. Focus on optimizing your existing content instead.
Count the results Google shows. Compare that number to the total pages on your site. A blog with 50 published posts showing only 12 indexed pages has a coverage problem.
You can also check individual pages. Search site:yourdomain.com/specific-page to verify whether a particular URL exists in the index.
This 30-second check saves you from duplicating work. If your homepage and key pages already appear, you can skip straight to submitting new or missing pages through the URL Inspection tool.
Why this step matters: Submitting pages Google has already indexed wastes your daily request limits. Knowing your starting point helps you prioritize the right pages first.
Pro tip: Bookmark this search query. Run it once per month to track your indexed page count over time. A declining number signals a technical problem worth investigating through an SEO audit.
Step 2: Create a Google Search Console Account
Google Search Console (GSC) is the only direct communication channel between you and Google’s search engine. It is free, official, and required for submitting your website to Google.
Go to search.google.com/search-console and sign in with your Google account. You will see two options for adding your site:
| Property Type | What It Covers | Verification Method | Best For |
|---|---|---|---|
| Domain | All subdomains and protocols (http, https, www, non-www) | DNS only | Most websites |
| URL Prefix | Only the exact URL pattern you enter | DNS, HTML file, HTML tag, Google Analytics, or Google Tag Manager | Quick setup or limited DNS access |
Choose Domain if you have access to your DNS settings. It covers every version of your site automatically. Choose URL Prefix if you cannot edit DNS records or need a faster setup.
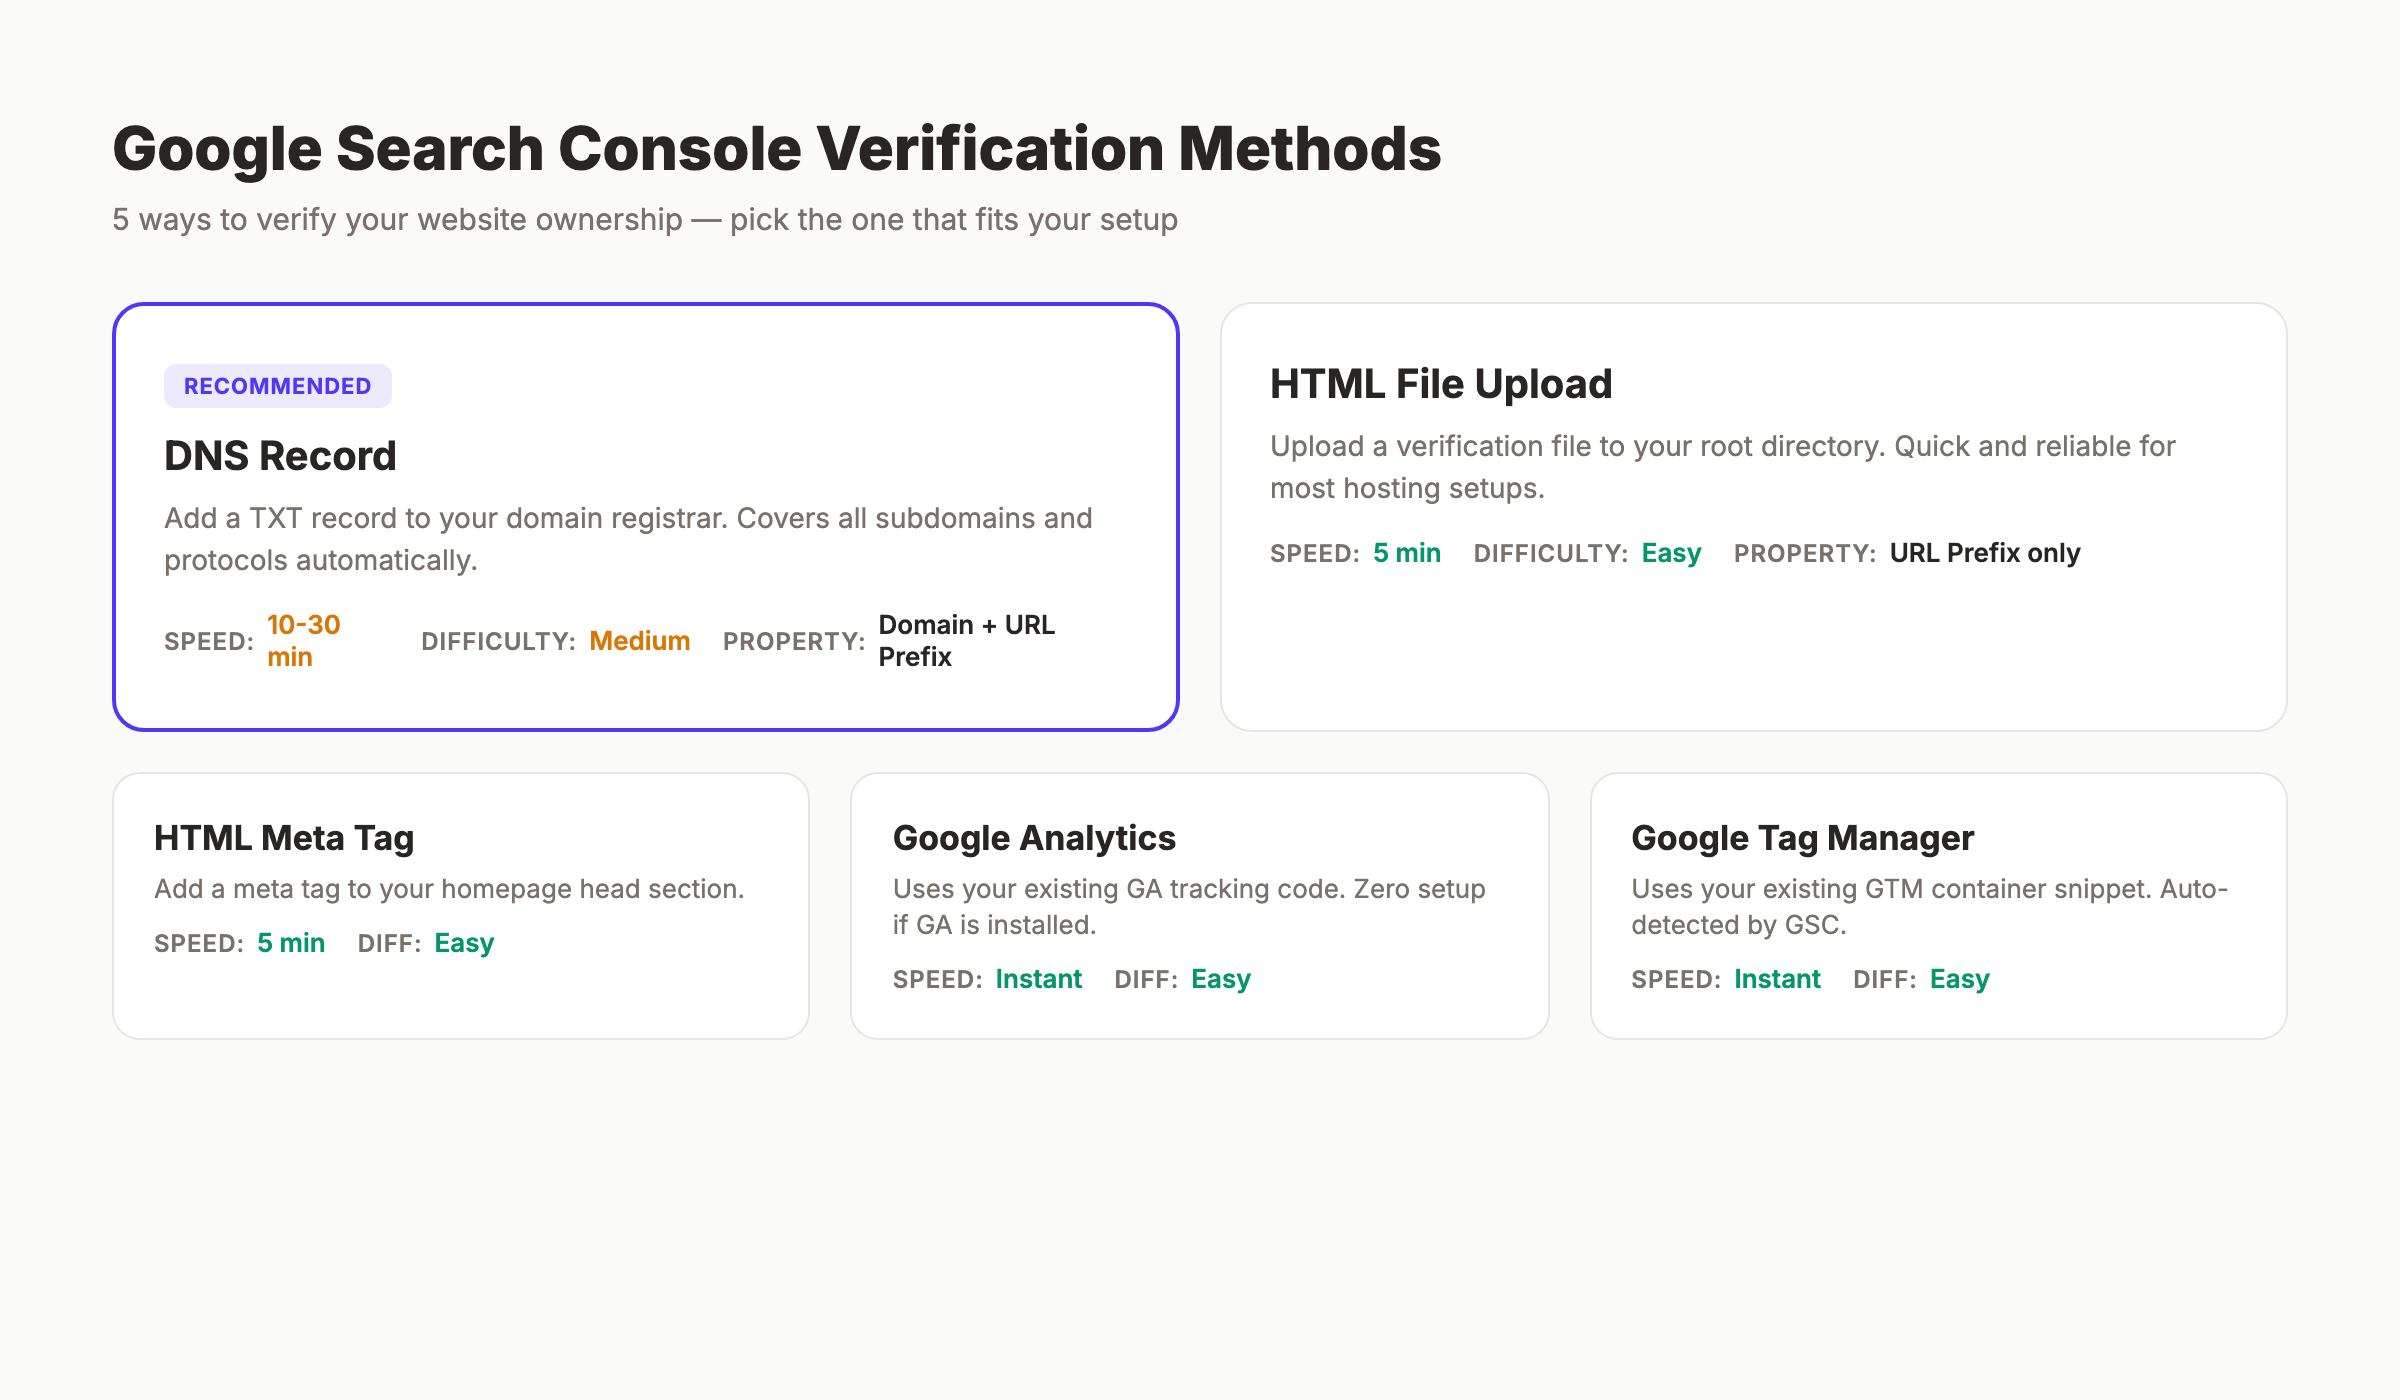
Google offers 5 verification methods for URL Prefix properties:
| Method | How It Works | Speed | Difficulty |
|---|---|---|---|
| DNS record | Add a TXT record to your domain registrar | 10 to 30 minutes | Medium |
| HTML file upload | Upload a file to your root directory | 5 minutes | Easy |
| HTML meta tag | Add a tag to your homepage’s <head> | 5 minutes | Easy |
| Google Analytics | Uses your existing GA tracking code | Instant | Easy |
| Google Tag Manager | Uses your existing GTM container | Instant | Easy |
If you already run Google Analytics or Tag Manager on your site, those methods require zero additional setup. The system detects your existing code and verifies automatically.
For Domain properties, DNS verification is the only option. Log into your domain registrar (GoDaddy, Namecheap, Cloudflare, or similar). Add the TXT record Google provides. Propagation takes anywhere from 10 minutes to 48 hours, though most complete within 1 hour.
Why this step matters: Without a verified Search Console property, you cannot submit sitemaps, request indexing, or see how Google views your site. GSC is not optional. It is essential.
Step 3: Verify Your Website Ownership
Google requires proof that you own the website before granting access to its data and submission tools. Verification prevents unauthorized people from manipulating your site’s presence in search results.
DNS Verification (Recommended)
- Copy the TXT record from the Search Console verification screen.
- Log into your domain registrar or DNS provider.
- Open DNS settings for your domain.
- Add a new TXT record. Set the host to
@(or leave blank). Paste the value Google provided. - Save the record.
- Return to Search Console and click Verify.
DNS propagation can take up to 48 hours. In practice, most records propagate within 15 to 60 minutes. If verification fails on the first attempt, wait 30 minutes and try again.
HTML Tag Verification (Backup Method)
If DNS access is unavailable, the HTML tag method works well:
- Copy the
<meta>tag from Search Console. - Open your website’s homepage HTML.
- Paste the tag inside the
<head>section, before the closing</head>tag. - Publish the change.
- Return to Search Console and click Verify.
This method works instantly after the tag is live on your homepage. The tag must remain on the page permanently. Removing it causes verification to lapse.
Why this step matters: An unverified property gives you zero access to submission tools. You cannot submit sitemaps, request indexing, or view performance data until verification completes. Do not skip this step.
Pro tip: If your site runs on WordPress, Shopify, or Wix, check if your platform has a built-in Search Console integration. Many CMS platforms let you paste the verification code directly into their SEO settings panel.
Step 4: Create and Submit an XML Sitemap
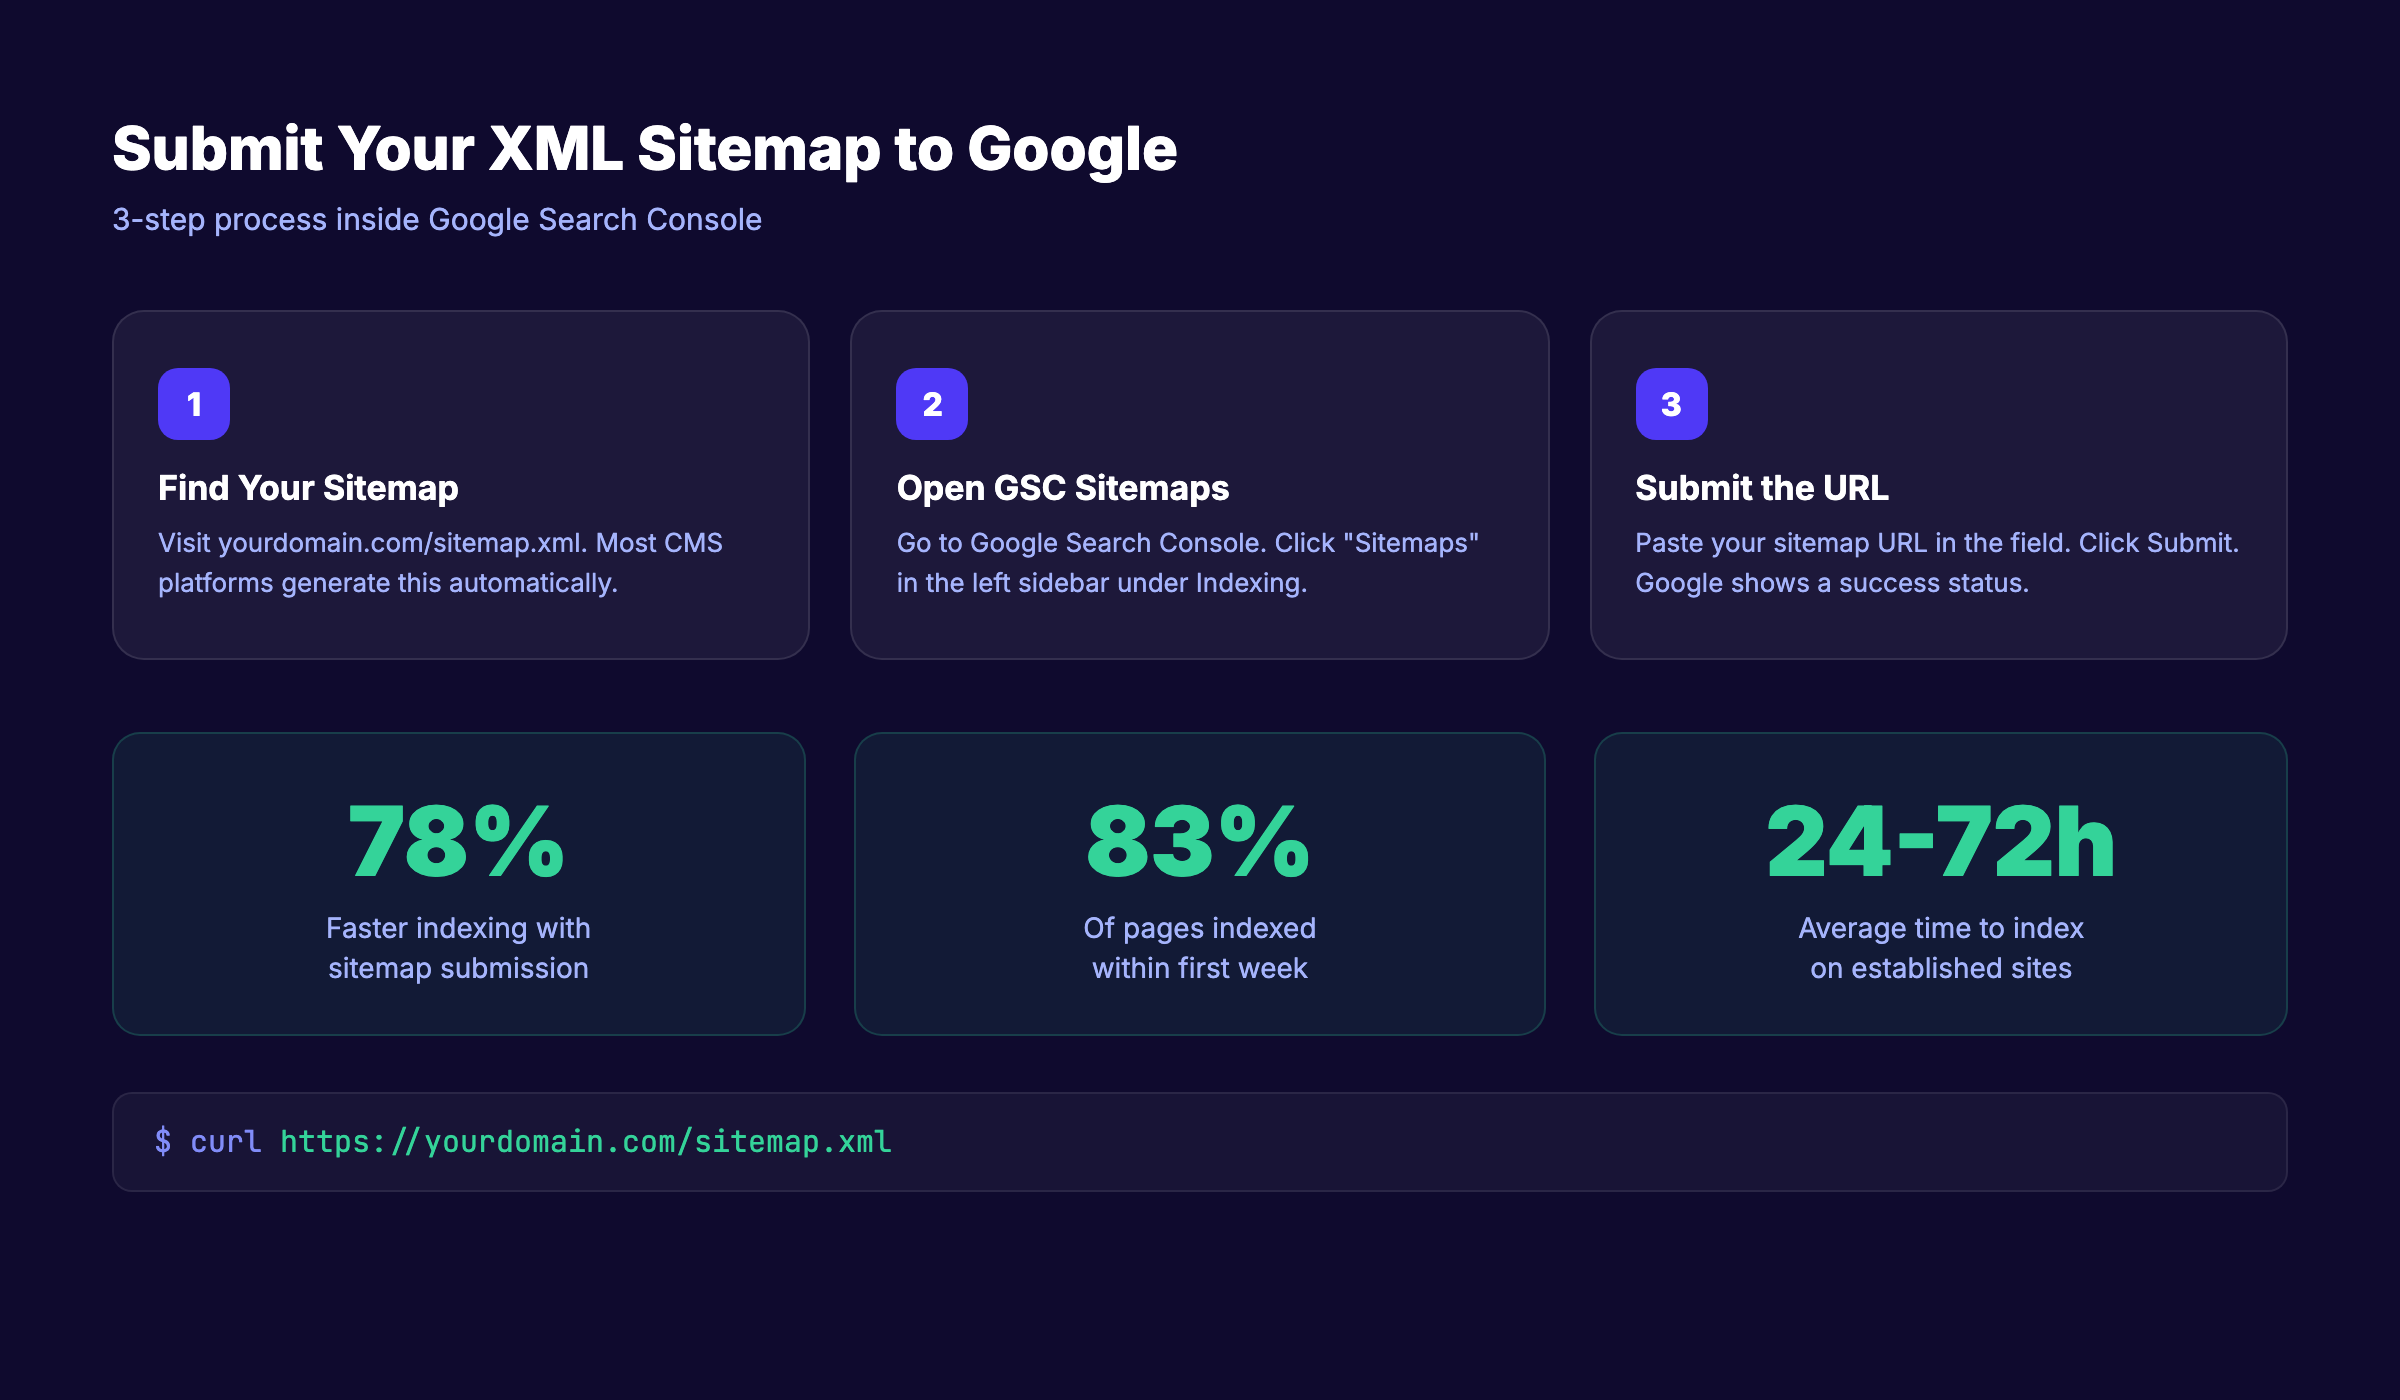
An XML sitemap is a file that lists every page on your website you want Google to find. Think of it as a table of contents for search engines. Submitting a sitemap speeds up the indexing process by approximately 78%.
Find Your Existing Sitemap
Most modern CMS platforms generate sitemaps automatically:
- WordPress (with Yoast or Rank Math):
yourdomain.com/sitemap_index.xml - Shopify:
yourdomain.com/sitemap.xml - Wix:
yourdomain.com/sitemap.xml - Squarespace:
yourdomain.com/sitemap.xml - Webflow:
yourdomain.com/sitemap.xml
Type your domain followed by /sitemap.xml in your browser. If a structured XML file appears, you already have one.
Submit the Sitemap to Google
- Open Google Search Console.
- Click Sitemaps in the left sidebar.
- Enter your sitemap URL in the “Add a new sitemap” field.
- Click Submit.
Google will show a “Success” status if the sitemap is valid. It then begins processing the URLs listed in the file. Processing does not mean instant indexing. Google crawls submitted URLs on its own schedule.
For larger sites with hundreds or thousands of pages, you may have multiple sitemaps organized into a sitemap index. Submit the index file. Google will discover all child sitemaps automatically.
What if You Do Not Have a Sitemap
If your CMS does not generate one automatically, you have options:
- Use a free tool like XML-Sitemaps.com to generate one (works for sites under 500 pages).
- Install an SEO plugin (Yoast, Rank Math, or All in One SEO for WordPress).
- Generate one programmatically if you have a custom-built site.
Upload the generated file to your site’s root directory so it is accessible at yourdomain.com/sitemap.xml.
Why this step matters: Without a sitemap, Google relies solely on following links to discover your pages. Orphan pages with no internal links may never get found. A sitemap ensures Google knows about every page you want indexed.
Pro tip: Keep your sitemap clean. Only include pages you want indexed. Remove 404 pages, redirects, and pages with noindex tags. A bloated sitemap wastes your crawl budget. For more on linking pages together effectively, read our guide on internal linking.
Step 5: Use the URL Inspection Tool for Priority Pages
The URL Inspection tool lets you request indexing for individual pages. It is the fastest way to get a specific URL into Google’s index.
How to Use It
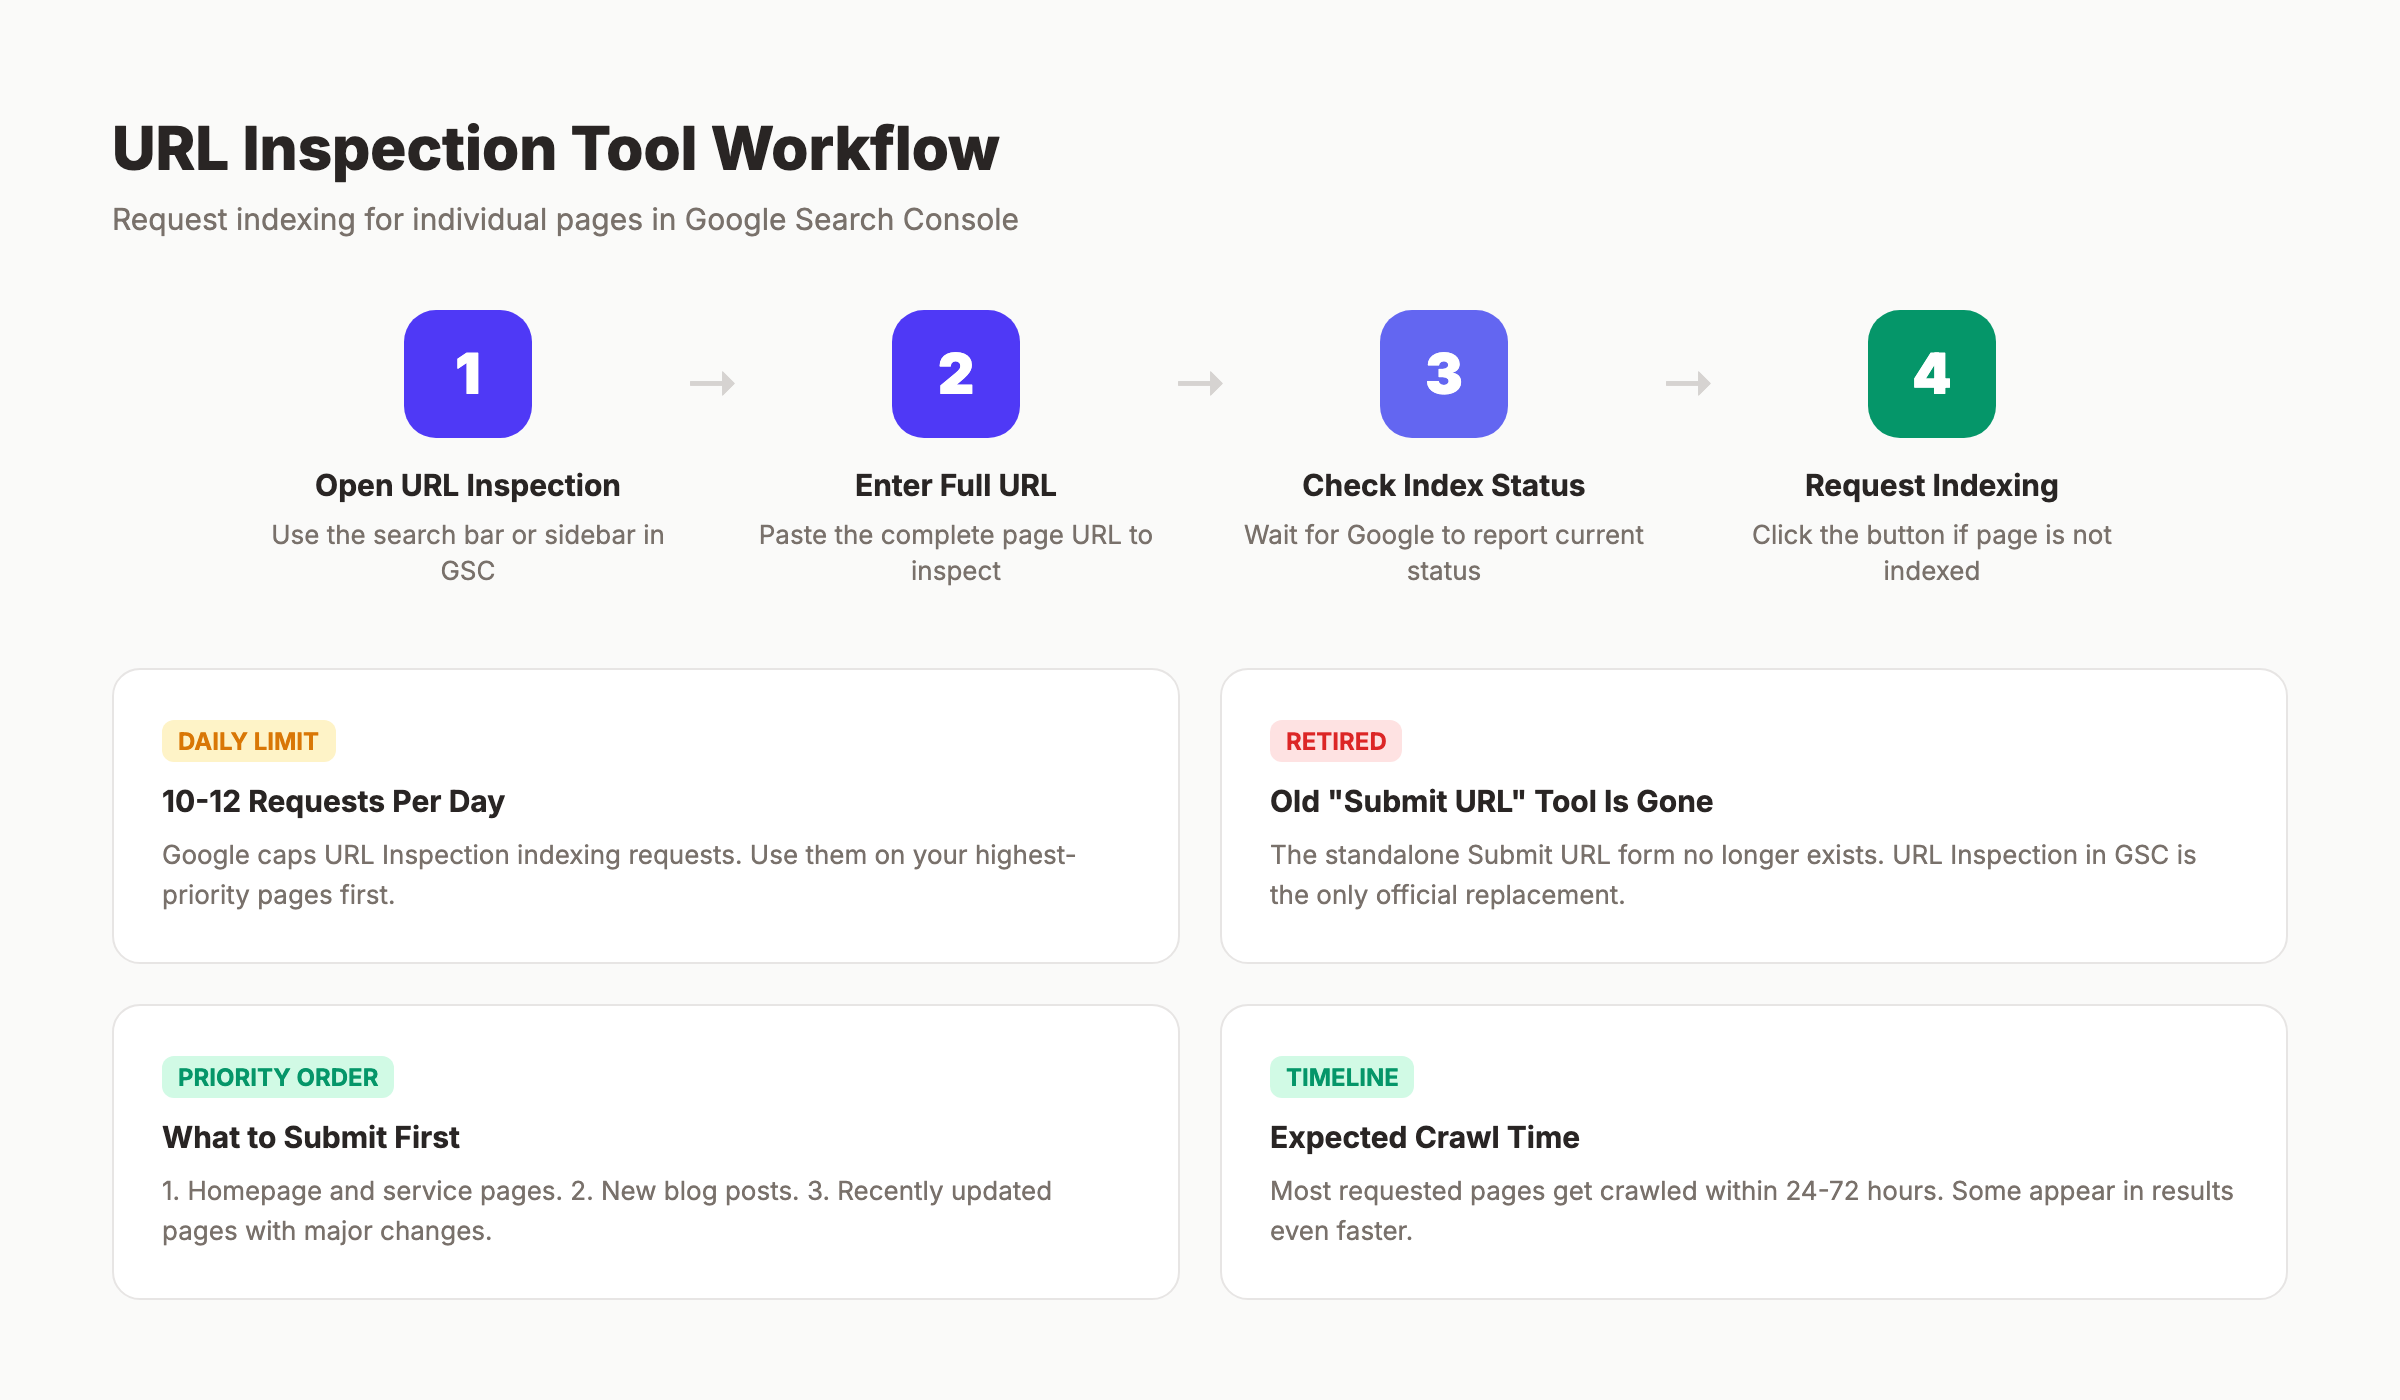
- Open Google Search Console.
- Click URL Inspection in the left sidebar (or use the search bar at the top).
- Enter the full URL of the page you want indexed.
- Wait for Google to check the current index status.
- If the page is not indexed, click Request Indexing.
Google will add the URL to its priority crawl queue. Most requested pages get crawled within 24 to 72 hours. Some appear in search results even faster.
Daily Limits and Best Practices
Google limits indexing requests to approximately 10 to 12 per day per property. Use these requests strategically:
- Priority 1: Homepage and main service or product pages
- Priority 2: New blog posts and landing pages
- Priority 3: Recently updated pages with significant changes
Do not waste requests on low-value pages like tag archives or author pages. Focus on URLs that drive traffic and conversions.
The Old “Submit URL” Tool Is Retired
Google previously offered a standalone “Submit URL to Google” tool that anyone could use without Search Console. That tool no longer exists. It was retired years ago. The URL Inspection tool inside Search Console is the only official replacement.
If you find guides referencing a simple URL submission form outside of Search Console, that information is outdated. Ignore it.
Why this step matters: Sitemap submission tells Google your pages exist. The URL Inspection tool tells Google to look at specific pages right now. Use both together for the fastest results.
Pro tip: After publishing a new blog post, immediately request indexing through the URL Inspection tool. Then share the post on social media. Google often discovers pages faster when they see social signals alongside an indexing request. For tips on creating content that ranks once indexed, check our guide on how to write SEO blog posts.
Stop chasing Google. Let your content do the work. Stacc publishes 30 SEO-optimized articles per month and handles indexing automatically. Start for $1 →
Step 6: Submit Your Site to Other Search Engines
Google dominates search with over 90% market share. But 6 to 8% of search traffic comes from other engines. Ignoring them means leaving traffic on the table.
Bing Webmaster Tools
Bing powers its own search results plus Yahoo and DuckDuckGo. One submission covers all 3 engines.
- Go to bing.com/webmasters.
- Sign in with a Microsoft, Google, or Facebook account.
- Add your site URL.
- Verify ownership (Bing supports XML file, meta tag, and CNAME methods).
- Submit your XML sitemap.
Bing also offers an “Import from Google Search Console” option. If you already completed Steps 2 through 4, this imports your entire GSC setup in one click. It is the fastest path.
Why Bother With Non-Google Engines
Bing captures roughly 3 to 4% of global search traffic. That percentage is higher in certain demographics. Desktop users over 45 use Bing at nearly double the average rate. B2B audiences on Microsoft Edge default to Bing.
DuckDuckGo has grown to over 100 million daily searches. It uses Bing’s index. Submitting to Bing automatically covers DuckDuckGo.
The effort takes 5 minutes. The potential traffic gain lasts indefinitely.
Why this step matters: Diversifying your search engine presence protects against Google algorithm volatility. A site ranking well on both Google and Bing has a more stable traffic baseline. Every additional indexed search engine compounds your visibility.
Step 7: Monitor Indexing Status and Fix Errors
Submitting your website to Google is not a one-time task. Pages get deindexed. New content needs crawling. Technical errors block indexing. Ongoing monitoring prevents silent traffic loss.
Check the Pages Report
- Open Google Search Console.
- Click Pages in the left sidebar (under “Indexing”).
- Review the summary chart showing indexed vs. not indexed pages.
The Page Indexing report categorizes every URL Google knows about. Pay attention to these status categories:
| Status | Meaning | Action Required |
|---|---|---|
| Indexed | Page is in Google’s search results | None. Monitor for changes. |
| Discovered — currently not indexed | Google found the URL but has not crawled it yet | Improve page quality. Add internal links. Request indexing. |
| Crawled — currently not indexed | Google crawled the page but chose not to index it | Improve content depth. Check for thin content. |
| Blocked by robots.txt | Your robots.txt file prevents crawling | Edit robots.txt to allow access. |
| Noindex tag detected | A noindex meta tag tells Google to skip the page | Remove the tag if you want the page indexed. |
| Redirect | URL redirects to another page | Verify the redirect target is correct. |
| Not found (404) | Page does not exist | Fix the URL or set up a redirect. |
Set Up a Monthly Monitoring Routine
- Check total indexed page count (should trend upward)
- Review “Not indexed” reasons for new issues
- Verify new content published in the last 30 days is indexed
- Fix any pages stuck in “Discovered” or “Crawled” status
- Check for sudden drops in indexed page count
A sudden drop in indexed pages signals a technical problem. Common causes include accidental noindex tags, robots.txt changes, server errors, or a manual penalty. Catch these early before they damage your organic traffic.
Why this step matters: Indexing is not permanent. Google regularly re-evaluates pages. A page indexed today can get dropped next month if quality signals decline. Monthly monitoring keeps your site healthy and visible.
Pro tip: Set a calendar reminder for the first Monday of each month. Open Search Console, check the Pages report, and address any new issues. This 10-minute habit prevents most indexing problems from compounding.
Results: What to Expect
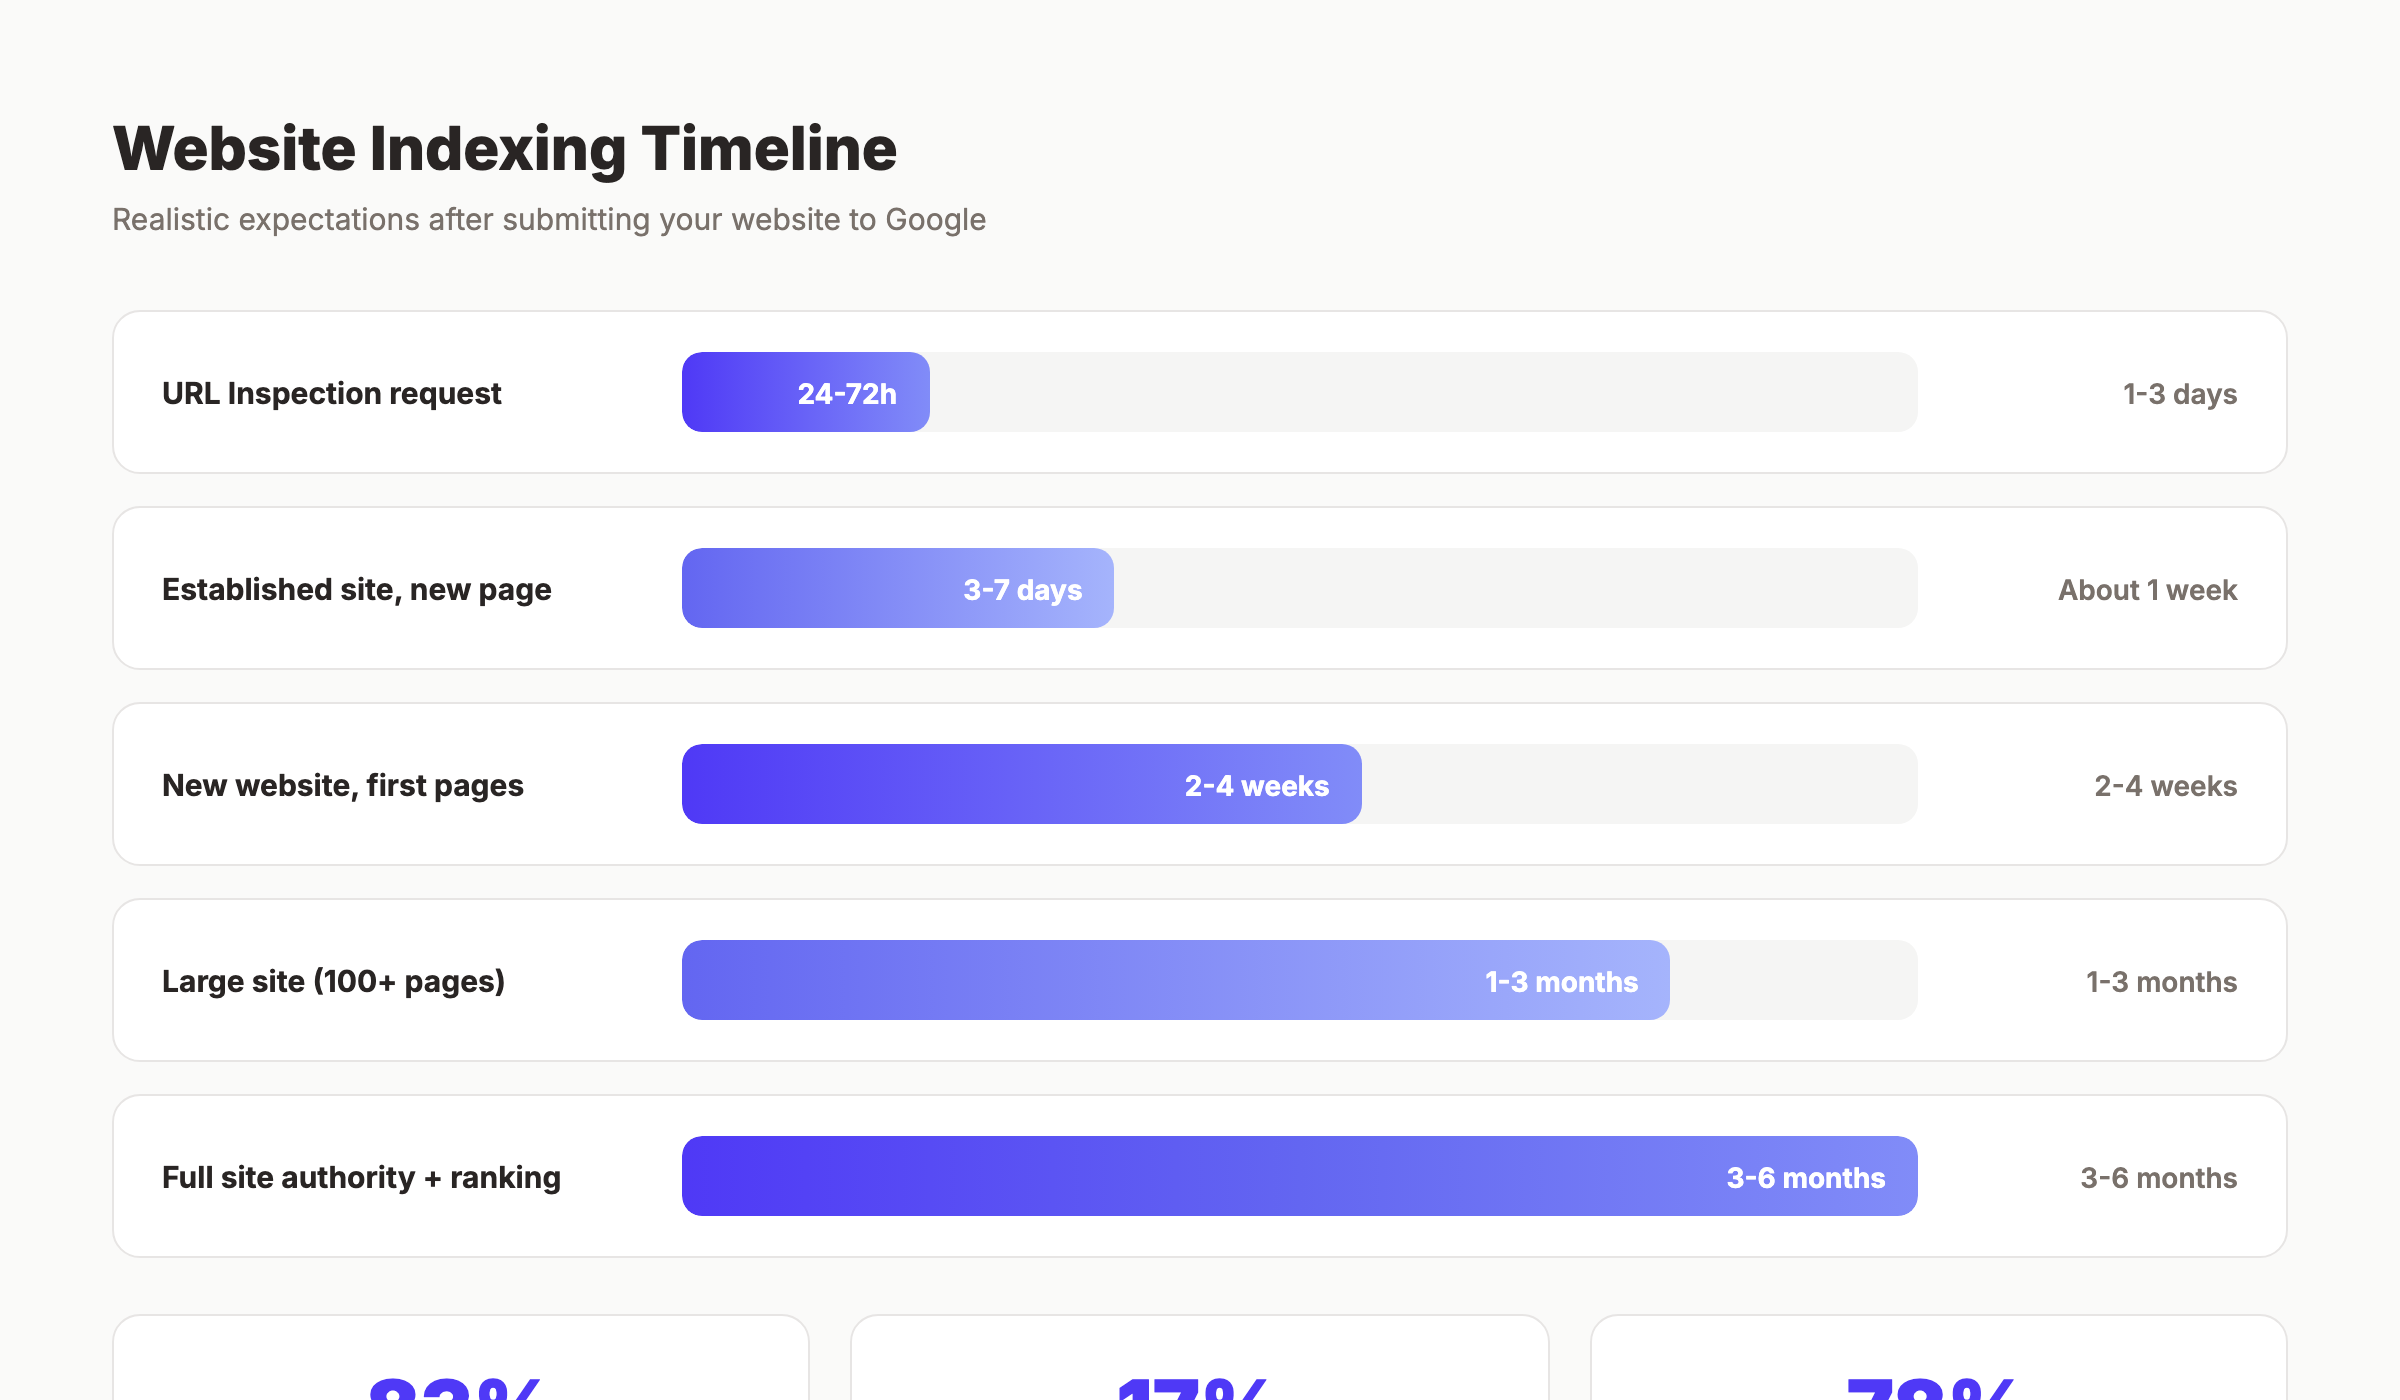
After completing all 7 steps, here is a realistic timeline for indexing:
- New websites: 2 to 4 weeks for initial pages to appear in search results
- Established sites, new pages: 24 to 72 hours with URL Inspection requests
- Full site indexing: 1 to 3 months for sites with 100+ pages
- 83% of submitted pages get indexed within the first week
- 17% of pages may take longer or require quality improvements before Google indexes them
According to Google’s official documentation, crawling “can take from a few days to a few weeks.” John Mueller from Google has stated that “most good content is picked up within about a week.”
Do not expect instant results. Google prioritizes pages based on perceived quality, site authority, and crawl demand. A brand-new site with zero backlinks will index slower than an established domain with strong topical authority.
Speed up the process by publishing high-quality content consistently, building internal links between pages, and earning backlinks from other sites.
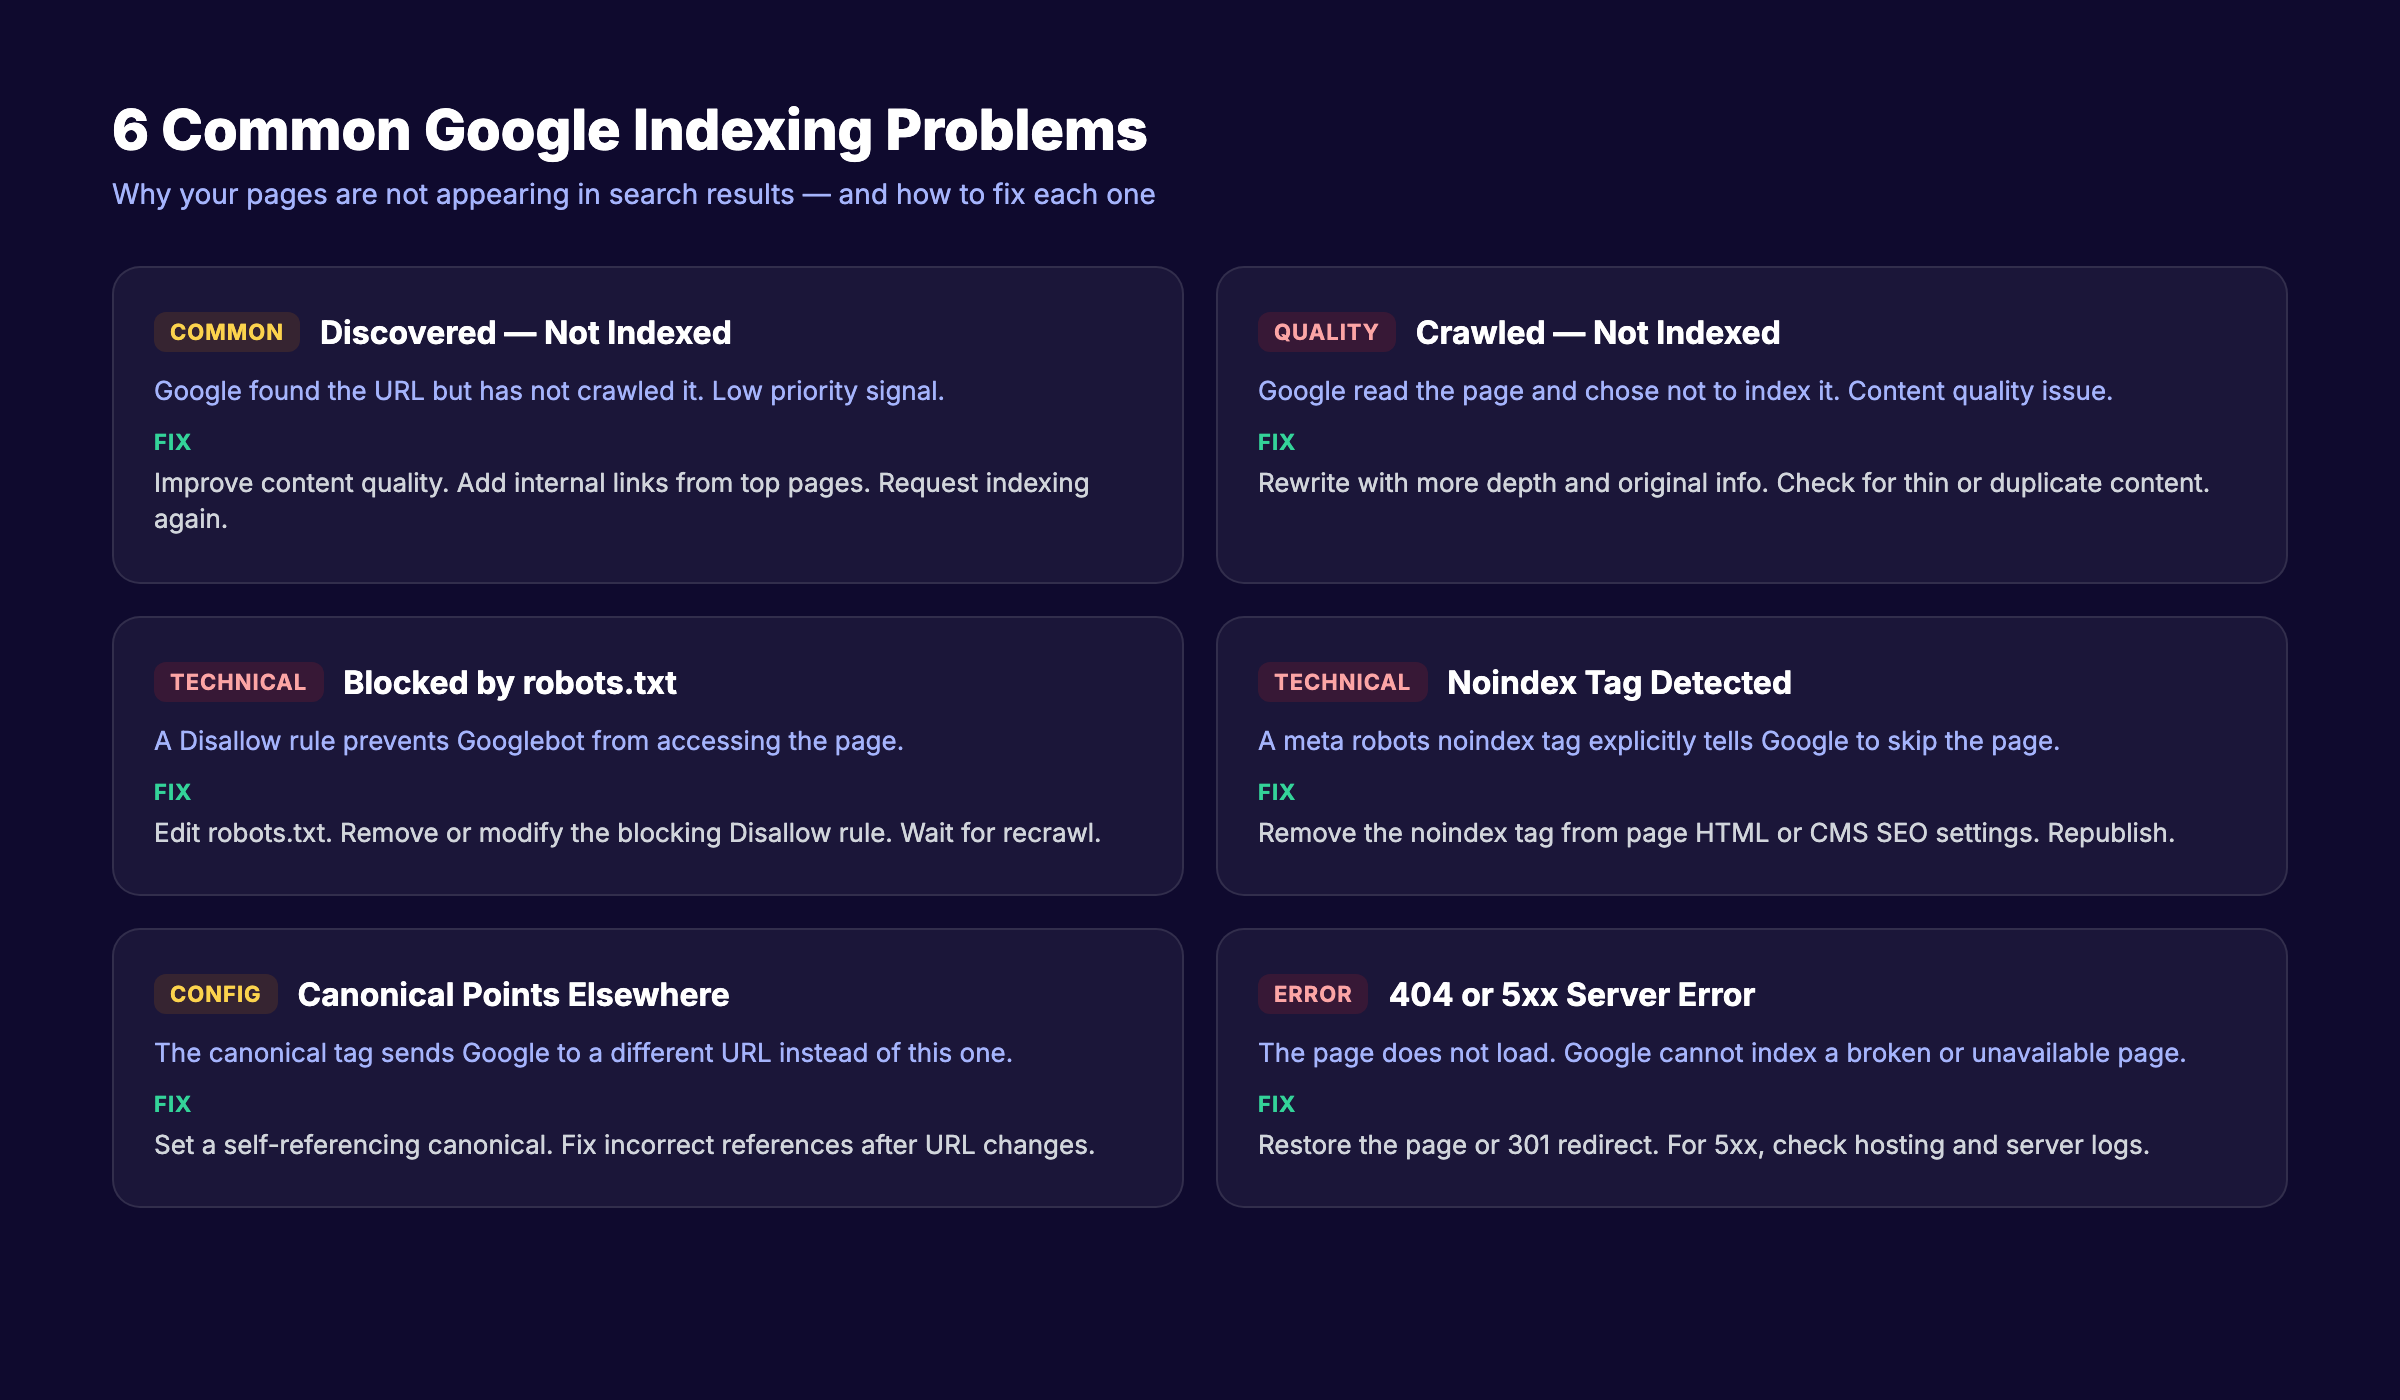
Troubleshooting: 6 Common Indexing Problems
Even after submitting your site correctly, some pages may fail to appear in Google. Here are the 6 most common problems and their fixes.
Problem 1: “Discovered — Currently Not Indexed”
Google found the URL (through your sitemap or internal links) but has not bothered to crawl it yet. This usually means Google does not consider the page valuable enough to prioritize.
Fix: Improve the page’s content quality. Add more depth, original data, or unique insights. Build internal links from your highest-traffic pages to the stuck page. Then request indexing again through the URL Inspection tool.
Problem 2: “Crawled — Currently Not Indexed”
Google visited the page but decided not to add it to the index. The page exists. Google read it. Google said no.
Fix: This is a content quality signal. The page likely has thin content, duplicates existing content on your site, or lacks search demand. Rewrite the page with more depth. Add original information competitors do not cover. Ensure the page targets a keyword with actual search volume.
Problem 3: Blocked by robots.txt
Your robots.txt file contains a rule that prevents Googlebot from accessing the page. This is often accidental, especially after site migrations or CMS updates.
Fix: Open yourdomain.com/robots.txt in your browser. Look for Disallow rules that match the blocked URL. Remove or modify the rule. Wait for Google to recrawl. Use the robots.txt tester in Search Console to verify the change works.
Problem 4: Noindex Tag on the Page
A <meta name="robots" content="noindex"> tag in the page’s HTML tells Google explicitly not to index it. Some CMS platforms add this tag by default for certain page types.
Fix: Check the page source code for noindex tags. In WordPress, check the Yoast or Rank Math settings for that specific page. Look for a checkbox labeled “Allow search engines to show this page in search results” and enable it. Republish the page.
Problem 5: Canonical Tag Pointing Elsewhere
A canonical tag (<link rel="canonical" href="...">) tells Google which version of a page is the “official” one. If your canonical points to a different URL, Google indexes that URL instead of yours.
Fix: Inspect the page’s HTML <head> section. Find the canonical tag. Ensure it points to the page’s own URL. Self-referencing canonicals are the standard practice. Fix any incorrect canonical references. This is a common issue after site redesigns or URL structure changes. Learn more about technical optimization in our on-page SEO guide.
Problem 6: Page Returns 404 or 5xx Server Error
Google cannot index a page that does not load. A 404 error means the page does not exist at that URL. A 5xx error means your server failed to deliver the page.
Fix: For 404 errors, either restore the page at the correct URL or set up a 301 redirect to the most relevant alternative. For 5xx errors, check your hosting provider’s status page and server logs. Contact your host if errors persist. Intermittent 5xx errors during high traffic often indicate you need to upgrade your hosting plan.
Your SEO team. $99 per month. 30 optimized articles, published automatically. Indexing handled. Start for $1 →
FAQ
How do I submit my website to Google for free?
Google Search Console is 100% free. Create an account, verify your site, submit your XML sitemap, and use the URL Inspection tool. There is no paid version. Every feature mentioned in this guide costs nothing. You do not need any third-party tools or paid services to submit your website to Google.
How long does it take Google to index a new website?
New websites typically take 2 to 4 weeks for initial indexing. Individual new pages on established sites appear within 24 to 72 hours when submitted through the URL Inspection tool. Google states that crawling “can take from a few days to a few weeks.” Factors that affect speed include site authority, content quality, backlink profile, and crawl demand. Consistent publishing accelerates the timeline.
Do I need to submit my website to Google?
Technically, no. Google will eventually discover most websites through links from other sites. But waiting for organic discovery can take weeks or months. Submitting through Search Console speeds up the process significantly. Sitemap submission alone improves indexing speed by roughly 78%. There is no downside to submitting. It is free and takes 15 minutes.
Why is my website not showing up on Google?
The most common reasons include: your site is too new and has not been crawled yet, a noindex tag is blocking indexing, your robots.txt file blocks Googlebot, the pages have thin or duplicate content, or your site has technical errors preventing crawling. Use the Page Indexing report in Search Console to identify the specific cause. Our SEO audit guide covers a full diagnostic process.
How often does Google crawl websites?
Crawl frequency depends on site authority, update frequency, and page importance. High-authority news sites get crawled multiple times per day. Small business sites may see Googlebot once every few days or weeks. Publishing fresh content regularly signals to Google that your site is active and worth crawling more often. Sites that publish 30 or more pages per month typically see faster and more frequent crawling. Learn how Google crawling works.
Is Google Search Console free?
Yes. Google Search Console is completely free for any website owner. There are no premium tiers, no feature locks, and no usage limits beyond the daily URL Inspection request cap of approximately 10 to 12 requests. Google provides it because indexed, well-structured websites improve the overall quality of search results.
Submitting your website to Google takes 15 to 30 minutes. The real work happens after submission. Monitor your indexing status monthly. Fix errors as they appear. Publish content that earns its place in the index.
Consistent publishing paired with strong technical health builds long-term search visibility. If you want to increase organic traffic without managing the process yourself, that is exactly what we do at Stacc. 30 articles per month. Indexed, optimized, and published on autopilot.
Written and published by Stacc. We publish 3,500+ articles per month across 70+ industries. All data verified against public sources as of March 2026.