How to Write SEO Blog Posts That Rank (2026)
8 steps to write SEO blog posts that rank on Google. Keyword research, SERP analysis, structure, on-page SEO, and AI formatting. Updated March 2026.
Most businesses publish blog posts that never get a single visitor from Google. 96.55% of all web pages receive zero organic traffic. The content gets written, edited, formatted, and published. Then it sits on page 5 forever.
That failure costs real money. Each blog post takes 3 to 5 hours to produce. At 4 posts per month, you invest 12 to 20 hours of writing time per month. If none of those posts rank, that is 150 to 240 hours per year producing content nobody finds. The average freelance writer charges $150 to $500 per article. Do the math on 48 articles that generate zero traffic.
The problem is not bad writing. It is writing without a process. The businesses ranking on page 1 follow a repeatable system: research the keyword, match search intent, structure the content, optimize every on-page element, and format for AI search. That system is what this guide teaches.
We publish 3,500+ blog posts per month across 70+ industries. Every one follows this exact 8-step process. Our average SEO score is 92%. By the end of this guide, you will have the same system. Even if you have never written an SEO blog post before.
Here is what you will learn:
- How to pick keywords that you can realistically rank for
- How to study search results before writing a single word
- How to build outlines that prevent rambling and ensure topical coverage
- How to write titles, introductions, and headers that earn clicks and rankings
- How to optimize every on-page element in under 15 minutes
- How to format content so AI search engines cite it
Overview
| Detail | Info |
|---|---|
| Time required | 2 to 4 hours per post (faster with practice) |
| Difficulty | Beginner to Intermediate |
| What you need | A keyword research tool (free options work), Google Search, and a text editor or CMS |
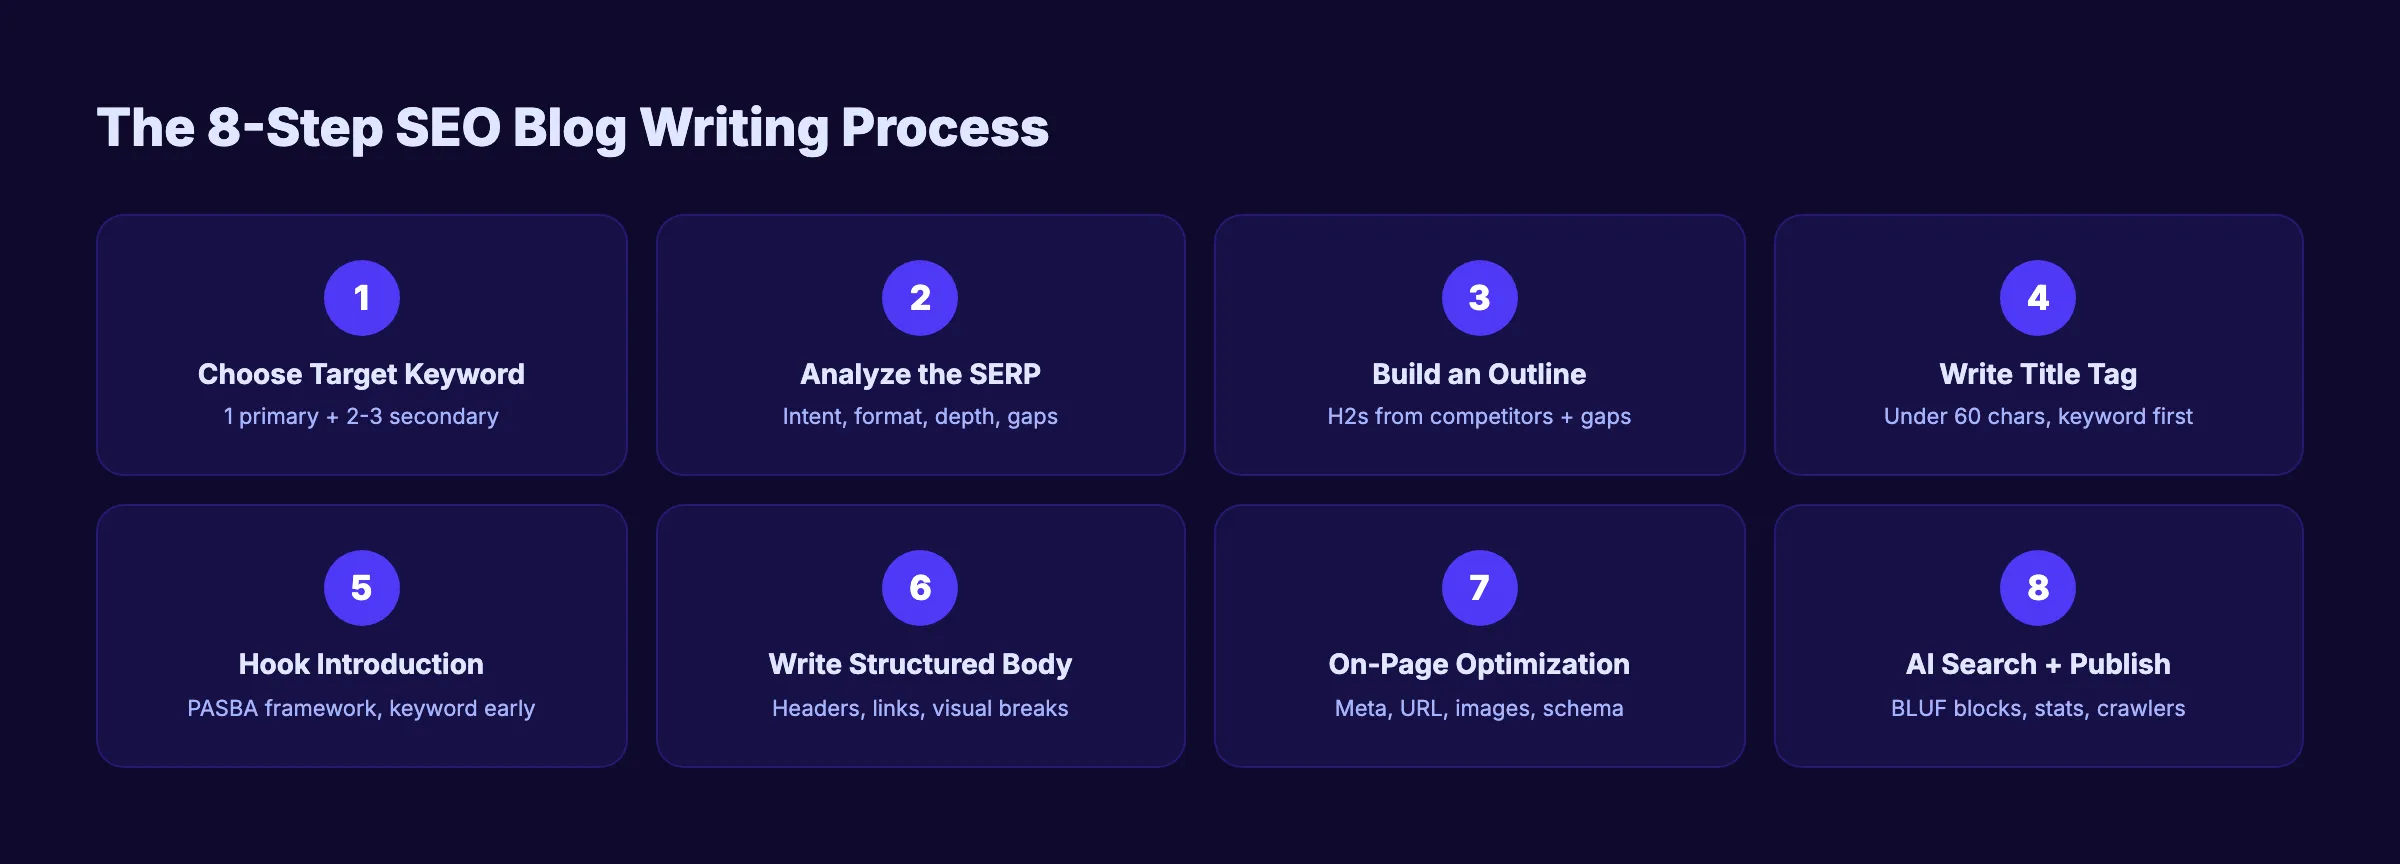
Step 1: Choose One Target Keyword
Every SEO blog post starts with 1 keyword. Not 5. Not a vague topic. One specific phrase that real people type into Google every day.
How to Find the Right Keyword
Start with a seed topic related to your business. If you sell HVAC services, your seed topics might be “furnace repair,” “AC maintenance,” or “home heating costs.” Plug these into a keyword research tool like Google Keyword Planner, Ahrefs, or any tool from our best AI blog writing tools list.
Look for keywords that meet 3 criteria:
- Search volume above 100 per month. Anything lower rarely justifies the writing time.
- Keyword difficulty you can compete with. New sites should target difficulty under 30 on a 100-point scale. Established sites can aim higher.
- Clear informational intent. The keyword should signal that the searcher wants to learn, not buy. “How to fix a leaky faucet” is informational. “Buy kitchen faucet” is transactional.
Primary vs Secondary Keywords
Select 1 primary keyword and 2 to 3 secondary keywords. The primary keyword goes in your title, URL, H1, and first paragraph. Secondary keywords are related phrases you weave into H2 headings and body text naturally.
Example for this post:
- Primary: write seo blog posts
- Secondary: seo blog writing, blog posts that rank, seo optimized blog post
Long-tail keywords (3 or more words) convert at 2.5x the rate of head terms and account for over 91% of all searches. They are less competitive and more specific. Start here if your site is new.
Why this step matters: Without a target keyword, Google cannot match your content to any search query. You are publishing into a void. Every decision in the next 7 steps depends on knowing exactly what phrase you are optimizing for. Pick the wrong keyword and no amount of writing quality will save the post.
Pro tip: Check Google Search Console for keywords where your site already gets impressions but few clicks. These “striking distance” terms (positions 8 to 20) are the fastest wins because Google already associates your domain with the topic.
Step 2: Analyze Search Intent and the SERP
Before you write a single word, search your target keyword on Google. Open an incognito window so results are not personalized. Study the top 5 results.
What to Look For
Note 4 things about each top-ranking page:
| Element | Question to Answer |
|---|---|
| Content format | Is it a step-by-step guide, a listicle, a comparison, or a landing page? |
| Content depth | How many words? How many sections? How deep does it go? |
| Heading structure | What H2s and H3s do they use? These are the subtopics Google expects. |
| Unique elements | Do they include tables, images, videos, checklists, downloadable resources? |
Match the Dominant Format
If 4 out of 5 top results are step-by-step guides, write a step-by-step guide. If they are all listicles, write a listicle. Do not fight the SERP. Google has already decided what format satisfies searchers for this query.
Find the Content Gap
List every H2 heading from the top 3 pages. The headings that appear across all 3 are mandatory sections your post must cover. The headings missing from all 3 are your differentiation opportunities. Filling those gaps with original insight is how you outrank established competitors.
Check SERP Features
Note whether featured snippets, People Also Ask boxes, or AI Overviews appear. Each feature tells you something. A featured snippet means Google wants a concise, direct answer. PAA boxes reveal related questions your post should address. AI Overviews mean your content needs extractable answer blocks (covered in Step 8).
Why this step matters: Writing a blog post without checking the SERP is like building a product without talking to customers. You might create something brilliant that nobody wants. Intent mismatch is the number 1 reason quality content fails to rank. A perfectly written product review will never rank for a “how to” query.
Pro tip: Open the top 3 results in separate tabs. Spend 10 minutes reading each one. Note what they do well and where they fall short. Those shortcomings become the unique angles that set your post apart.
Step 3: Build an Outline from Competitor Analysis
Do not start writing without an outline. Writers who skip the outline spend 40% more time revising because they discover halfway through that they missed a section, repeated themselves, or went off-topic.
The Outline Process
- Pull the H2 headings from the top 5 results. These are the subtopics Google expects.
- Group common headings. If 4 out of 5 pages cover “keyword research,” your post needs that section.
- Identify the gap. Find 1 to 2 subtopics none of them cover. This is your competitive edge.
- Structure your H2s and H3s. Put them in a logical order: chronological, priority, or simple-to-complex.
- Plan your links. Note where to place internal links to existing pages on your site and external links to authoritative sources.
- Plan your visuals. Mark where tables, images, or checklists will go. At least 1 visual element per 500 words.
Word Count Planning
Assign a target word count to each H2 section. This prevents some sections from ballooning while others stay thin. For a step-by-step guide, aim for 250 to 400 words per step. The total should match or exceed the depth of the top 3 ranking pages.
The average top-10 Google result contains approximately 1,447 words. But posts in positions 1 through 3 average 2,100 to 2,500 words. Go deep enough to cover the topic fully. Not long enough to pad.
Why this step matters: An outline is a ranking blueprint. It ensures you cover every subtopic Google expects, fill content gaps competitors miss, and organize your ideas before the pressure of writing kicks in. Posts written from outlines rank faster because they cover topics more thoroughly.
For a deeper process, read our guide on how to optimize content for SEO, which covers the full on-page optimization workflow.
Step 4: Write a Click-Worthy Title Tag
Your title tag is the single most important on-page SEO element. It appears in search results, browser tabs, and social shares. Google uses it as a primary relevance signal.
4 Rules for Every Title Tag
- Front-load the primary keyword. Place it within the first 5 words. Google reads left to right. If the title gets truncated, your keyword still shows.
- Keep it under 60 characters. Google truncates titles beyond approximately 580 pixels. That translates to 55 to 60 characters including spaces.
- Add a hook. Numbers, years, and power words increase click-through rate. “8 Steps” sets expectations. “(2026)” signals freshness. “Proven” or “Complete” adds authority.
- Make it specific. “SEO Tips” is generic. “How to Write SEO Blog Posts That Rank (2026)” tells the searcher exactly what they will learn.
Title Tag Formula
[Primary Keyword] + [Power Word] + [Number or Year] + ([Hook])Examples:
- “How to Write SEO Blog Posts That Rank (2026)” , 46 chars
- “SEO Blog Writing: 8 Steps to Page 1 (2026)” , 43 chars
- “Write Blog Posts That Rank on Google: 8 Steps” , 47 chars
Test your titles with a headline analyzer before publishing. Write 3 variations and pick the one that scores highest.
Titles with numbers generate 36% more clicks than titles without them. Google rewrites approximately 61% of title tags. Keeping your title aligned with your H1 heading reduces the chance of a rewrite.
Why this step matters: The title tag determines whether someone clicks your result or scrolls past it. Position 1 on Google earns 39.8% of clicks. Position 2 drops to 15.8%. A strong title can generate more traffic from position 3 than a weak title generates from position 1. It is the highest-impact optimization you can make.
Stop writing posts that nobody finds. Stacc publishes 30 SEO-optimized blog posts per month. Every post follows this exact process. $99/month. Start for $1 →
Step 5: Write a Hook Introduction with PASBA
The introduction determines whether readers stay or bounce. You have roughly 5 seconds to prove the post is worth reading. Most blog introductions waste the first 100 words on generic definitions and throat-clearing.
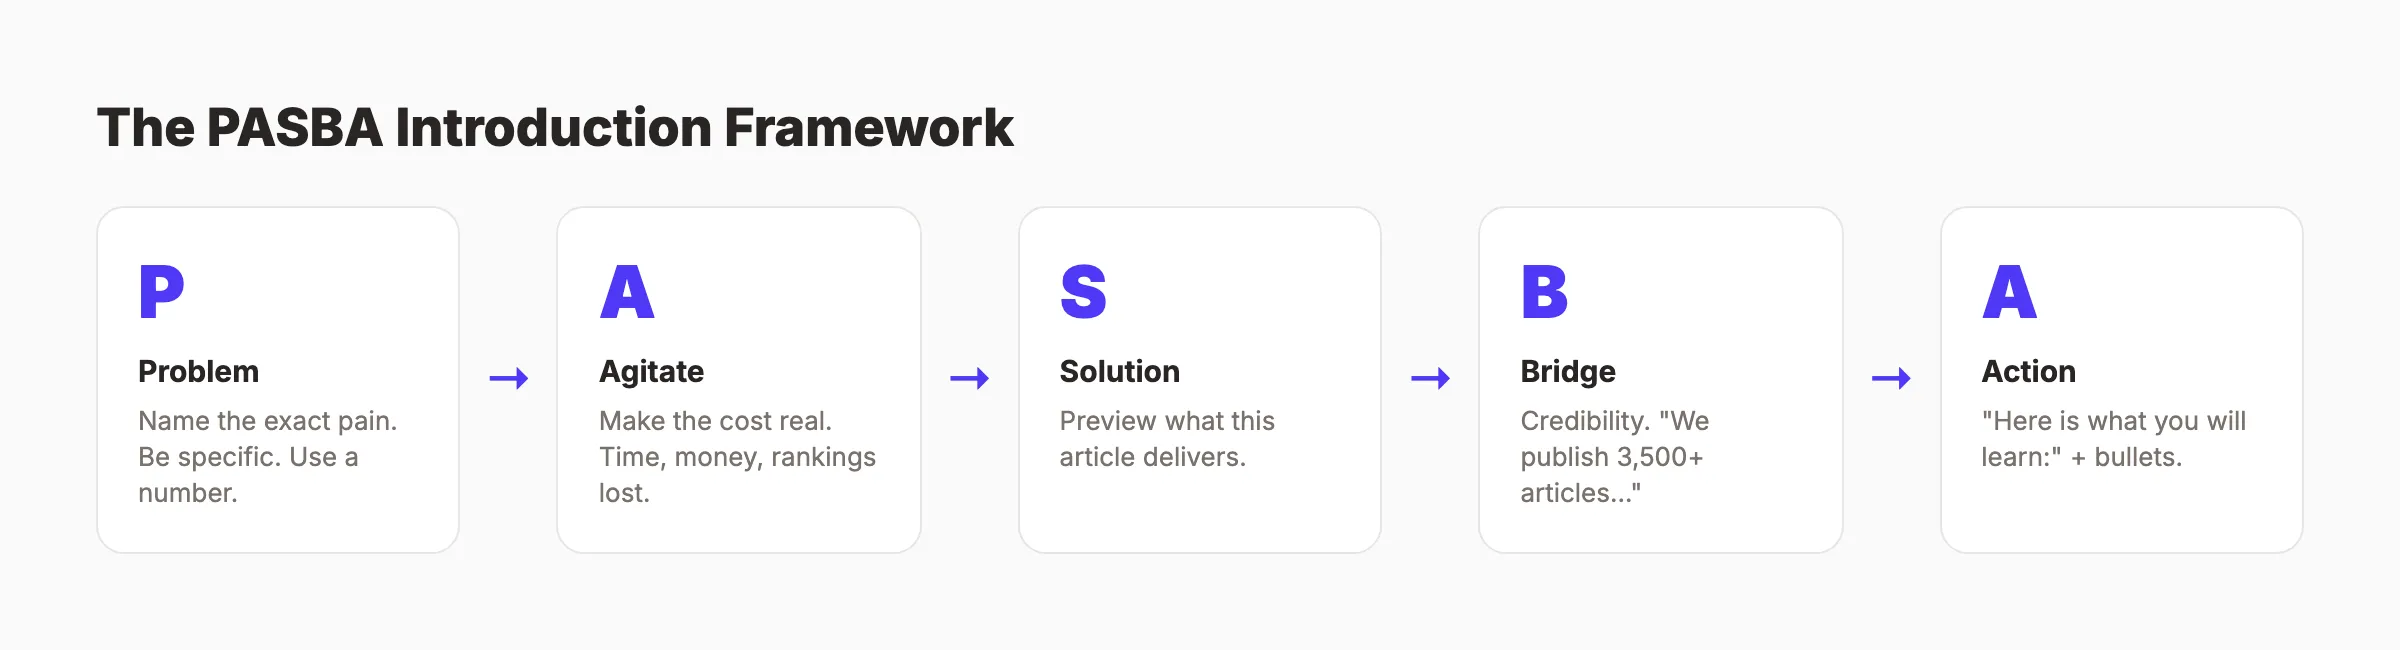
The PASBA Framework
Use this structure for every blog post introduction:
- Problem. Name the exact pain your reader faces. Be specific. “You published 10 blog posts last quarter. None of them rank.”
- Agitate. Make the cost feel real. “That is 40 hours of writing with zero return.”
- Solution. Introduce what this article delivers. “This guide gives you an 8-step process for writing posts that rank.”
- Bridge. Connect to their situation. “It works whether you are a solo founder or a marketing team of 5.”
- Action. Tell them what to do next. “Here is what you will learn:” followed by a bullet list.
Keyword Placement in the Opening
Place your primary keyword in the first 100 words. Google weighs early keyword mentions more heavily than keywords buried in paragraph 8. One natural mention is enough. Do not force it.
Keep It Under 200 Words
Get to the point fast. Long introductions filled with generic background kill engagement. Readers came for answers, not history lessons. The opening of this post you are reading now is 160 words. It states the problem, quantifies the cost, previews the solution, and lists the takeaways. That is the formula.
44.2% of all AI citations come from the first 30% of an article. Your introduction carries disproportionate weight for both human readers and AI search engines.
Why this step matters: Google measures engagement signals. If visitors click your result and immediately return to the search results page (called pogo-sticking), Google interprets that as a failed query match. A strong introduction keeps readers scrolling. That engagement signal tells Google your content satisfies the query. The introduction is where you earn or lose that signal.
Step 6: Write the Body with Proper Structure
The body is where you deliver on your title’s promise. Structure matters as much as the words themselves. A well-structured post is scannable, deep, and linked.
Header Hierarchy Rules
- H1: Your main title. Exactly 1 per page. Handled by the page template.
- H2: Major sections and subtopics. Each H2 covers 1 distinct idea.
- H3: Supporting points under each H2. Use when a section needs subdivision.
- Never skip levels. Do not jump from H2 to H4. Google uses header nesting to understand content relationships.
Paragraph and Sentence Rules
Write in short paragraphs. 2 to 3 sentences maximum. Use bullet points and numbered lists for anything sequential or with 3 or more items.
Readability rules that help rankings:
- Sentences under 20 words. Shorter sentences are easier to read and scan.
- Active voice only. “Google rewards helpful content” beats “Helpful content is rewarded by Google.”
- One idea per paragraph. Let white space do the heavy lifting.
- Numbers as numerals. “30 articles” not “thirty articles.”
Visual Breaks Every 300 Words
Walls of text kill engagement. Insert a non-paragraph element every 250 to 300 words. Tables, bullet lists, images, blockquote callouts, and checklists all work. Each visual break gives the reader a scanning anchor and keeps them scrolling.
Internal and External Links
Add 3 to 5 internal links per 1,000 words. Link to related posts on your site using descriptive anchor text. “Read our content optimization guide” is useful. “Click here” is not.
Include 2 to 3 external links to authoritative sources. Link to the specific page with the data or claim: Google’s official SEO starter guide, research from Ahrefs, or studies from Backlinko. External links signal that your content engages with trusted sources.
After publishing, go back to 2 to 3 older articles and add links pointing to your new post. This two-way linking distributes authority to fresh content.
Why this step matters: Google uses headings to understand your content architecture. Readers use headings to decide whether to invest their time. 79% of web users scan before they read. If your structure does not communicate value at a glance, readers bounce. Bounce rate is an indirect ranking signal that compounds over time.
Pro tip: Read your draft aloud before publishing. If a sentence feels long or clunky, split it. If a paragraph covers 2 topics, break it apart. Your ear catches problems your eyes skip.
Step 7: Optimize On-Page Elements
Writing great content is half the job. On-page optimization ensures Google can find, understand, and rank it. This step takes 10 to 15 minutes per post and directly affects whether the post appears on page 1.
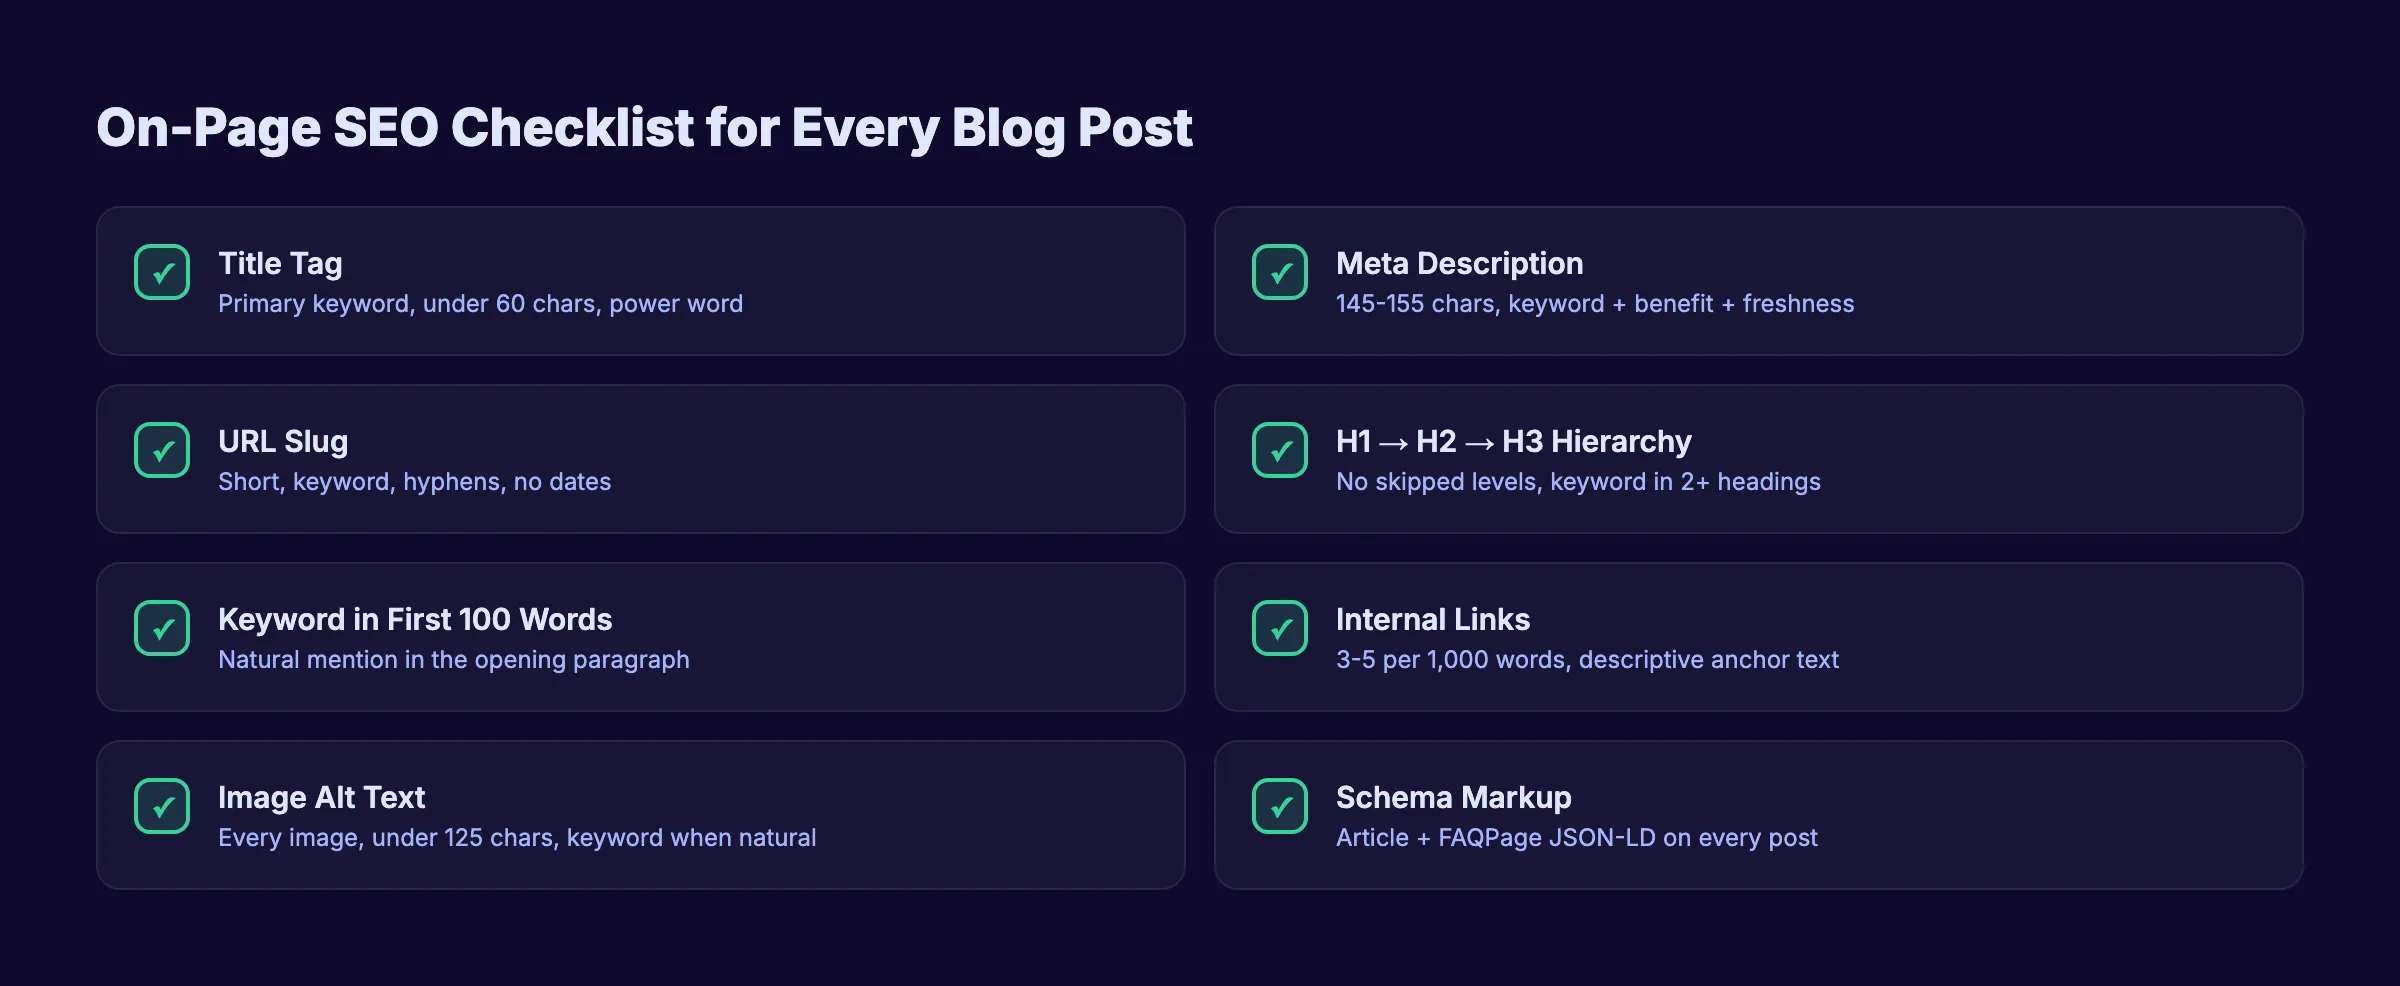
Meta Description
Write a meta description between 145 and 155 characters. Include the primary keyword. State a specific benefit. Add a freshness signal like the year.
Formula: [What you covered] + [What the reader gets] + [Freshness]
Example: “8 steps to write blog posts that rank on Google. Keyword research, SERP analysis, structure, and AI formatting. Updated March 2026.”
25% of top-ranking pages have no custom meta description. Google auto-generates one that is almost always worse. Write your own. Check it with our meta tag analyzer.
URL Slug
Keep your URL short. Include the primary keyword. Remove stop words. Use hyphens.
- Good:
/blog/how-to-write-seo-blog-posts - Bad:
/blog/2026/03/how-to-write-seo-friendly-blog-posts-that-rank-on-google-in-2026
Image Optimization
Add at least 1 image per 500 words. Every image needs:
- Descriptive alt text (under 125 characters, include keyword when natural)
- Compressed file size (WebP format, under 200KB)
- Descriptive file name:
seo-blog-writing-process.pngnotIMG_4521.png
Schema Markup
Add Article schema to every blog post. If you include an FAQ section, add FAQPage schema. Schema markup helps Google display rich results and helps AI crawlers interpret your content structure. Use our schema markup generator to create valid JSON-LD.
Run your completed post through our SEO audit tool to catch anything you missed. The tool checks title tags, meta descriptions, headers, links, and images in seconds.
Why this step matters: On-page optimization is where most writers stop short. A perfectly written post with a missing meta description, bloated images, and no internal links will underperform a mediocre post that nails these elements. The technical details are not glamorous. They are the difference between page 1 and page 5.
Step 8: Format for AI Search and Publish
In 2026, ranking on Google is not enough. AI Overviews appear on 48% of Google searches. ChatGPT has over 900 million weekly active users. Your blog post needs to rank in traditional search AND get cited by AI platforms.
Write Extractable Answer Blocks
AI systems pull passages of 40 to 60 words from web content. Under each H2 heading, write a self-contained answer in the first 1 to 2 sentences. State the answer directly. Follow with supporting detail.
Not extractable: “There are many factors that go into writing content that performs well in search results.”
Extractable: “SEO blog posts rank by matching search intent, targeting a specific keyword, and structuring content with clear headers and internal links. Posts that follow this formula rank 3x more often than unstructured content.”
Include Statistics with Named Sources
Content with specific, sourced statistics earns 33% more visibility in AI search platforms. Every major section should include at least 1 data point with a named source. “According to Ahrefs” is verifiable. “Studies show” is not.
Verify AI Crawler Access
Before publishing, confirm your robots.txt file allows Googlebot, OAI-SearchBot (ChatGPT), and PerplexityBot to crawl your content. Blocking these crawlers means your post will never appear in AI-generated answers.
Publish and Submit
After publishing, submit the URL to Google Search Console for indexing. Google typically crawls submitted URLs within 1 to 7 days. Share the post on 2 to 3 channels (email, LinkedIn, a relevant community) to generate initial traffic signals.
Why this step matters: AI search is the fastest-growing discovery channel in 2026. AI referral traffic converts at 4.4x the rate of traditional organic search. Formatting your content for AI citation costs zero extra time if you follow the BLUF pattern in every section. Ignoring it means leaving an entire traffic channel on the table.
Your SEO team. $99/month. Stacc writes, optimizes, and publishes 30 blog posts per month for your business. Every post follows this 8-step process on autopilot. Start for $1 →
Results: What to Expect
SEO blog posts are not paid ads. They do not generate traffic overnight. But they compound over time in a way paid ads never will.
After following this 8-step process, expect:
- Week 1 to 4: Google indexes your post. It may appear on page 3 to 5 for competitive keywords. Long-tail variations may surface earlier.
- Month 2 to 3: Rankings climb as Google evaluates engagement signals. Click-through rate, time on page, and bounce rate all influence position.
- Month 6 to 12: The post reaches its peak ranking position. Traffic compounds month over month. Each post generates 60% more traffic after month 6 than it did in its first 6 months.
The key is consistency. Companies that publish 16 or more blog posts per month get 4.5x more leads than those publishing 0 to 4. One post will not transform your business. 30 posts following this process will.
Troubleshooting
Problem: The post ranks on page 2 but will not break into page 1.
Check 3 things. First, compare your content depth to the top 3 results. If they cover subtopics you skip, add those sections. Second, check your internal links. Pages with fewer than 3 internal links pointing to them struggle to rank. Add links from older posts. Third, verify your title tag and meta description. Low CTR at positions 8 to 12 keeps pages stuck on page 2.
Problem: Traffic dropped after 6 months.
Content decay is real. Check if competitors published fresher versions. Update your statistics with 2026 data. Add new sections covering subtopics that emerged since you published. Refresh the “Updated” date. Resubmit in Search Console.
Problem: The post ranks for keywords you did not target.
This is often a good sign. It means Google sees your content as relevant to a broader topic. Check Search Console for these keywords. If they have volume, create dedicated posts targeting them and link back to the original. You just discovered content gap opportunities.
FAQ
How long should an SEO blog post be?
There is no magic word count. Match the depth of top-ranking content for your keyword. The average page-1 result is 1,447 words. Positions 1 through 3 average 2,100 to 2,500 words. Write enough to cover the topic fully. Do not pad content with filler to hit a number. A thorough 2,000-word post outranks a padded 4,000-word post every time.
How many keywords should I target per blog post?
Target 1 primary keyword and 2 to 3 secondary keywords. The primary keyword goes in the title, URL, first 100 words, at least 1 H2, and the meta description. Secondary keywords appear naturally in the body and other headings. Targeting 10 keywords on 1 page dilutes your signal and confuses Google about what the page covers.
How long does it take for a blog post to rank?
Most blog posts take 3 to 6 months to reach their peak ranking. Low-competition long-tail keywords can rank within 30 to 60 days. Competitive head terms take 6 to 12 months or longer. The timeline depends on your domain authority, the keyword difficulty, and how consistently you publish supporting content.
Do I need backlinks to rank blog posts?
Backlinks help, especially for competitive keywords. The number 1 result on Google averages 3.8x more backlinks than positions 2 through 10. But for low-competition keywords, a well-optimized post with strong internal links can rank without any external backlinks. Focus on creating content worth linking to. Original data, definitive guides, and free tools attract links naturally.
Can AI write my blog posts for me?
AI can generate drafts and outlines. It cannot replace the research, intent matching, and editing that make posts rank. Google does not penalize AI content. It penalizes unhelpful content. An unedited AI draft reads like every other unedited AI draft on page 1. The posts that rank are the ones where a human added original data, specific examples, and an editorial voice. Use AI as a drafting partner. Do the thinking yourself.
How often should I publish blog posts?
Publish at least 4 posts per month for steady growth. Companies publishing 16 or more posts per month see 4.5x more leads. The compounding effect of consistent publishing builds topical authority faster than sporadic bursts. 4 quality posts per week for 12 months beats 48 posts in month 1 followed by silence.
The 8 steps in this guide work for every blog post. Choose a keyword. Study the SERP. Build an outline. Write a strong title. Hook the reader with PASBA. Structure the body for scanners. Optimize every on-page element. Format for AI search.
The businesses ranking on page 1 in 2026 are not the ones with the best writers. They are the ones with the best process. Now you have it.
Skip the process. Get the results. Stacc runs this exact 8-step system for your business. 30 blog posts per month, fully optimized, published automatically. Start for $1 →
Related Tools & Resources
Free SEO Tools:
Best Lists:

Written by
Siddharth GangalSiddharth is the founder of theStacc and Arka360, and a graduate of IIT Mandi. He spent years watching great businesses lose organic traffic to competitors who simply published more. So he built a system to fix that. He writes about SEO, content at scale, and the tactics that actually move rankings.
30 SEO blog articles published every month
Keyword-optimized, scheduled, and live on your site. Automatically.
30-day trial · Cancel anytime
theStacc
Stop writing SEO content manually
30 blog articles, 30 GBP posts, and social media content. Published every month. Automatically.
Start Your $1 Trial$1 for 3 days · Cancel anytime