Build an MCP Server for Marketing in 7 Steps
Learn how to build an MCP server for marketing. Connect your ad platforms, CRM, and analytics to AI assistants like Claude in 7 clear steps.
Stacc Editorial • 2026-04-04 • SEO Tools
In This Article
Marketing teams drown in disconnected data. Google Ads sits in one tab. HubSpot lives in another. Google Analytics runs in a third. Every question about campaign performance means switching between 4 or 5 tools, exporting CSVs, and stitching numbers together by hand.
That manual process costs 5 to 10 hours per week for the average marketing analyst. Over a full year, that is more than 300 hours lost to tab-switching and spreadsheet wrangling.
This guide shows you how to build an MCP server for marketing. You will connect your ad platforms, CRM data, and analytics tools to AI assistants like Claude or ChatGPT through one structured protocol.
We publish 3,500+ blogs across 70+ industries. We have seen firsthand how protocol-driven automation changes marketing workflows. The Model Context Protocol is the next step in that direction.
Here is what you will learn:
- What MCP is and why it matters for marketing teams
- How to plan your marketing data sources before writing code
- How to set up a TypeScript project and install the MCP SDK
- How to define marketing-specific tools and resources
- How to connect your server to Claude Desktop or Cursor
- How to test, secure, and deploy for production use
What Is an MCP Server (and Why Should Marketers Care)?
The Model Context Protocol (MCP) is an open standard created by Anthropic in November 2024. It gives AI assistants structured access to external tools and data sources. Think of MCP as a USB port for AI. One standard protocol connects any data source to any AI client.
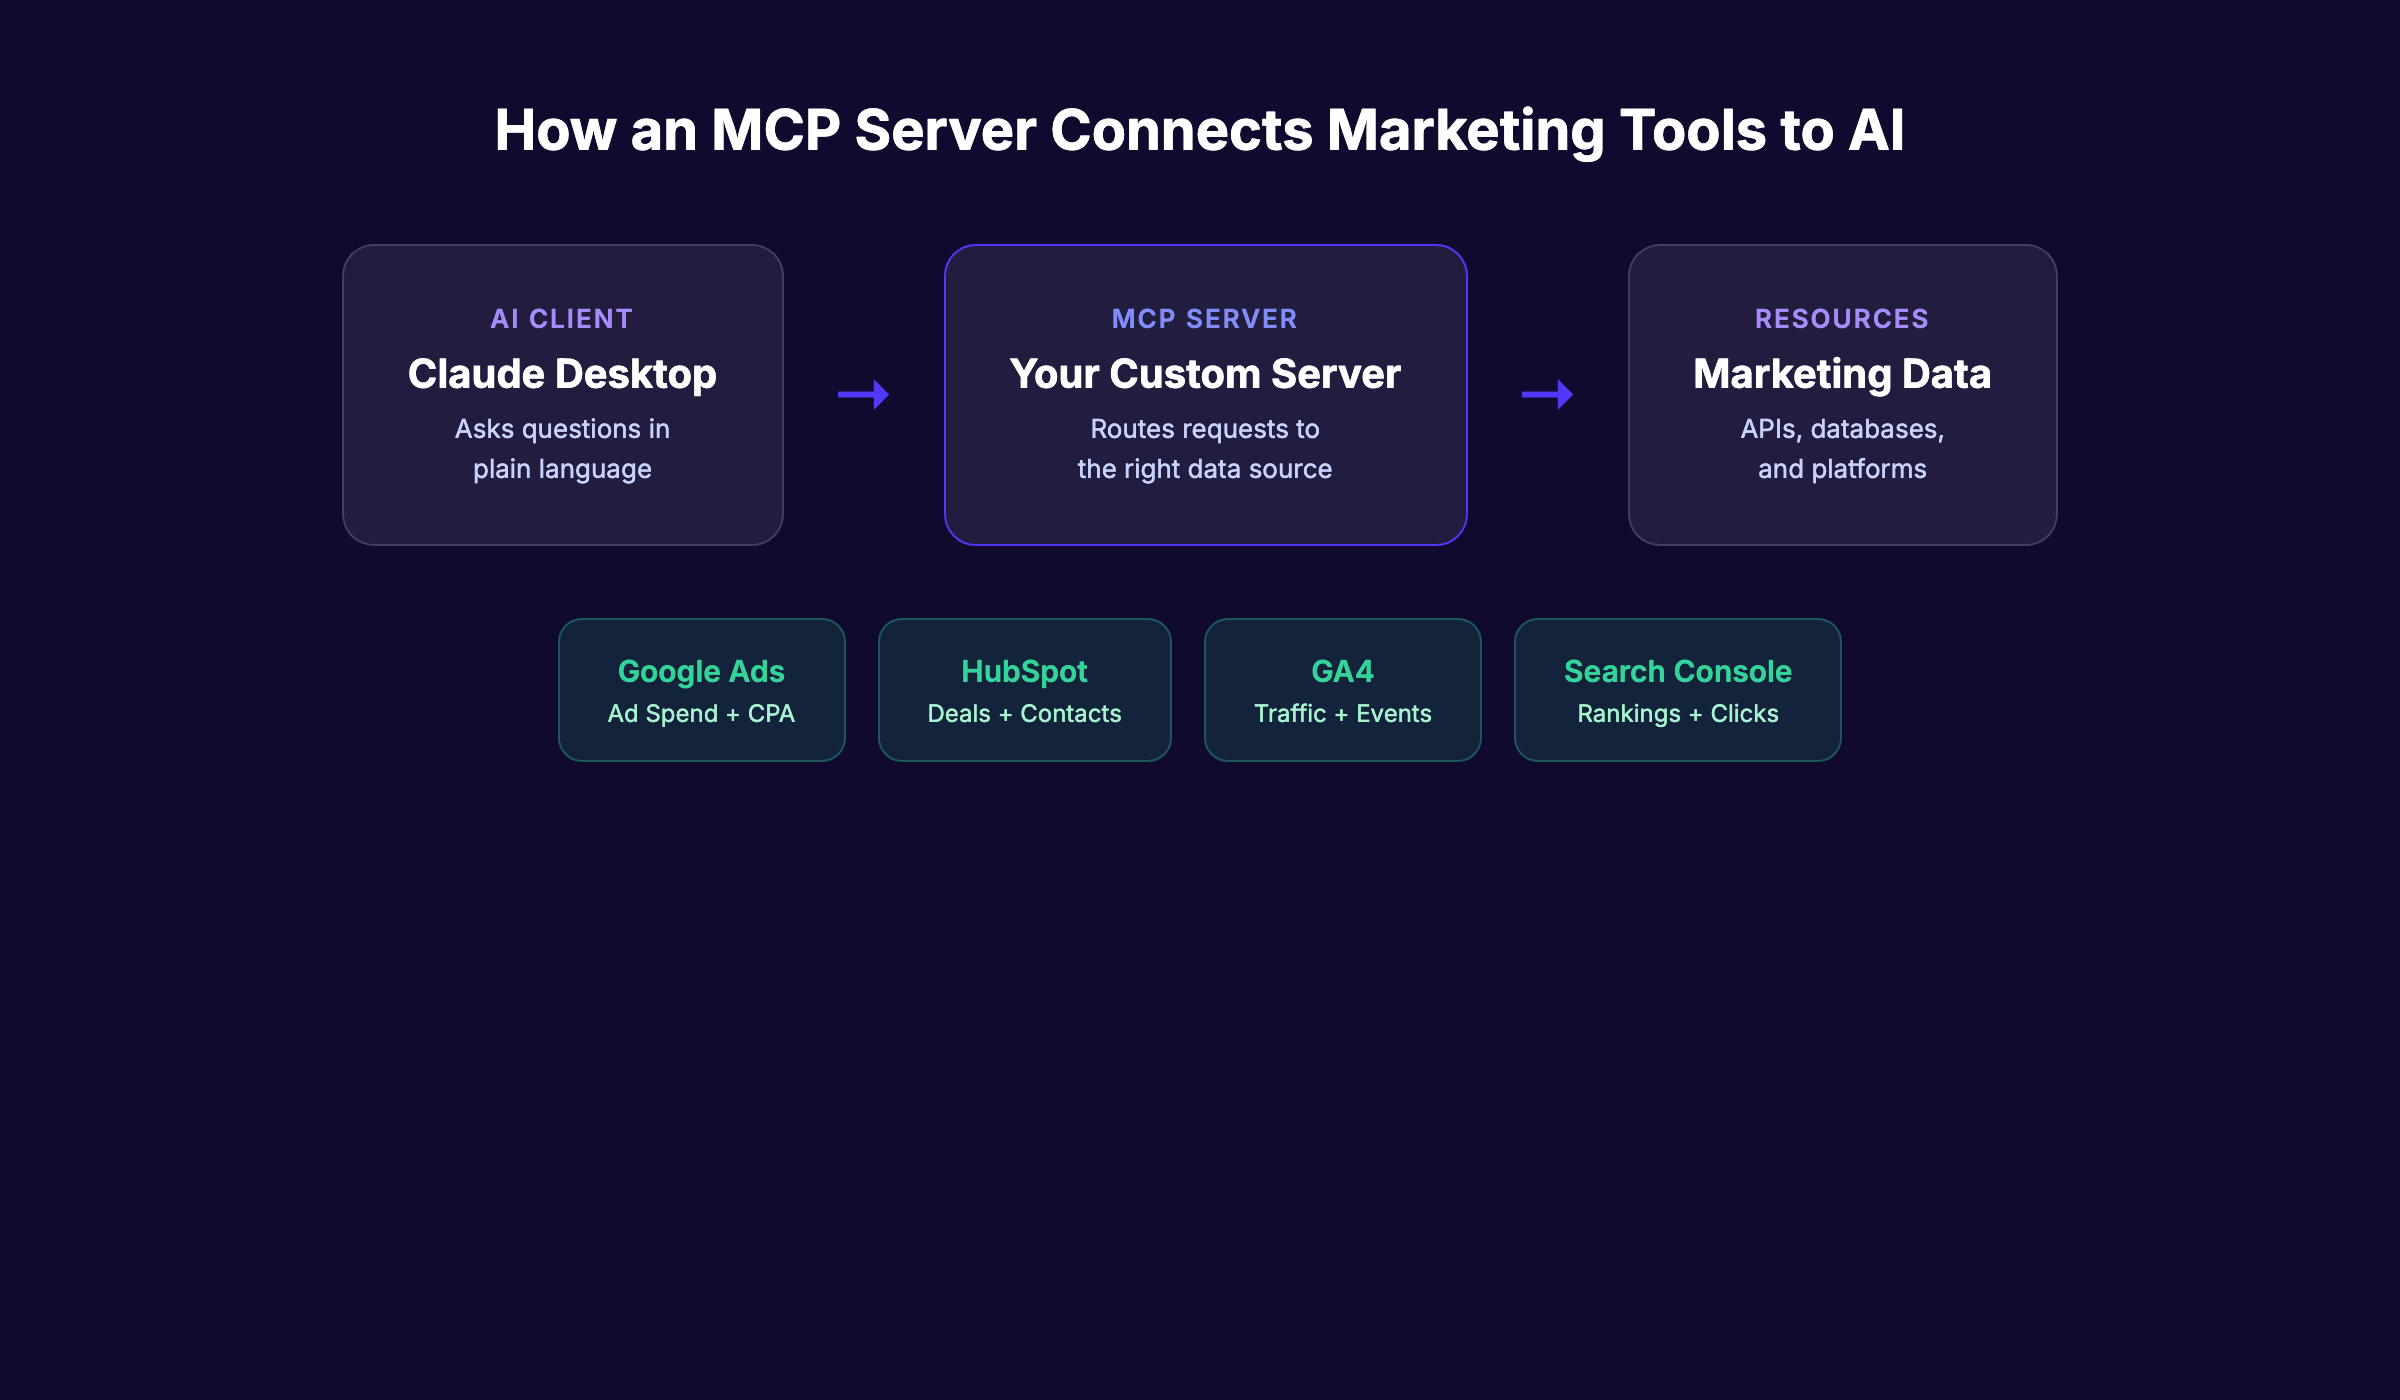
An MCP server is the connector that sits between your marketing tools and your AI assistant. It translates API calls from Google Ads, HubSpot, or GA4 into a format that Claude or ChatGPT can read and act on.
| Component | Role | Example |
|---|---|---|
| MCP Client | The AI assistant asking questions | Claude Desktop, Cursor, ChatGPT |
| MCP Server | The connector translating requests | Your custom server |
| Resource | The data source being accessed | Google Ads API, HubSpot CRM |
By early 2026, more than 10,000 MCP servers exist across every category. The MCP SDK has reached 97 million monthly downloads. OpenAI, Google, Microsoft, and AWS all support the protocol. Anthropic donated MCP to the Linux Foundation in December 2025, making it a true industry standard.
For marketers, this means one thing. You can ask your AI assistant plain-language questions like “What is our Google Ads CPA this week?” and get real answers from live data. No dashboards. No exports. No SQL.
An Improvado study found that marketing teams using MCP servers report 80% time savings on reporting workflows. That matches what we see across the industry. Teams that automate their AI marketing workflows move faster than those still toggling between tabs.
The exception: not every team needs a custom MCP server. If you only use HubSpot, their official MCP server already exists. Custom builds make sense when you need to combine multiple data sources or add business logic that off-the-shelf servers do not support.
What You Need Before You Build an MCP Server for Marketing
Time required: 2 to 4 hours for a basic server. 1 to 2 days for production-ready deployment.
Difficulty: Intermediate. You need basic TypeScript or JavaScript knowledge.
What you will need:
- Node.js 18+ installed on your machine
- A code editor (VS Code or Cursor recommended)
- TypeScript basics (variables, functions, async/await)
- API keys for your marketing tools (Google Ads, HubSpot, GA4, or similar)
- Claude Desktop, Cursor, or another MCP-compatible client
- A terminal or command line interface
You do not need to be a senior engineer. If you can write a basic API call in JavaScript, you can build an MCP server. The SDK handles most of the heavy lifting.
One prerequisite that trips people up: API access. Google Ads requires a developer token. HubSpot needs a private app token. GA4 uses a service account. Get these credentials set up before you start coding. Each platform has its own approval process, and some take 24 to 48 hours.
Skip the build entirely. Stacc handles content publishing, SEO optimization, and reporting on autopilot. No code required. Start for $1 →
Step 1: Choose Your Marketing Data Sources
Before writing a single line of code, map out exactly which marketing tools you want to connect. This step determines the scope of your MCP server and prevents scope creep later.
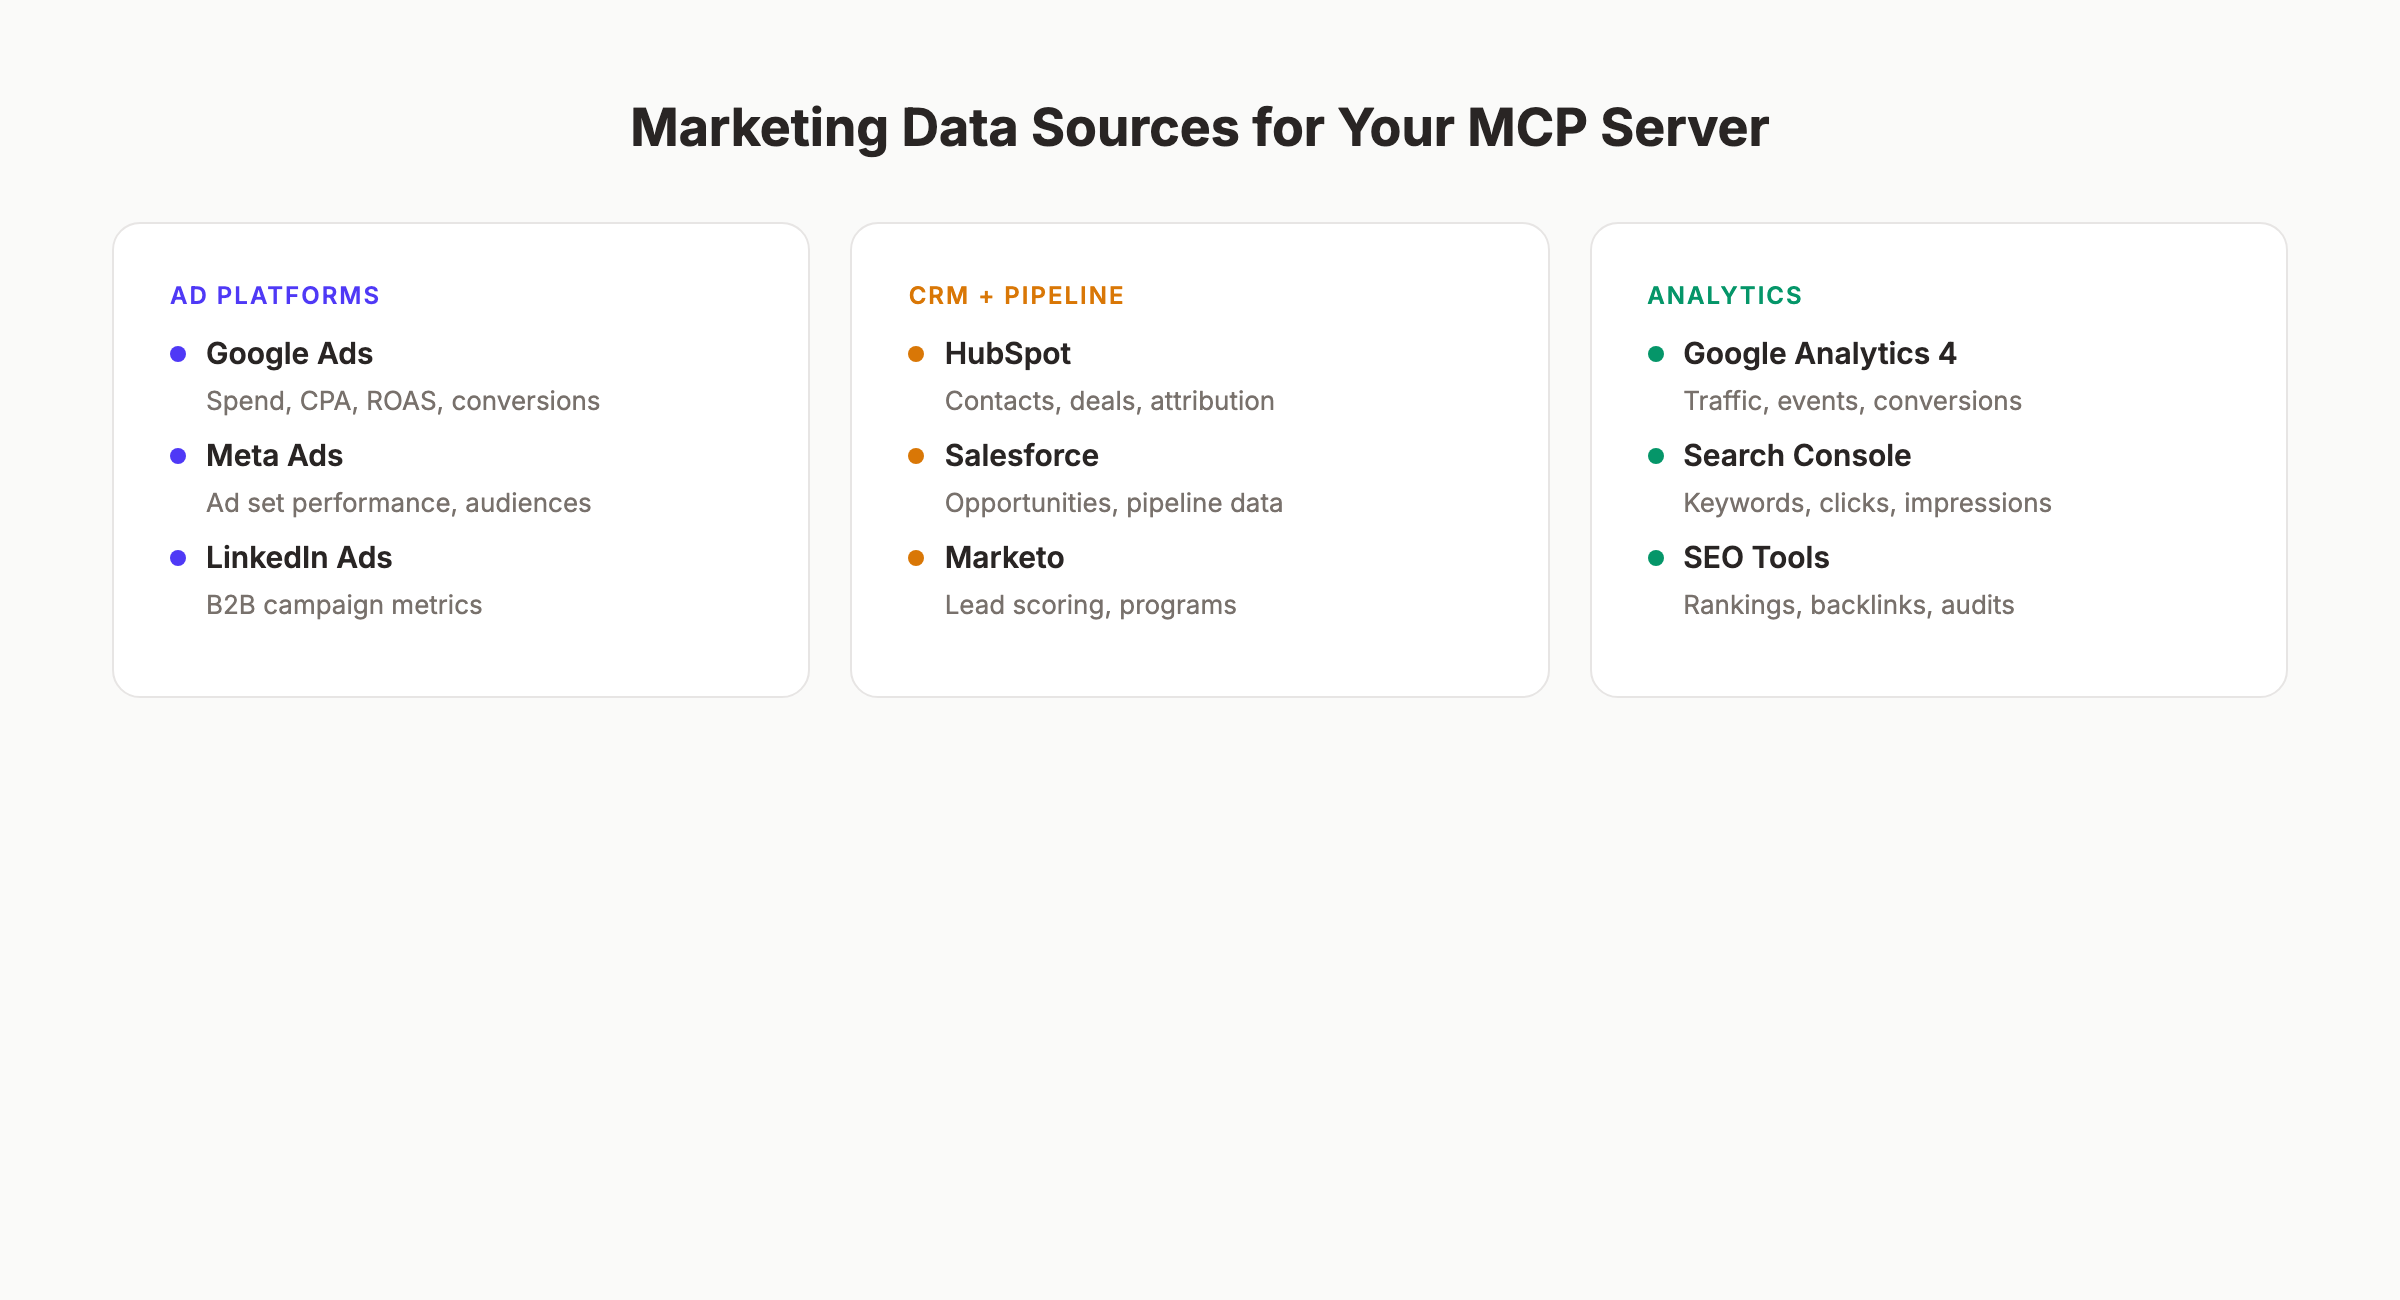
Start with the tools your team queries most often. For most marketing teams, that list includes 3 categories.
Ad platforms:
- Google Ads (campaign spend, CPA, ROAS, conversion data)
- Meta Ads (ad set performance, audience insights)
- LinkedIn Ads (B2B campaign metrics)
CRM and pipeline:
- HubSpot (contacts, deals, lifecycle stages, attribution)
- Salesforce (opportunities, pipeline data)
Analytics:
- Google Analytics 4 (traffic, events, conversions)
- Google Search Console (keyword rankings, click data)
- SEO reporting tools (position tracking, backlink data)
| Data Source | MCP Tool Type | Example Query |
|---|---|---|
| Google Ads | Tool (callable function) | “What is our CPA for the last 7 days?” |
| HubSpot CRM | Tool + Resource | ”Show me all deals closing this month” |
| GA4 | Tool | ”How much organic traffic did we get last week?” |
| Search Console | Resource (browsable) | “List our top 20 keywords by clicks” |
The distinction matters. MCP supports 2 types of integrations. Tools are functions the AI can call with parameters. Resources are data the AI can browse through URI patterns. Ad spend queries work best as tools. Keyword ranking lists work best as resources.
Pick 2 to 3 data sources for your first build. You can always add more later. Trying to connect everything at once is the number one reason custom MCP projects stall.
For each source, document the API endpoint, authentication method, and the specific metrics you want to expose. This becomes your build blueprint.
Step 2: Set Up Your Development Environment
Open your terminal and create a new project directory. The MCP TypeScript SDK is the fastest path to a working server.
Run these commands:
mkdir marketing-mcp-server
cd marketing-mcp-server
npm init -y
npm install @modelcontextprotocol/sdk zod express
npm install -D typescript @types/node @types/express
npx tsc --init
This installs 3 core dependencies:
- @modelcontextprotocol/sdk — The official MCP SDK from Anthropic
- zod — Schema validation for tool inputs (required by MCP)
- express — HTTP server for production deployment
Update your tsconfig.json with these settings:
{
  "compilerOptions": {
    "target": "ES2022",
    "module": "Node16",
    "moduleResolution": "Node16",
    "outDir": "./dist",
    "strict": true,
    "esModuleInterop": true
  }
}
Create your project structure:
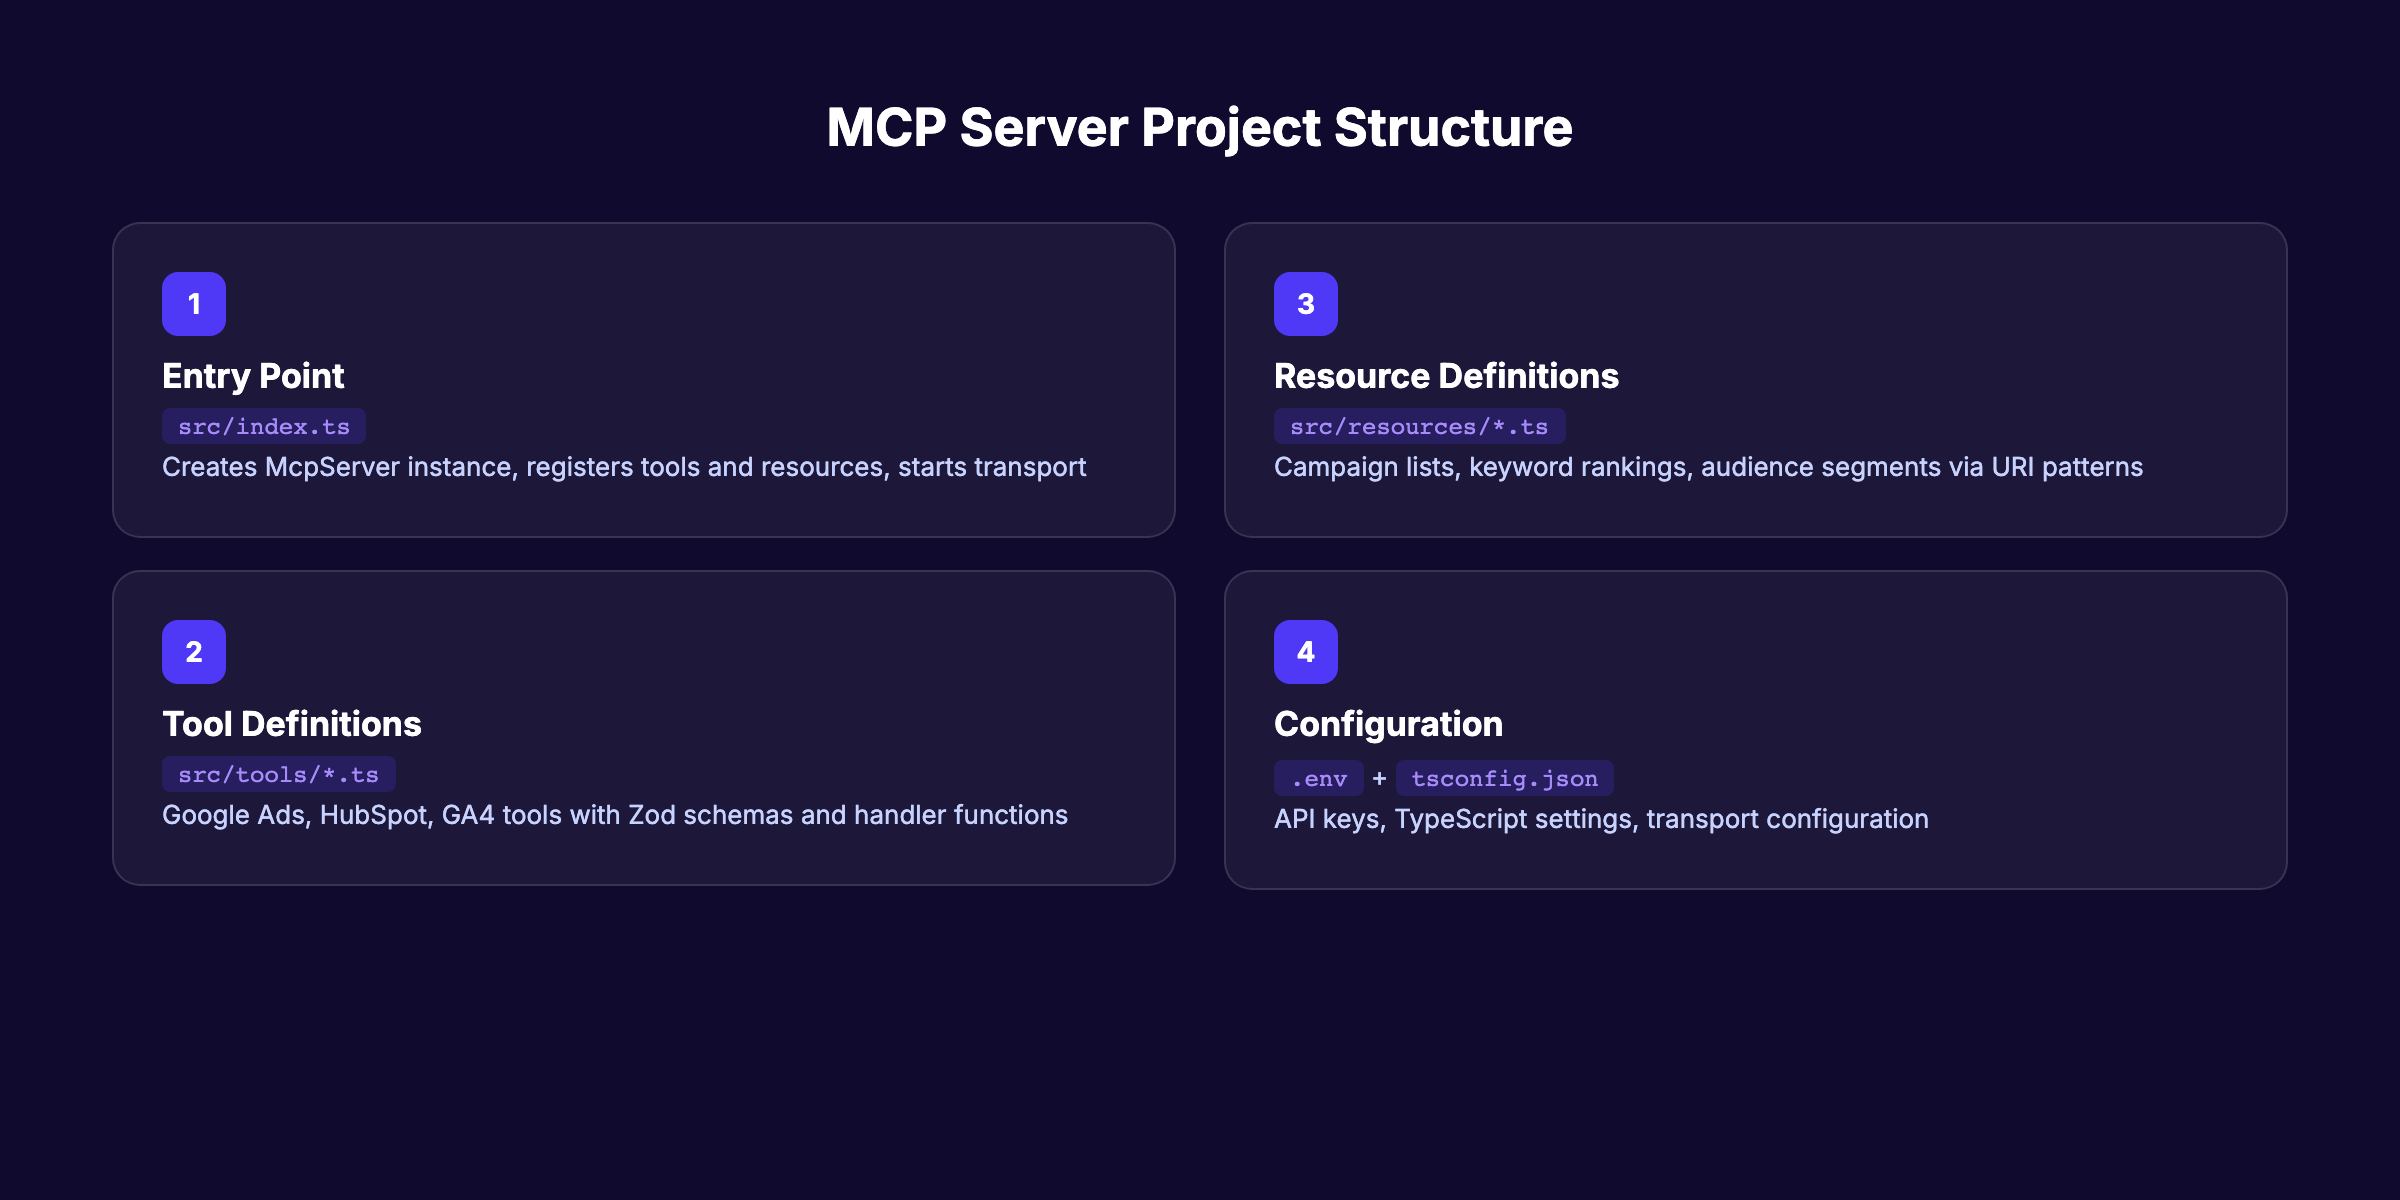
marketing-mcp-server/
├── src/
│   ├── index.ts          (server entry point)
│   ├── tools/            (marketing tool definitions)
│   │   ├── google-ads.ts
│   │   ├── hubspot.ts
│   │   └── ga4.ts
│   └── resources/        (browsable data resources)
│       └── keywords.ts
├── tsconfig.json
├── package.json
└── .env                  (API keys — never commit this)
Store your API keys in the .env file:
GOOGLE_ADS_TOKEN=your-developer-token
HUBSPOT_TOKEN=your-private-app-token
GA4_PROPERTY_ID=your-property-id
Why this step matters: A clean project structure makes debugging easier and lets you add new marketing integrations without rewriting existing code. Teams that skip this organization step end up with a tangled monolith by week 2.
Pro tip: Use Cursor as your editor. It has native MCP client support, so you can test your server without switching applications.
Step 3: Create the MCP Server Skeleton
Now build the core server. This is the foundation that every marketing tool and resource plugs into.
Create src/index.ts:
import { McpServer } from "@modelcontextprotocol/sdk/server/mcp.js";
import { StdioServerTransport } from "@modelcontextprotocol/sdk/server/stdio.js";

const server = new McpServer({
  name: "marketing-mcp-server",
  version: "1.0.0",
  capabilities: {
    tools: {},
    resources: {}
  }
});

// Tools and resources will be registered here

const transport = new StdioServerTransport();
await server.connect(transport);

console.error("Marketing MCP server running on stdio");
This skeleton does 3 things:
- Creates an MCP server instance with a name and version
- Declares that it supports both tools and resources
- Connects via stdio transport (for local development)
The McpServer class from the SDK handles all protocol negotiation. Your AI client sends a request, the SDK routes it to the right tool or resource, and returns the response. You never touch the protocol layer directly.
Key concept: tools vs. resources. Tools are actions the AI calls with specific inputs. “Get Google Ads spend for campaign X between date A and date B.” Resources are data the AI browses. “Show me all active campaigns.” The MCP specification treats them differently, and your server needs to register them separately.
The skeleton above uses stdio transport. This works for local testing with Claude Desktop. For production, you will switch to HTTP transport with Express in Step 6.
Why this step matters: Every MCP server starts with this exact pattern. The skeleton is deceptively simple, but it handles connection lifecycle, error propagation, and session management automatically. Skipping the SDK and building from raw HTTP calls adds weeks of debugging.
If you are building autonomous SEO workflows, this same server pattern applies. The MCP protocol works identically for SEO data, ad data, or CRM data. Only the tool definitions change.
Want automated SEO content without writing code? Stacc publishes 30+ articles per month and handles the entire pipeline. Start for $1 →
Step 4: Define Marketing Tools With Zod Schemas
Tools are the core of your marketing MCP server. Each tool is a function your AI assistant can call. Every tool needs 3 things: a name, a Zod input schema, and a handler function.
Here is a Google Ads spend tool:
import { z } from "zod";

server.tool(
  "get-google-ads-spend",
  "Get Google Ads spend and conversions for a date range",
  {
    campaignId: z.string().describe("Google Ads campaign ID"),
    startDate: z.string().describe("Start date in YYYY-MM-DD format"),
    endDate: z.string().describe("End date in YYYY-MM-DD format")
  },
  async ({ campaignId, startDate, endDate }) => {
    const data = await fetchGoogleAdsData(campaignId, startDate, endDate);
    return {
      content: [{
        type: "text",
        text: JSON.stringify(data, null, 2)
      }]
    };
  }
);
The Zod schema does 2 things. It validates inputs so the AI cannot pass malformed data. It also describes each parameter so the AI knows what to send. Good descriptions are critical. The AI reads them to decide when and how to use each tool.
Here is a HubSpot deals tool:
server.tool(
  "get-hubspot-deals",
  "Get HubSpot deals by stage and date range for pipeline reporting",
  {
    stage: z.enum(["qualified", "proposal", "negotiation", "closed-won", "closed-lost"])
      .describe("Deal pipeline stage"),
    minAmount: z.number().optional().describe("Minimum deal amount in USD")
  },
  async ({ stage, minAmount }) => {
    const deals = await fetchHubSpotDeals(stage, minAmount);
    return {
      content: [{
        type: "text",
        text: JSON.stringify(deals, null, 2)
      }]
    };
  }
);
And a GA4 traffic tool:
server.tool(
  "get-ga4-traffic",
  "Get Google Analytics 4 traffic data by source and date range",
  {
    startDate: z.string().describe("Start date YYYY-MM-DD"),
    endDate: z.string().describe("End date YYYY-MM-DD"),
    dimension: z.enum(["source", "medium", "campaign", "page"])
      .describe("Traffic dimension to break down by")
  },
  async ({ startDate, endDate, dimension }) => {
    const traffic = await fetchGA4Data(startDate, endDate, dimension);
    return {
      content: [{
        type: "text",
        text: JSON.stringify(traffic, null, 2)
      }]
    };
  }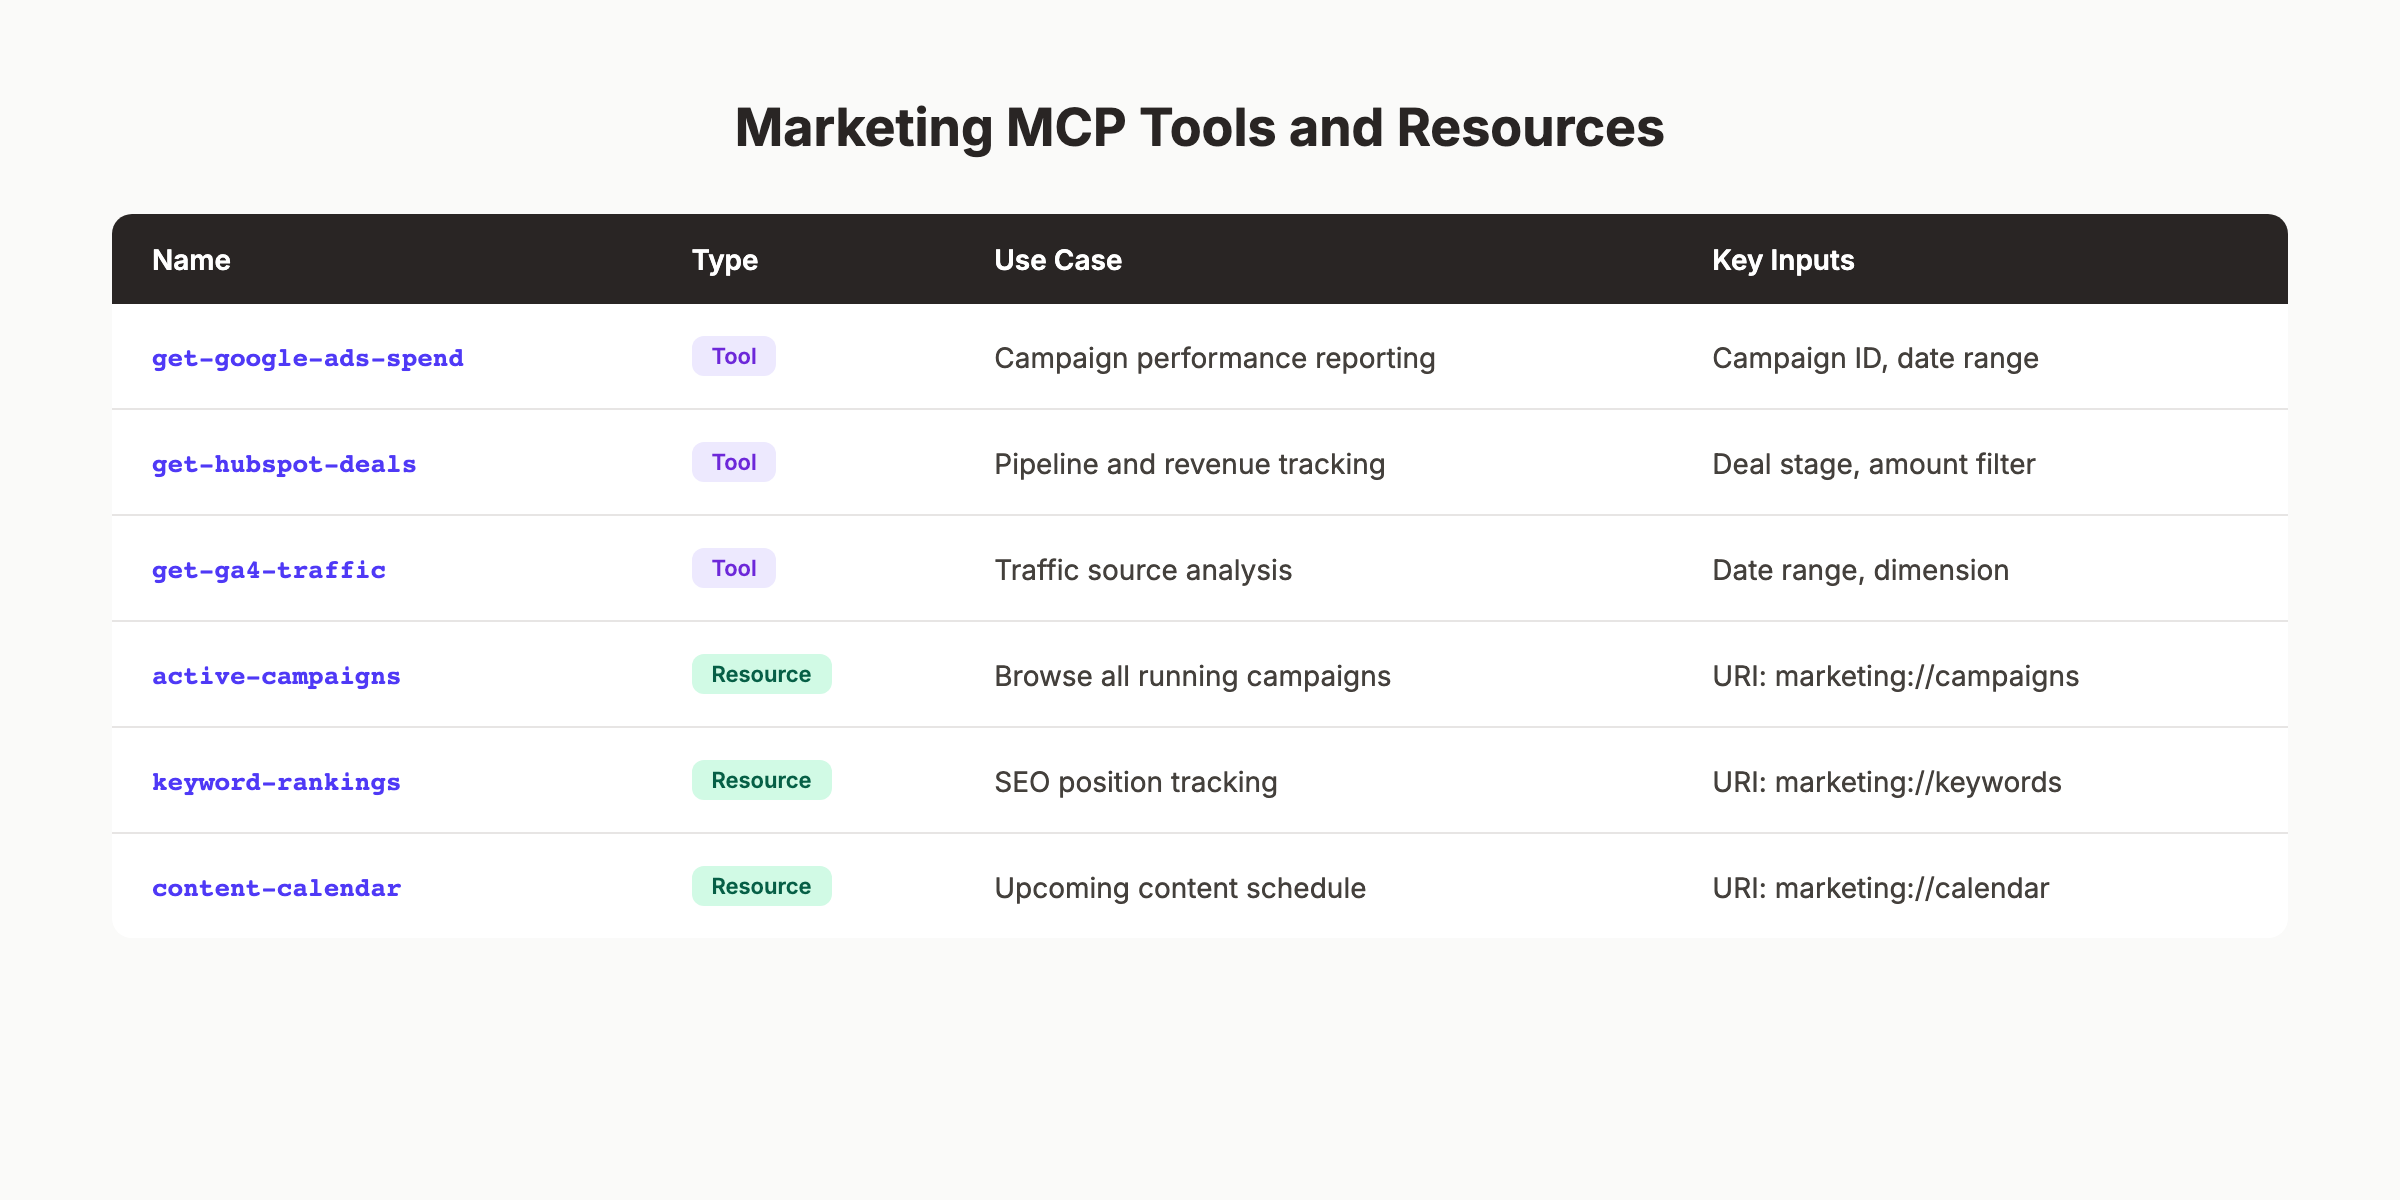
);| Tool Name | Use Case | Key Input |
|---|---|---|
| get-google-ads-spend | Campaign performance reporting | Campaign ID + date range |
| get-hubspot-deals | Pipeline and revenue tracking | Deal stage + amount filter |
| get-ga4-traffic | Organic and paid traffic analysis | Date range + dimension |
| get-search-rankings | SEO keyword position tracking | Domain + keyword list |
Why this step matters: Tool descriptions directly affect how well your AI assistant uses the server. Vague descriptions like “get data” cause the AI to misuse tools. Specific descriptions like “Get Google Ads spend and conversions for a date range” tell the AI exactly when this tool applies.
Write each tool description as if you were explaining it to a new team member. Be specific about what data comes back and what inputs are required. Teams that invest 10 extra minutes in descriptions save hours of debugging later.
For content-focused tools, consider adding one that pulls SEO statistics or keyword rankings. This lets your AI assistant answer questions like “Which blog posts drove the most organic traffic this month?”
Step 5: Expose Marketing Resources via URIs
Resources complement tools. While tools are functions the AI calls with parameters, resources are structured data the AI can browse. Resources use URI patterns and work well for reference data that does not change frequently.
Register a campaigns resource:
server.resource(
  "active-campaigns",
  "marketing://campaigns/active",
  "List of all active marketing campaigns across platforms",
  async () => {
    const campaigns = await getAllActiveCampaigns();
    return {
      contents: [{
        uri: "marketing://campaigns/active",
        text: JSON.stringify(campaigns, null, 2),
        mimeType: "application/json"
      }]
    };
  }
);
You can also create dynamic resources with URI templates:
server.resource(
  "campaign-detail",
  "marketing://campaigns/{campaignId}",
  "Detailed metrics for a specific campaign",
  async (uri) => {
    const campaignId = extractIdFromUri(uri);
    const detail = await getCampaignDetail(campaignId);
    return {
      contents: [{
        uri: uri.href,
        text: JSON.stringify(detail, null, 2),
        mimeType: "application/json"
      }]
    };
  }
);
Good resource candidates for marketing teams:
- Active campaigns list — All running campaigns across Google, Meta, and LinkedIn
- Keyword rankings — Current SEO keyword positions for tracked terms
- Content calendar — Upcoming blog posts and their target keywords
- Audience segments — HubSpot or CRM audience definitions
- Budget allocations — Monthly spend distribution by channel
Resources shine when the AI needs context before making a tool call. If someone asks “Which campaign should I pause?”, the AI first browses the active campaigns resource, then calls the spend tool for specific performance data.
Why this step matters: Resources give your AI assistant context without requiring exact query parameters. Without resources, the AI must guess campaign IDs and date ranges. With resources, it browses available data first and makes smarter tool calls.
This pattern mirrors how effective content clusters work in SEO. Resources provide the hub of reference data. Tools provide the spoke-level detail.
Step 6: Add Transport and Connect to an AI Client
Your server needs a transport layer to communicate with AI clients. MCP supports 2 transport types: stdio for local development and HTTP with SSE (Server-Sent Events) for production.
For local testing with Claude Desktop (stdio):
Your skeleton already includes stdio transport. To connect it to Claude Desktop, add this to your Claude Desktop config file:
On macOS: ~/Library/Application Support/Claude/claude_desktop_config.json
{
  "mcpServers": {
    "marketing": {
      "command": "npx",
      "args": ["tsx", "/path/to/marketing-mcp-server/src/index.ts"],
      "env": {
        "GOOGLE_ADS_TOKEN": "your-token",
        "HUBSPOT_TOKEN": "your-token"
      }
    }
  }
}
Restart Claude Desktop. You should see a hammer icon indicating your marketing tools are available.
For production deployment (HTTP + SSE):
Replace the stdio transport with an Express server:
import express from "express";
import { SSEServerTransport } from "@modelcontextprotocol/sdk/server/sse.js";

const app = express();

app.get("/sse", async (req, res) => {
  const transport = new SSEServerTransport("/messages", res);
  await server.connect(transport);
});

app.post("/messages", async (req, res) => {
  // Handle incoming messages
});

app.listen(3001, () => {
  console.log("Marketing MCP server running on port 3001");
});| Transport | Best For | Pros | Cons |
|---|---|---|---|
| stdio | Local testing, single user | Simple setup, no network config | Single user only |
| HTTP + SSE | Production, team access | Multi-user, remote access | Requires hosting, auth setup |
Why this step matters: Choosing the wrong transport wastes time. Start with stdio for development. Switch to HTTP only when you need team-wide access or remote deployment. Many teams over-engineer the transport layer before validating that their tools work correctly.
Pro tip: Test every tool individually before connecting to an AI client. Call each handler function directly with sample inputs. Fix data formatting issues at this stage. Debugging through the AI client is 5 times slower than direct function testing.
If your marketing team also needs automated content publishing, consider running your MCP server alongside a content pipeline. The server handles data queries while a service like Stacc handles content creation and publishing.
Automate your entire content pipeline. Stacc publishes SEO-optimized blog posts, GBP updates, and social media posts every month. Start for $1 →
Step 7: Test, Harden, and Deploy
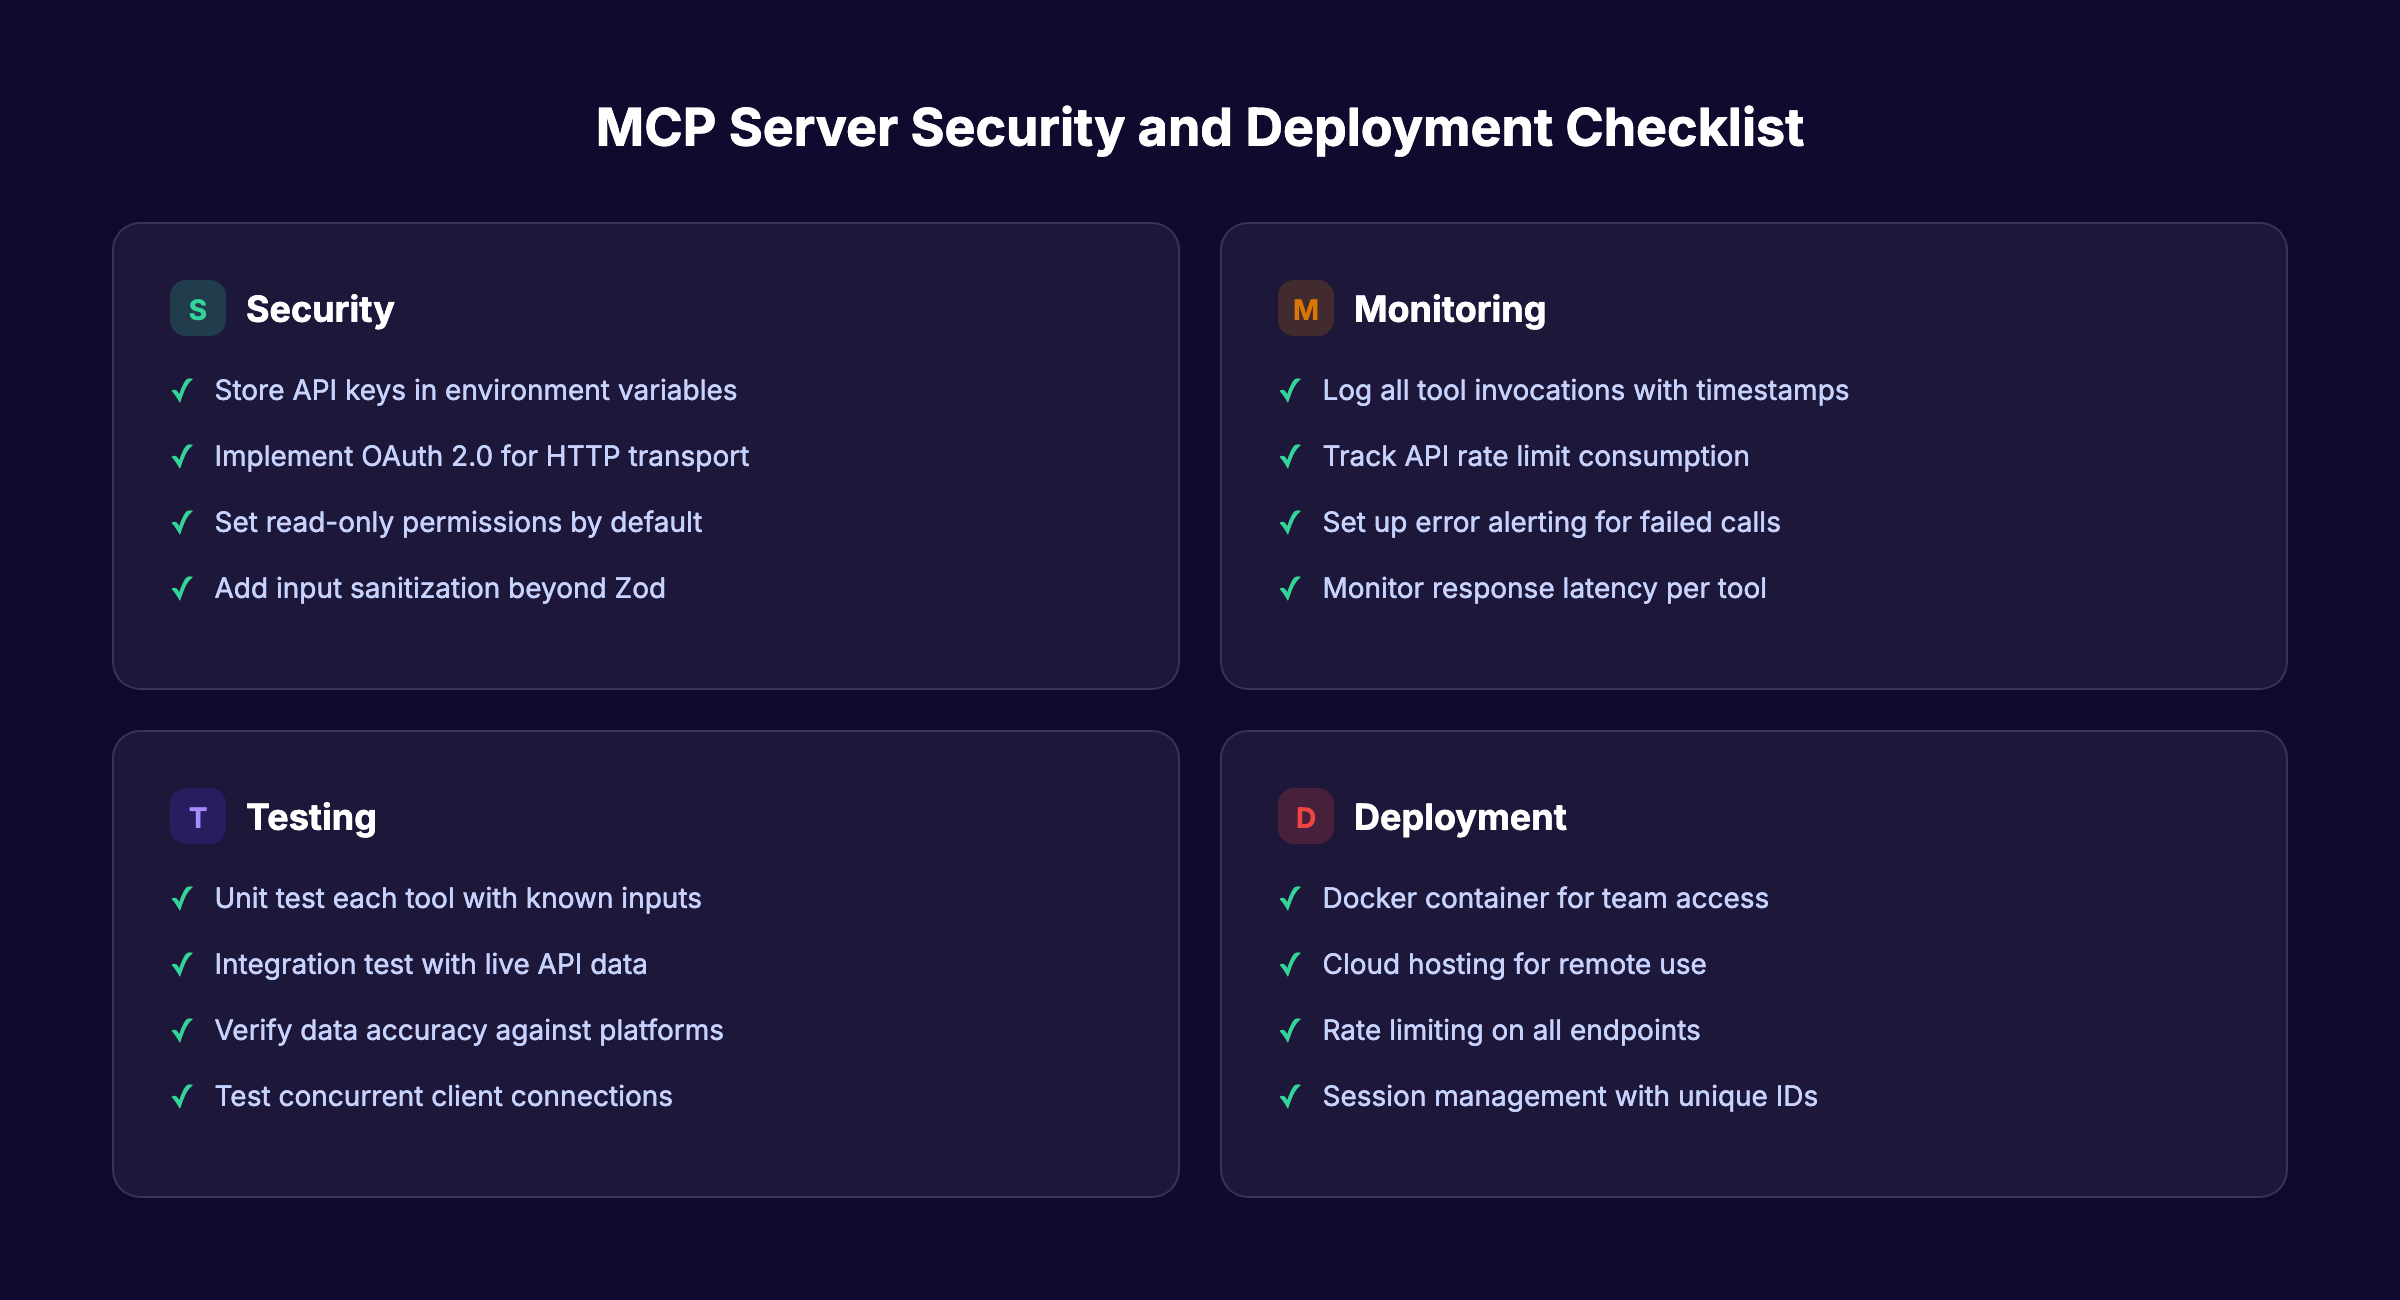
Testing an MCP server requires 3 layers: unit tests for individual tools, integration tests for data accuracy, and security hardening for production.
Unit testing each tool:
Call each tool handler with known inputs and verify the output format:
// Test Google Ads tool
const result = await getGoogleAdsSpend({
  campaignId: "123456789",
  startDate: "2026-03-01",
  endDate: "2026-03-31"
});
assert(result.content[0].text.includes("spend"));
Integration testing with Claude Desktop:
Open Claude Desktop and test real queries:
- “What was our Google Ads spend last month?”
- “Show me all deals in the proposal stage”
- “Which landing pages drove the most organic traffic?”
Verify that responses match the actual data in your marketing platforms. Off-by-one date errors and timezone mismatches are the most common bugs.
Security hardening checklist:
- Store all API keys in environment variables, never in code
- Add rate limiting to prevent excessive API calls
- Implement OAuth 2.0 authentication for HTTP transport
- Log all tool invocations for audit trails
- Set read-only permissions where possible (do not let the AI modify campaign settings)
- Add input sanitization beyond Zod validation
Deployment options:
| Option | Cost | Complexity | Best For |
|---|---|---|---|
| Local machine | Free | Low | Solo marketer or developer |
| Docker container | Low | Medium | Small teams with shared access |
| Cloud (AWS/GCP) | $10-50/month | High | Enterprise deployment |
Why this step matters: An MCP server with production marketing data is a security surface. Read-only access prevents accidental campaign changes. Rate limiting prevents runaway API costs. Logging creates accountability for every query.
Gartner predicts that 40% of enterprise applications will include AI agents by end of 2026. Getting security right now prevents painful retrofits later.
Results: What to Expect
After completing these 7 steps, here is what your marketing team gains:
- Immediate: Ask plain-language questions about campaign performance and get live data in seconds
- Within 1 week: Reduce reporting time by 50% to 80% as your team adopts conversational data queries
- Within 1 month: Build custom analysis workflows that combine data across Google Ads, HubSpot, and GA4 in a single conversation
Realistic expectations matter. Your first MCP server will handle 3 to 5 data sources well. It will not replace your entire analytics stack. It will eliminate the repetitive tab-switching and CSV exports that consume hours every week.
The real compounding effect kicks in when you add more tools over time. Each new integration makes the AI assistant more useful. This mirrors the Content Compound Effect in SEO. Consistent, incremental additions build something far more valuable than the sum of individual parts.
Troubleshooting
Problem: Claude Desktop does not show the hammer icon after configuration.
Fix: Check your claude_desktop_config.json for syntax errors. Verify the file path to your server is absolute, not relative. Restart Claude Desktop completely (not just the conversation).
Problem: Tools return empty or malformed data. Fix: Test each API call independently with a tool like Postman or curl. Confirm your API tokens have the correct permissions. Google Ads requires a developer token with “Test Account” or “Basic Access” approval.
Problem: The AI calls the wrong tool for a query. Fix: Improve your tool descriptions. If the AI confuses “get-google-ads-spend” with “get-ga4-traffic,” the descriptions are too similar. Add specific use cases to each description string.
Problem: Server crashes under concurrent requests. Fix: Add session management with unique IDs for each client connection. The MCP SDK supports this natively. Also check your API rate limits. Google Ads allows 15,000 requests per day by default.
Frequently Asked Questions
Do I need to know TypeScript to build an MCP server for marketing?
TypeScript is the fastest path because the official MCP SDK is built for it. Python support exists through the FastMCP library, and it works well for teams already using Python. If your marketing team has Python skills from data analysis work, that is a valid alternative. The core concepts (tools, resources, transports) are identical in both languages.
How long does it take to build a marketing MCP server from scratch?
A basic server with 2 to 3 tools takes 2 to 4 hours for someone with intermediate JavaScript skills. A production-ready server with authentication, logging, and multiple data sources takes 1 to 2 full days. The API credential setup (especially Google Ads developer token approval) often takes longer than the actual coding.
Can I use existing MCP servers instead of building one?
Yes. HubSpot, Google Analytics, and Google Search Console all have official or well-maintained community MCP servers. Check PulseMCP or the MCP Market for existing options. Build custom only when you need to combine multiple sources, add business logic, or connect to platforms without existing servers.
Is an MCP server secure enough for production marketing data?
The protocol itself supports OAuth 2.0, TLS encryption, and scoped permissions. Security depends on your implementation. Use read-only API tokens where possible. Store credentials in environment variables. Add rate limiting and audit logging. The Zuplo MCP Report covers security best practices in detail.
What AI clients support MCP servers?
Claude Desktop, Cursor, VS Code (with GitHub Copilot), Windsurf, and several other IDE-based clients support MCP natively as of early 2026. OpenAI added MCP support in March 2025. The protocol is client-agnostic, so any application implementing the MCP client specification can connect to your server.
How does building an MCP server compare to using Zapier or Make?
Zapier and Make handle workflow automation (trigger X, then do Y). MCP servers handle conversational data access (ask a question, get an answer from live data). They solve different problems. Many teams use both. Zapier automates repetitive actions. MCP gives AI assistants real-time access to query and analyze marketing data on demand.
Start Building
You now have a complete blueprint to build an MCP server for marketing. The 7 steps take your team from disconnected data silos to conversational marketing intelligence driven by AI.
Start with Step 1. Pick your 2 most-queried data sources. Build a working prototype this week. Add more tools as your team discovers new use cases.
For the content and SEO side of marketing, Stacc handles publishing automatically. Pair an MCP server for data queries with automated content publishing, and your marketing engine runs on autopilot.
Written and published by Stacc. We publish 3,500+ articles per month across 70+ industries. All data verified against public sources as of March 2026.