How to Create an XML Sitemap in 7 Steps (2026)
Step-by-step guide to creating an XML sitemap. Covers manual creation, CMS tools, validation, and Google submission. Updated March 2026.
Siddharth Gangal • 2026-03-27 • SEO Tips
In This Article
Google cannot rank what it cannot find. And for 96% of web pages that get zero organic traffic, poor discoverability is a leading cause.
An XML sitemap is the fastest way to tell search engines exactly which pages exist on your site. It does not guarantee rankings. But it removes the most common barrier to getting indexed: Googlebot never finding your page in the first place.
Most site owners either skip sitemaps entirely or let a plugin generate one they never check. Both approaches leave problems undetected. Broken URLs, noindexed pages, and missing entries silently block crawling for months.
We have published 3,500+ blogs across 70+ industries. Every site we work with starts with a clean, validated XML sitemap. The result: faster indexing, fewer crawl errors, and a clear signal to Google about which pages matter.
Here is what you will learn:
- What an XML sitemap is and when you need one
- How to create one manually or with tools
- Which URLs to include (and which to exclude)
- How to validate and submit your sitemap to Google
- How to maintain it over time so it stays accurate
What Is an XML Sitemap?
An XML sitemap is a file that lists every URL you want search engines to crawl and index. It uses a standardized XML format defined by the sitemaps.org protocol.
Here is what a basic XML sitemap looks like:
<?xml version="1.0" encoding="UTF-8"?>
<urlset xmlns="http://www.sitemaps.org/schemas/sitemap/0.9">
  <url>
    <loc>https://example.com/</loc>
    <lastmod>2026-03-15</lastmod>
  </url>
  <url>
    <loc>https://example.com/blog/seo-guide</loc>
    <lastmod>2026-03-10</lastmod>
  </url>
</urlset>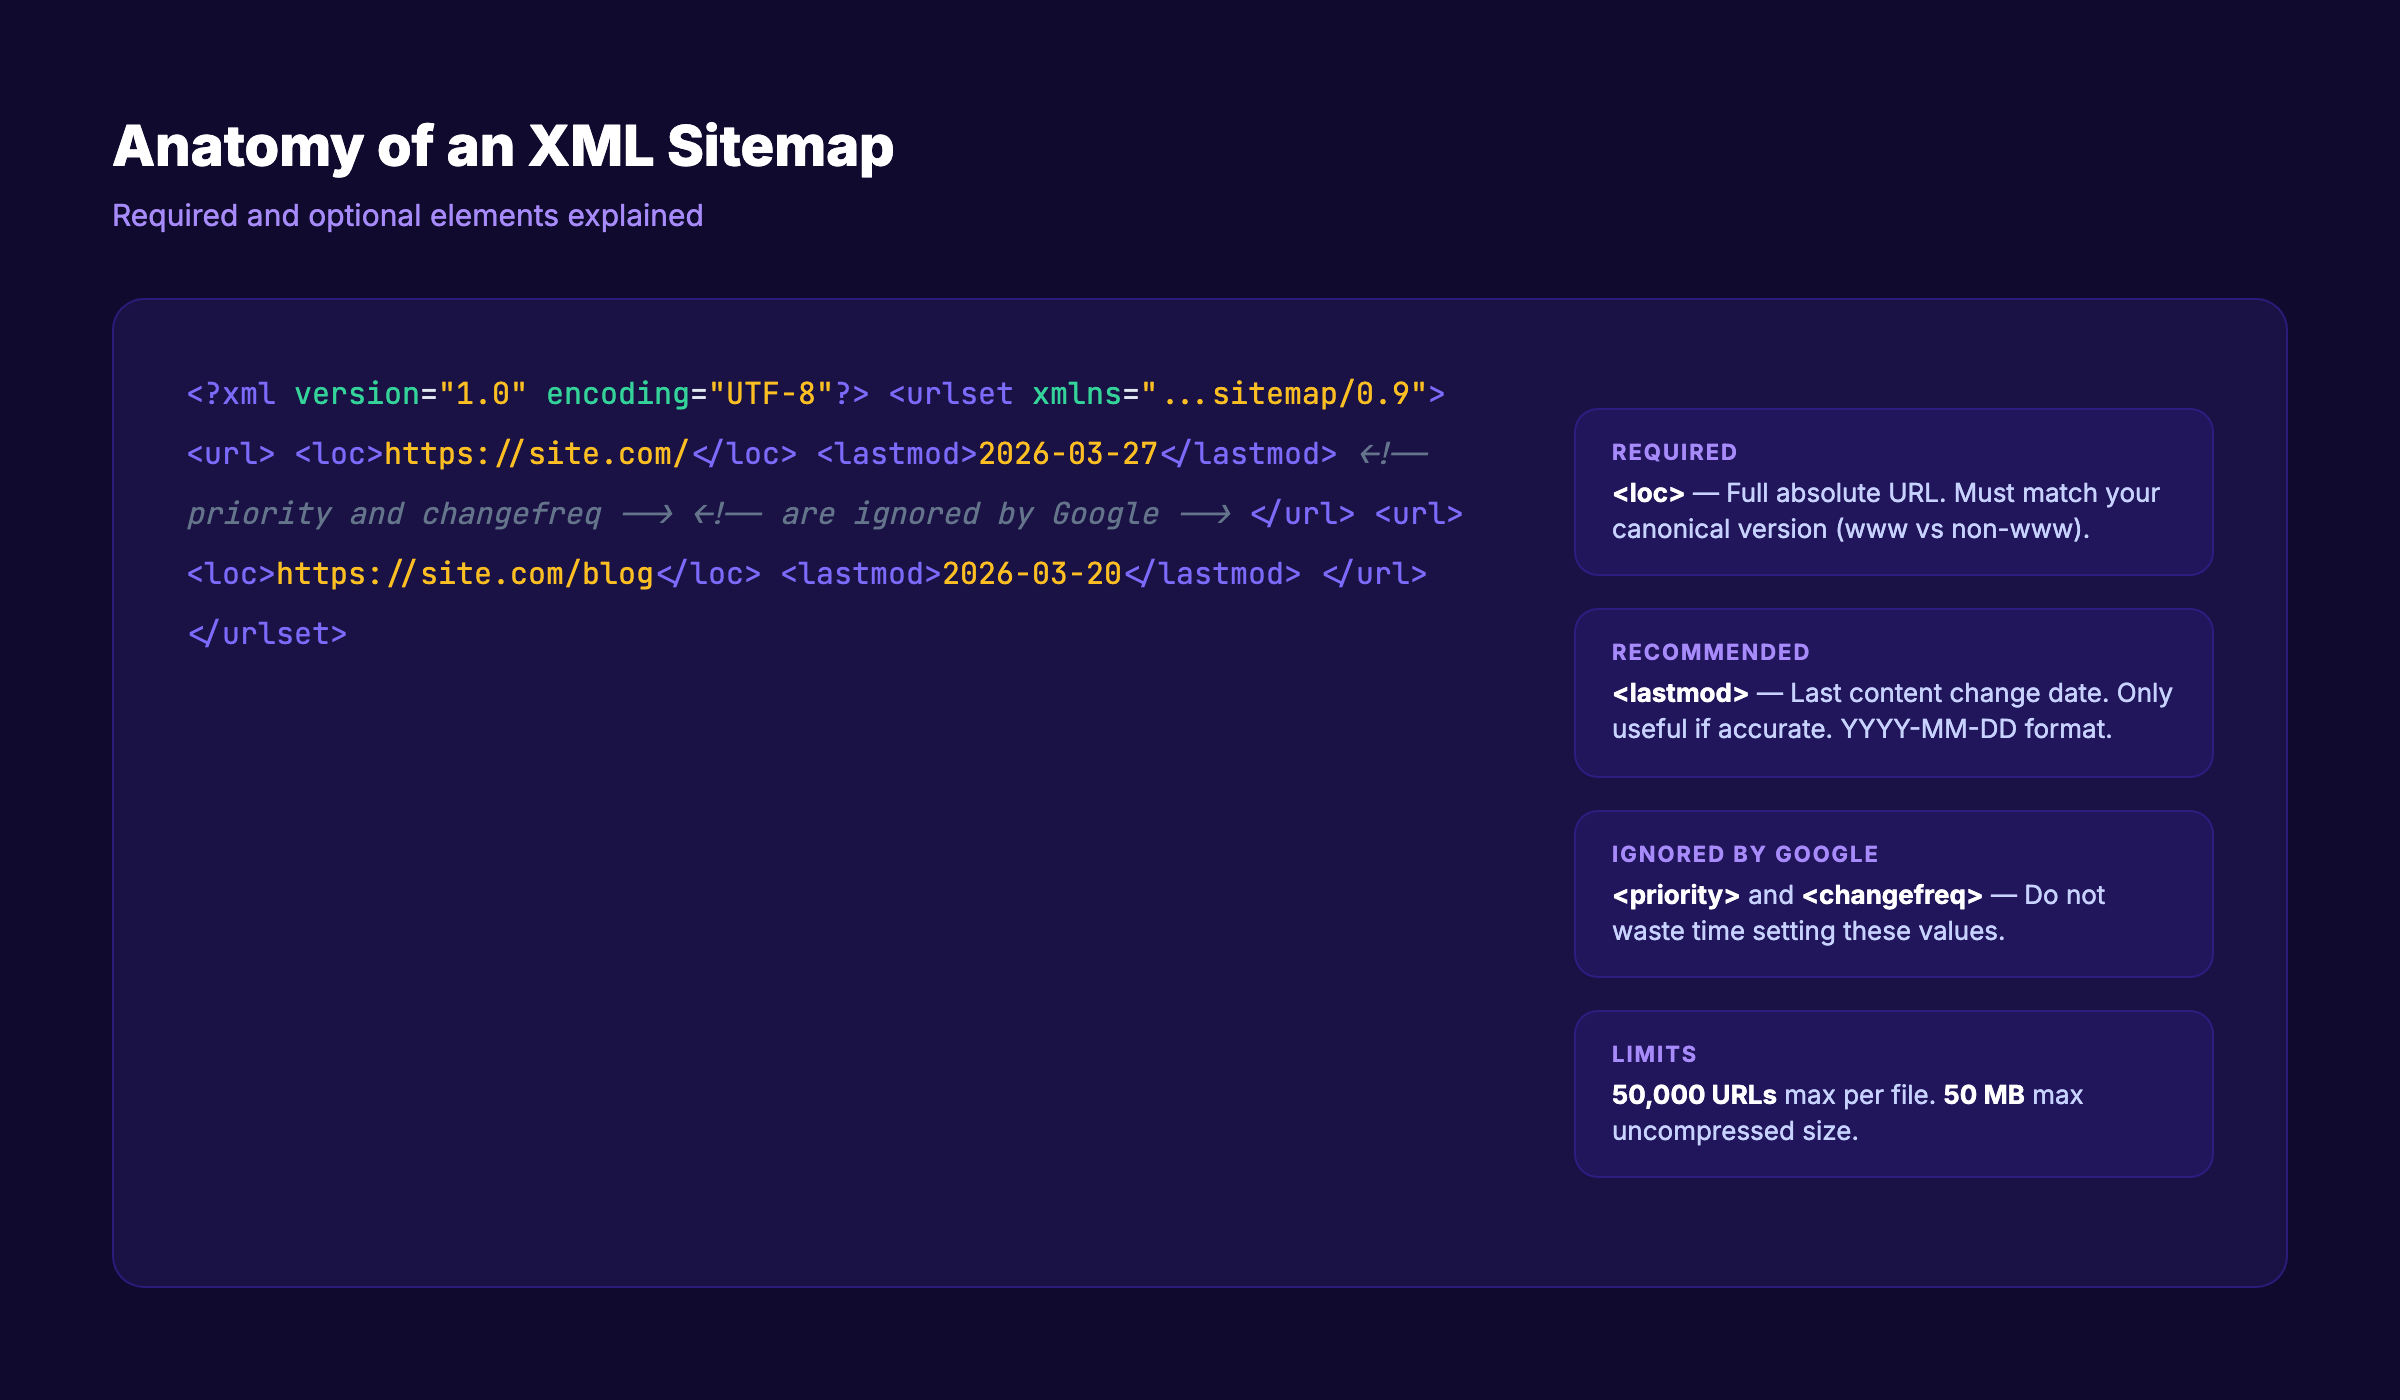
Each <url> entry contains a <loc> tag with the full URL and an optional <lastmod> tag with the last modification date. Google ignores the <priority> and <changefreq> tags entirely, according to Google Search Central. Do not waste time setting them.
When you need an XML sitemap:
- Your site has more than 50 pages
- Your site is new and has few external backlinks
- Your pages are deeply nested (3+ clicks from the homepage)
- You publish content frequently
- You use JavaScript rendering that makes crawling harder
- You have image, video, or news content
When a sitemap is less critical:
- You have a small site (under 10 pages) with strong internal linking
- Every page is reachable within 2 clicks from the homepage
Even small sites benefit from sitemaps. The cost is near zero, and the upside is real.
Overview: What You Will Need
Time required: 15 to 45 minutes (depending on site size and method)
Difficulty: Beginner
What you will need:
- Access to your website files or CMS admin panel
- A Google Search Console account
- A text editor (for manual creation) or a sitemap generator tool
- FTP/SFTP access or file manager (if uploading manually)
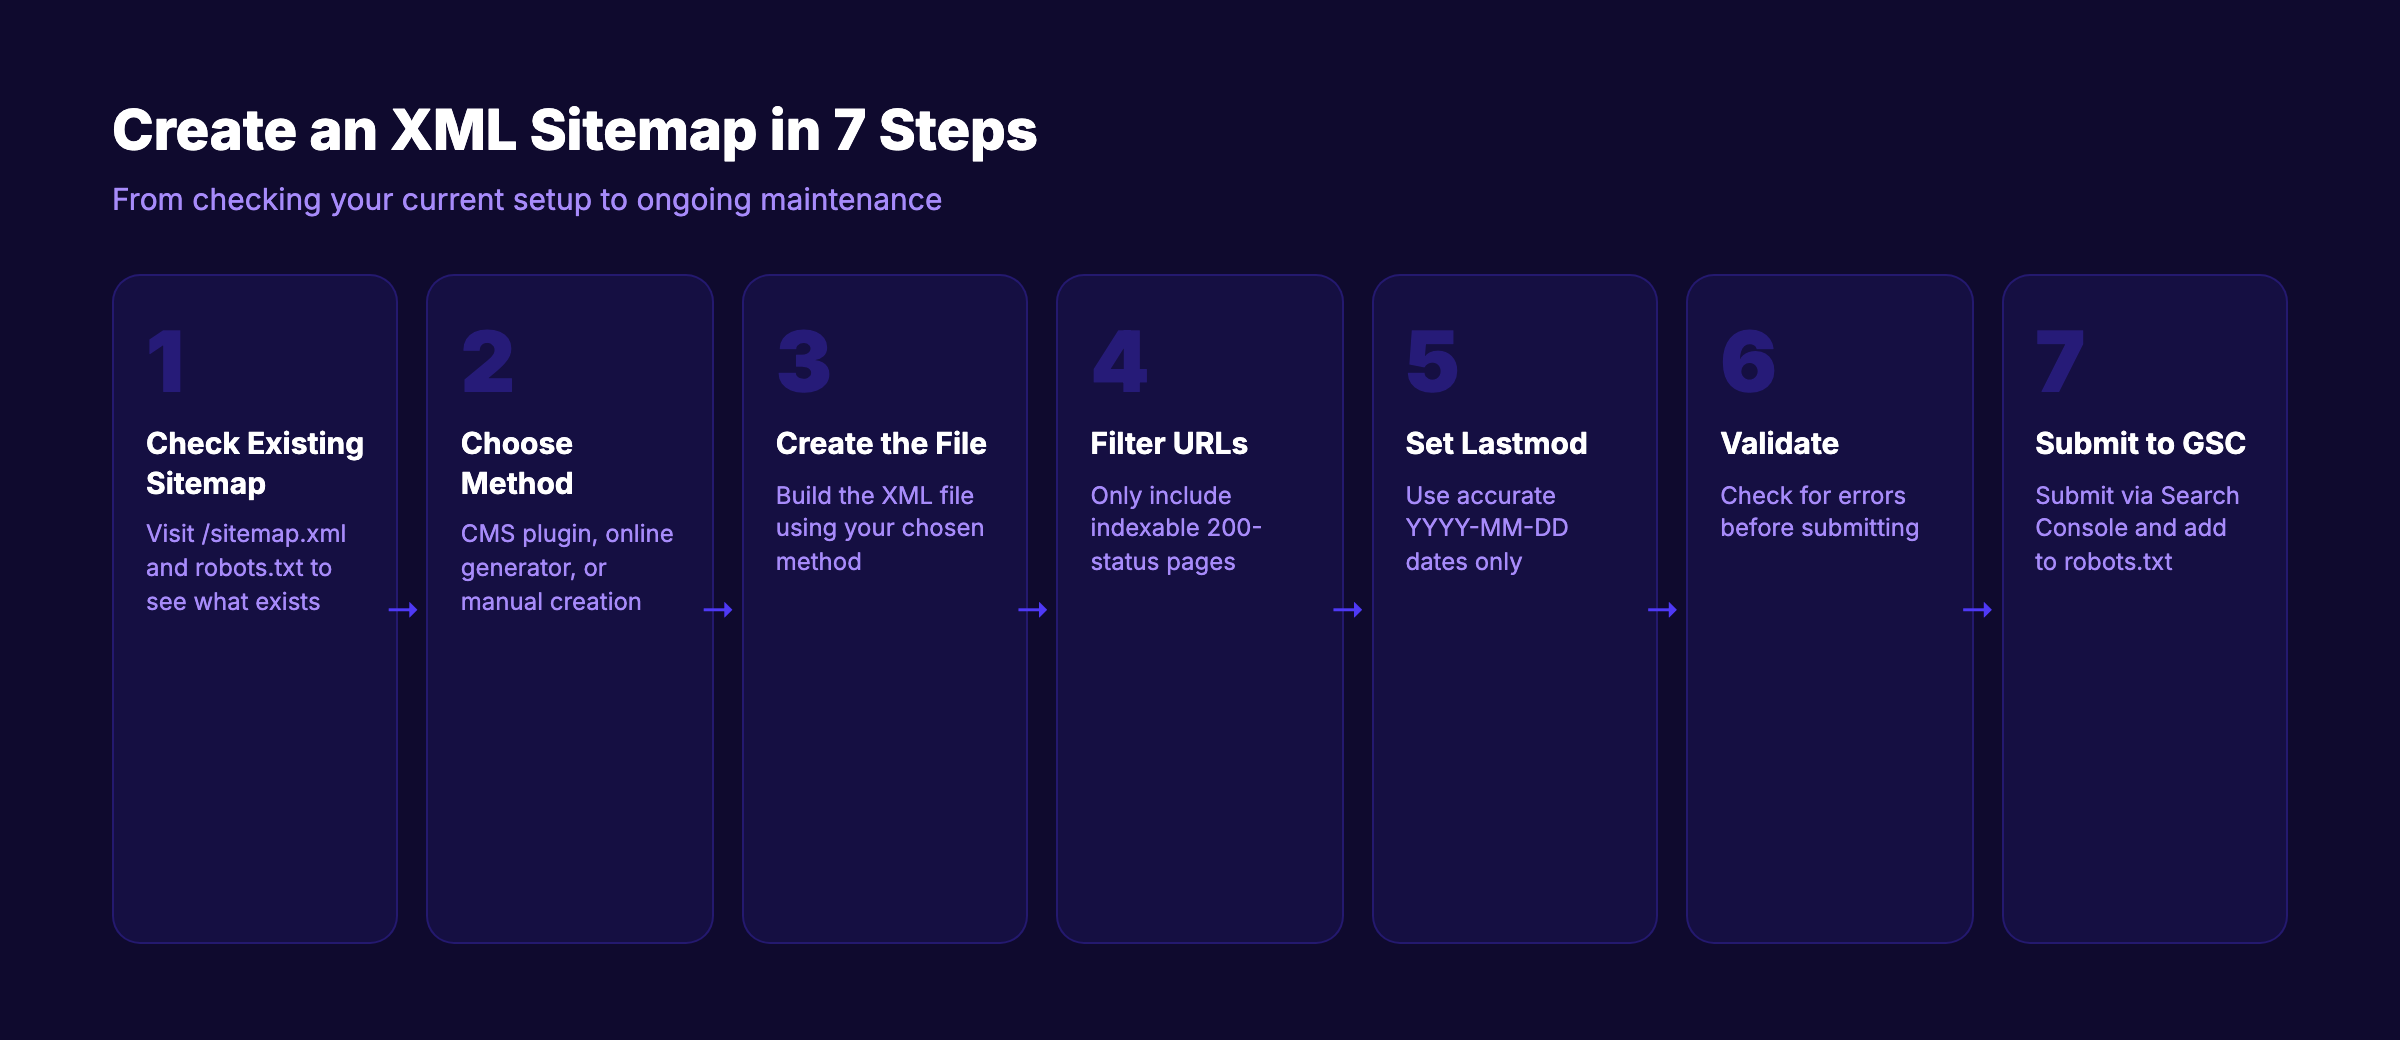
Step 1: Check If Your Site Already Has a Sitemap
Before creating a new sitemap, check whether one already exists. Many CMS platforms generate sitemaps automatically. Creating a second one causes confusion and duplicate entries.
How to check:
Open your browser and visit these URLs (replace example.com with your domain):
https://example.com/sitemap.xmlhttps://example.com/sitemap_index.xmlhttps://example.com/wp-sitemap.xml(WordPress 5.5+)https://example.com/sitemap.xml.gz(compressed version)
If any of these return an XML file, you already have a sitemap. Review it before deciding whether to replace it.
Also check your robots.txt file:
Visit https://example.com/robots.txt and look for a Sitemap: directive. This line tells search engines where to find your sitemap. If it points to an existing file, that sitemap is already being used.
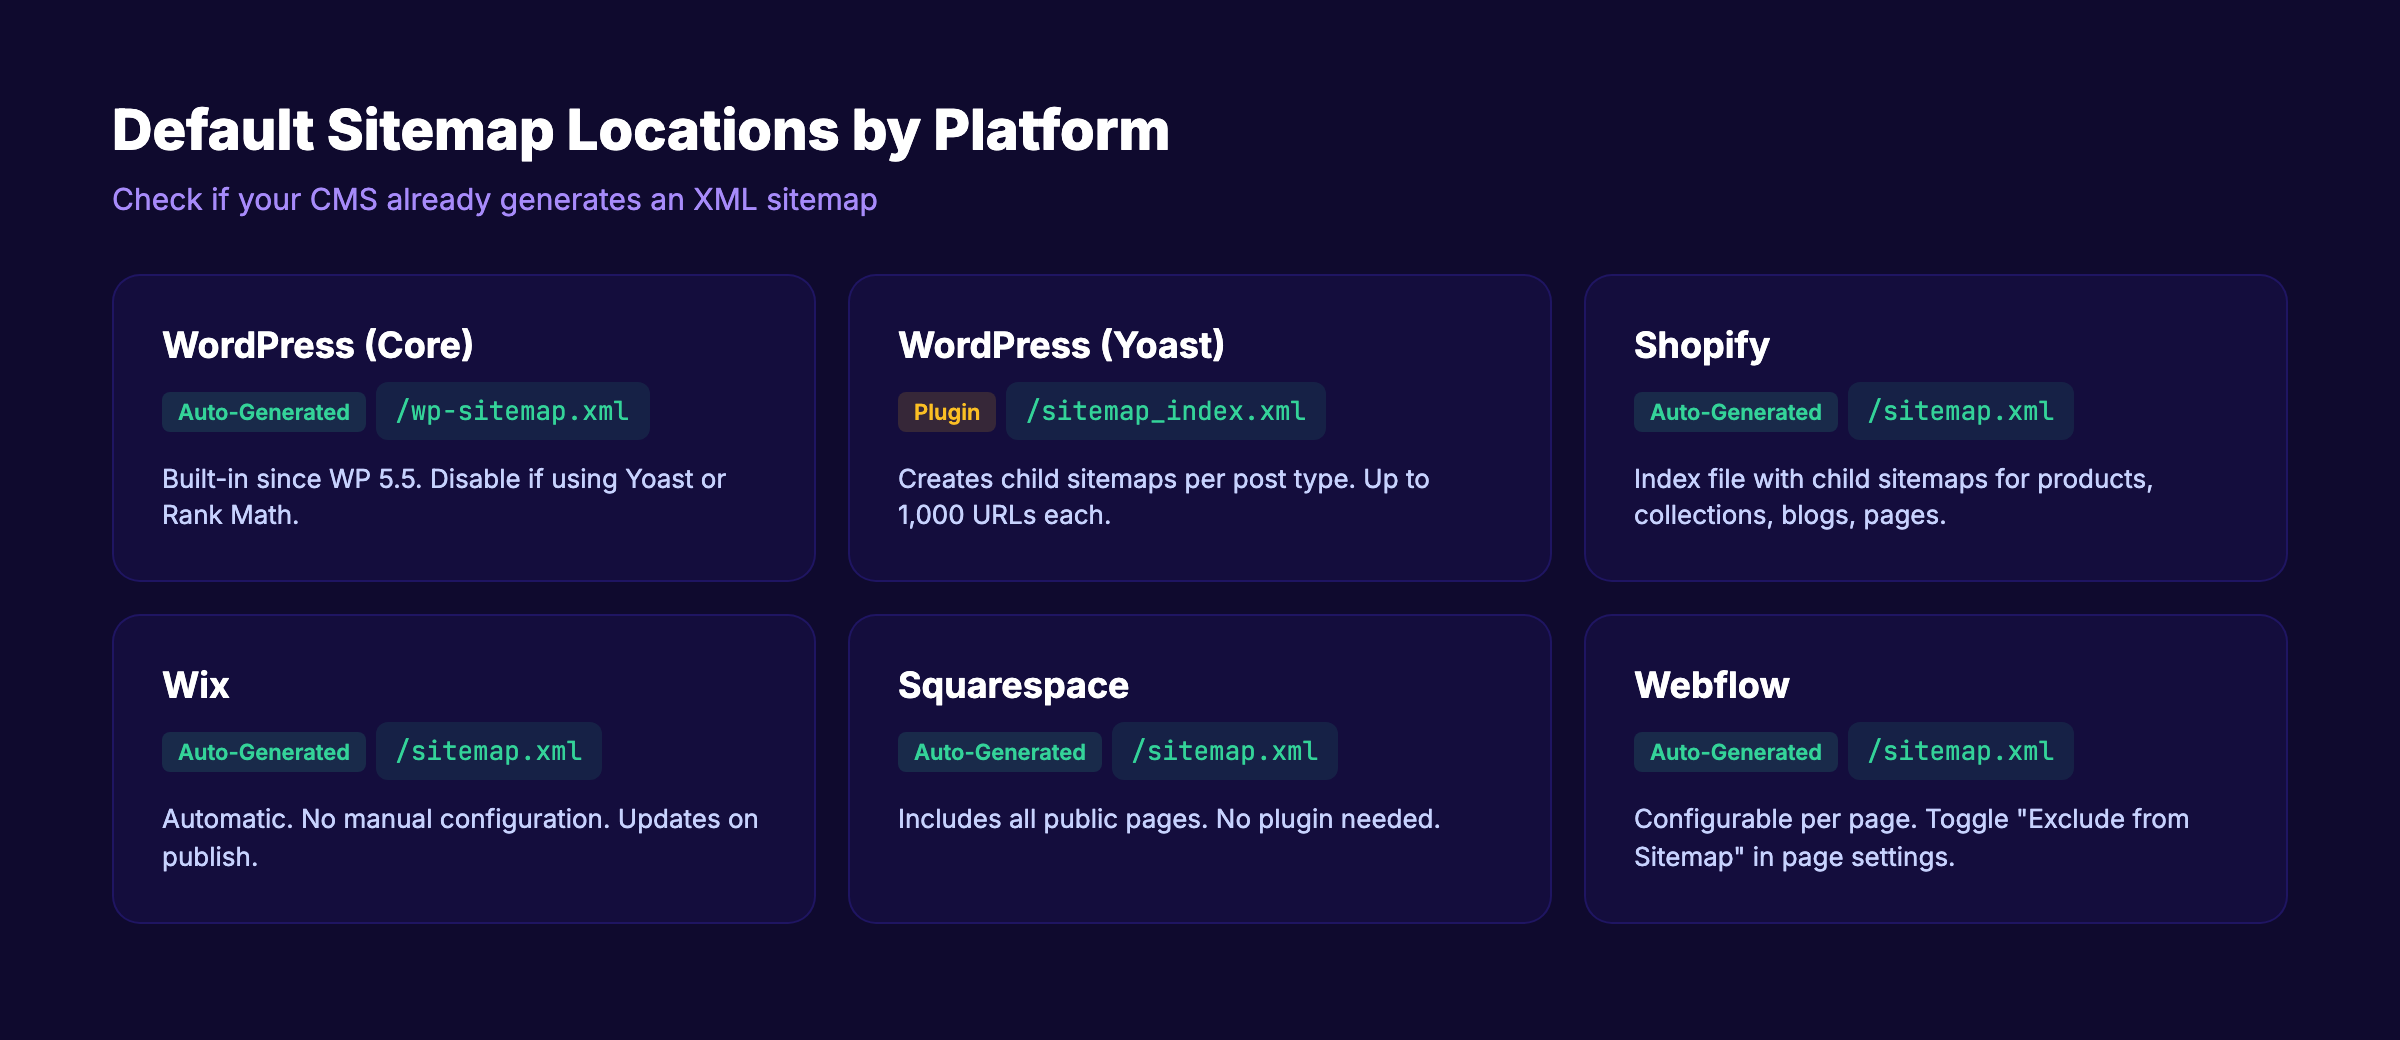
Platform-specific locations:
| Platform | Default Sitemap URL |
|---|---|
| WordPress (core) | /wp-sitemap.xml |
| WordPress (Yoast) | /sitemap_index.xml |
| WordPress (Rank Math) | /sitemap_index.xml |
| Shopify | /sitemap.xml |
| Wix | /sitemap.xml |
| Squarespace | /sitemap.xml |
| Webflow | /sitemap.xml |
Why this step matters: Duplicate sitemaps confuse crawlers and split your crawl budget. WordPress sites with both the core sitemap and a plugin sitemap active are a common source of this problem. Disable one before creating another.
Pro tip: If your existing sitemap contains URLs returning 404 errors, redirects, or noindex tags, it needs replacement. A bad sitemap is worse than no sitemap.
Step 2: Choose Your Sitemap Creation Method
There are 3 ways to create an XML sitemap. The right method depends on your platform and technical comfort.
Method A: CMS Plugin (Easiest)
If you use WordPress, Shopify, Wix, Squarespace, or Webflow, your platform either auto-generates a sitemap or offers a plugin to do it.
| Platform | Tool | Setup |
|---|---|---|
| WordPress | Yoast SEO or Rank Math | Install plugin, sitemap auto-generates |
| Shopify | Built-in | Auto-generated at /sitemap.xml |
| Wix | Built-in | Auto-generated, no setup needed |
| Squarespace | Built-in | Auto-generated at /sitemap.xml |
| Webflow | Built-in | Auto-generated, configurable per page |
Method B: Online Generator Tool (No Code)
For static sites or custom-built websites without CMS sitemap support:
- XML-Sitemaps.com — Free for up to 500 URLs. Crawls your site and generates the file.
- Screaming Frog — Free for up to 500 URLs. Desktop crawler with sitemap export.
- Sitebulb — Paid. Advanced crawler with sitemap generation and audit features.
Method C: Manual Creation (Full Control)
For developers or anyone who wants precise control over which URLs appear. You write the XML file by hand or generate it with a script.
Best for: static sites, headless CMS setups, Astro/Next.js/Gatsby projects, or sites where automated tools miss pages.
Why this step matters: Picking the wrong method wastes time. If Shopify already generates your sitemap, installing a third-party tool adds complexity with zero benefit. Match the method to your platform.
Your SEO team. $99 per month. 30 optimized articles, published automatically. Start for $1 →
Step 3: Create the XML Sitemap File
Follow the instructions for your chosen method.
Method A: WordPress with Yoast SEO
- Install and activate the Yoast SEO plugin
- Go to Yoast SEO → Settings → Site features
- Confirm “XML sitemaps” is toggled on
- Visit
yoursite.com/sitemap_index.xmlto verify
Yoast creates a sitemap index file that links to child sitemaps for posts, pages, categories, and other content types. Each child sitemap contains up to 1,000 URLs.
To exclude specific pages: edit the page in WordPress, scroll to the Yoast panel, and set “Allow search engines to show this page in search results” to No. The page will be removed from the sitemap automatically.
Method B: Online Generator
- Go to a sitemap generator (XML-Sitemaps.com or similar)
- Enter your full domain URL (including
https://) - Set the crawl frequency and priority (optional — Google ignores these)
- Click “Start” and wait for the crawl to complete
- Download the generated
sitemap.xmlfile - Upload it to your website root directory via FTP or file manager
The file must be accessible at https://yoursite.com/sitemap.xml.
Method C: Manual Creation
Create a new file called sitemap.xml with this structure:
<?xml version="1.0" encoding="UTF-8"?>
<urlset xmlns="http://www.sitemaps.org/schemas/sitemap/0.9">
  <url>
    <loc>https://yoursite.com/</loc>
    <lastmod>2026-03-27</lastmod>
  </url>
  <url>
    <loc>https://yoursite.com/about</loc>
    <lastmod>2026-02-15</lastmod>
  </url>
  <url>
    <loc>https://yoursite.com/blog/seo-guide</loc>
    <lastmod>2026-03-20</lastmod>
  </url>
</urlset>
Required rules:
- Every URL must use the full absolute path (including
https://) - URLs must match your canonical version (www vs non-www, trailing slash vs no slash)
- The file must be UTF-8 encoded
- Maximum 50,000 URLs per sitemap file
- Maximum 50 MB uncompressed file size
For sites with more than 50,000 URLs, use a sitemap index file:
<?xml version="1.0" encoding="UTF-8"?>
<sitemapindex xmlns="http://www.sitemaps.org/schemas/sitemap/0.9">
  <sitemap>
    <loc>https://yoursite.com/sitemap-posts.xml</loc>
    <lastmod>2026-03-27</lastmod>
  </sitemap>
  <sitemap>
    <loc>https://yoursite.com/sitemap-pages.xml</loc>
    <lastmod>2026-03-15</lastmod>
  </sitemap>
</sitemapindex>
Each child sitemap follows the same <urlset> format. This approach keeps files manageable and helps you organize URLs by content type.
Why this step matters: A malformed sitemap file gets rejected by Google Search Console. Even small syntax errors — a missing closing tag, an ampersand that is not encoded as & — will cause parsing failures.
Step 4: Add Only Indexable URLs
The biggest mistake in sitemap creation is including URLs that should not be indexed. An SE Ranking study of 50,000 sites found that 18% of XML sitemaps contain at least one attribute error, with date format issues accounting for 62% of all errors.
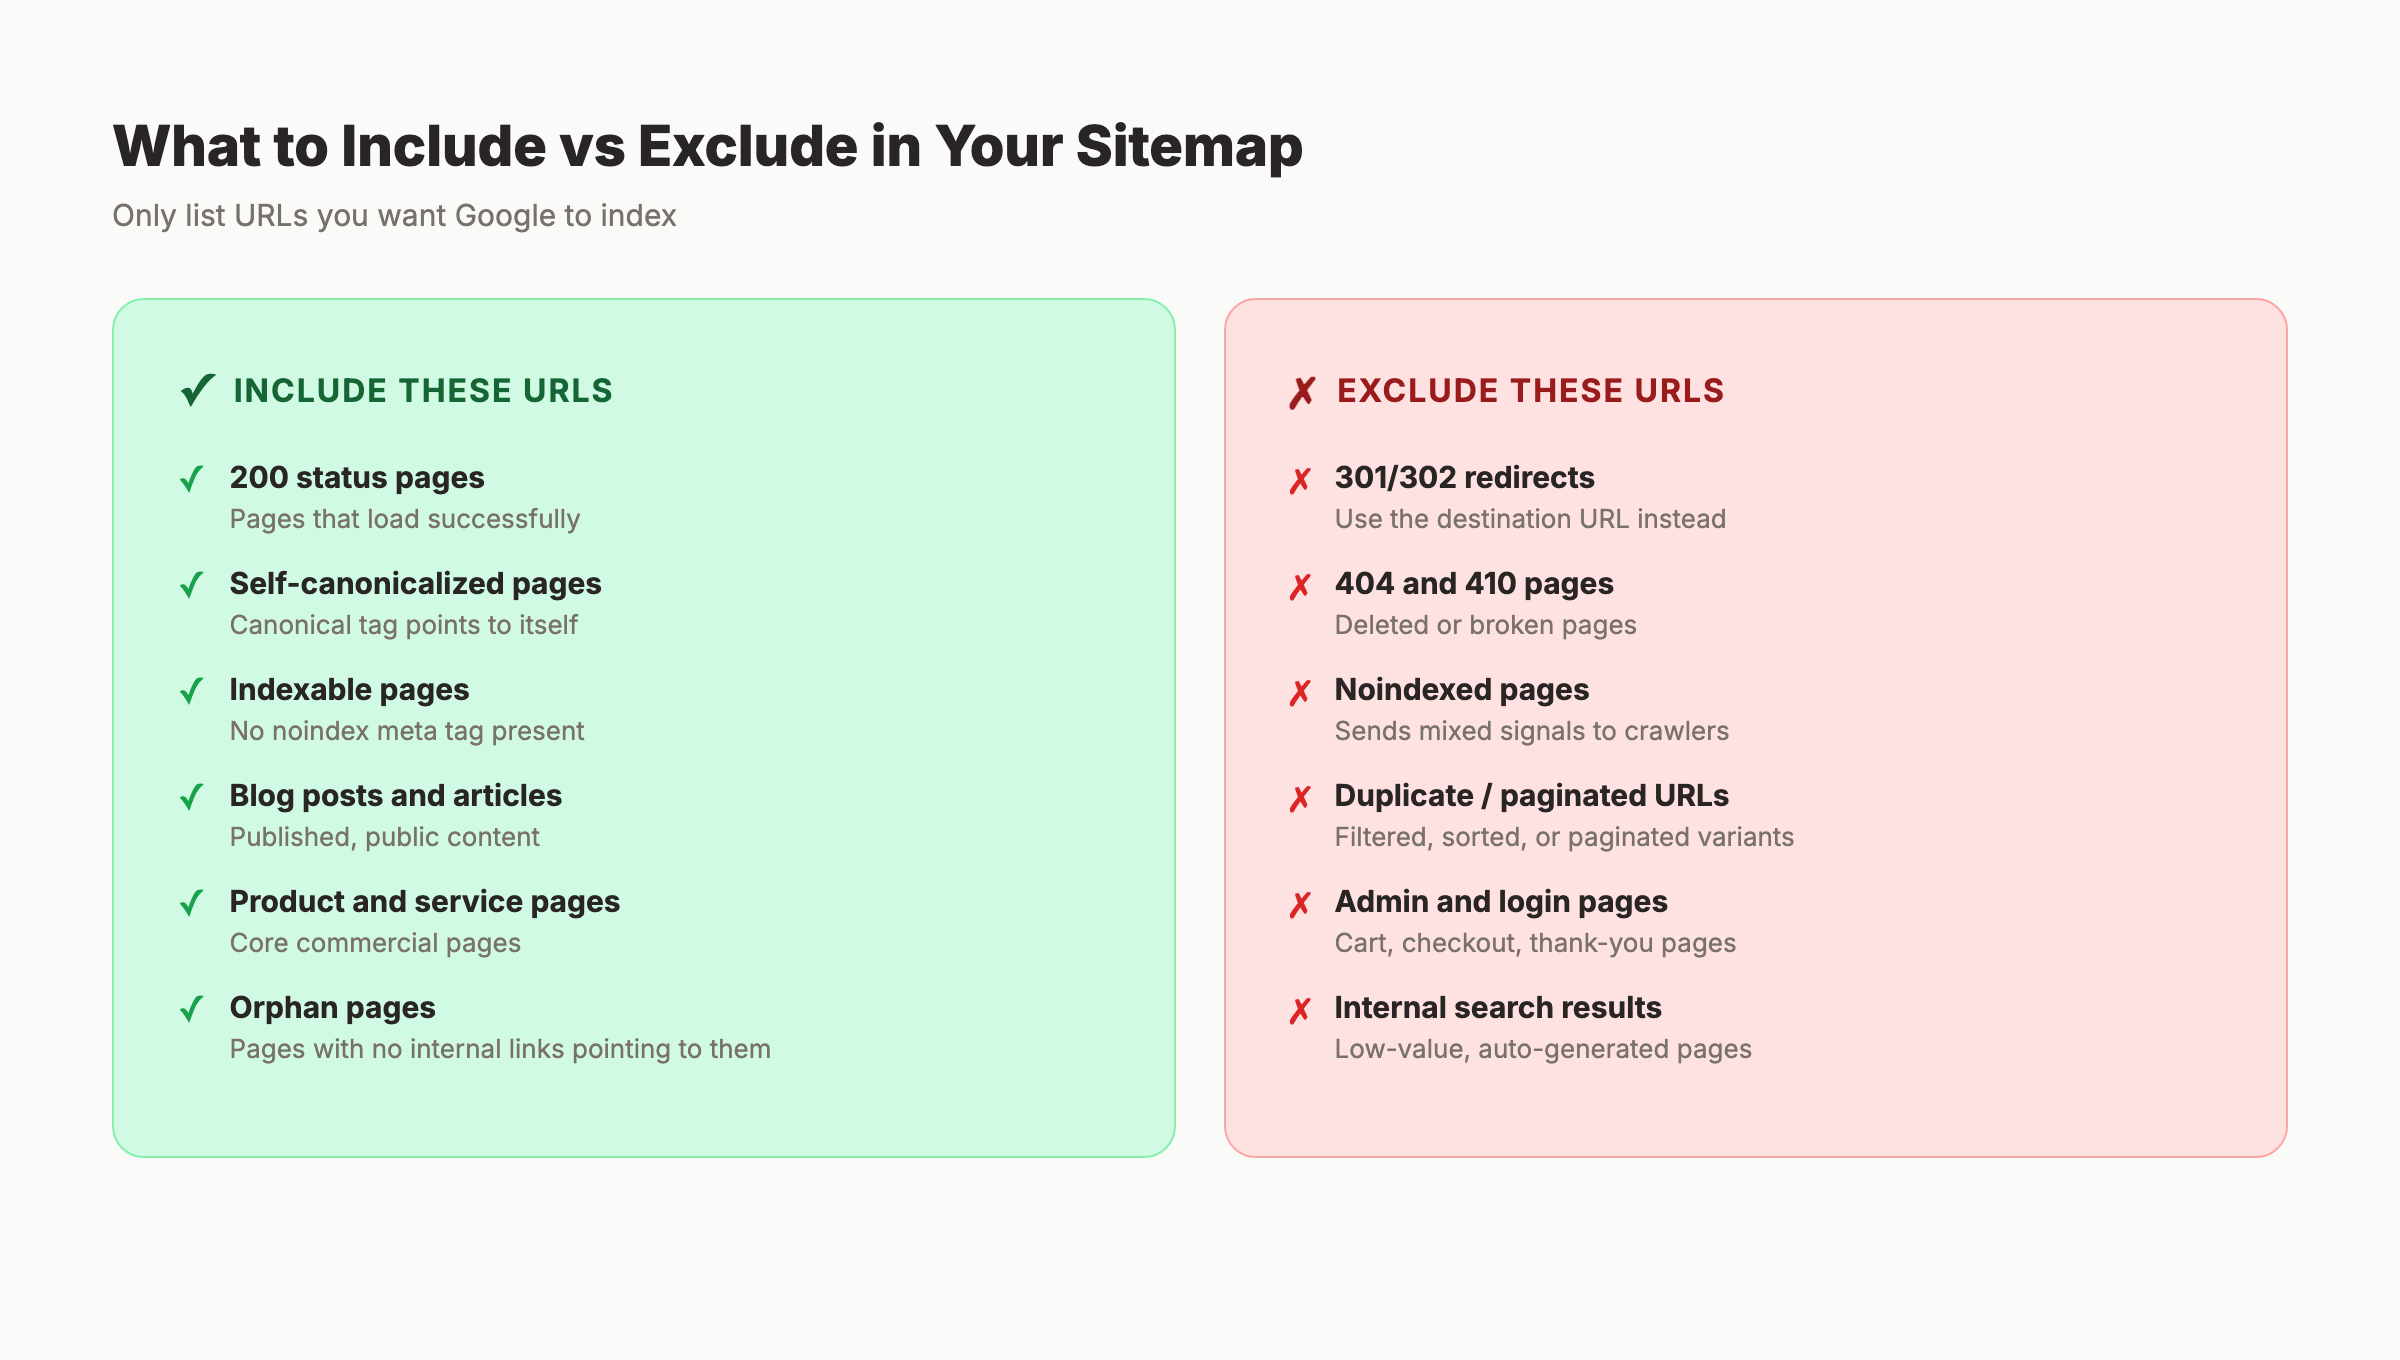
Include these URLs:
- Pages returning a 200 status code
- Pages with a canonical tag pointing to themselves
- Pages set to “index, follow” (or no meta robots tag)
- Published blog posts, product pages, service pages, landing pages
- Category and tag pages (if they have unique, valuable content)
Exclude these URLs:
- Pages returning 301, 302, 404, or 410 status codes
- Pages with a
noindexmeta tag - Pages blocked by
robots.txt - Duplicate pages (pagination pages, filtered URLs, sort variations)
- Admin, login, cart, checkout, and thank-you pages
- Internal search result pages
- PDF files and media attachments (unless they are standalone content)
A quick audit process:
- Crawl your site with Screaming Frog (free up to 500 URLs)
- Export the list of all URLs with their status codes and meta robots tags
- Filter out anything that is not a 200 status with an “index” directive
- Use the filtered list as the basis for your sitemap
Why this step matters: Including noindexed or redirected URLs in your sitemap sends mixed signals. You are telling Google “please crawl this” while the page itself says “do not index me.” Google wastes crawl budget processing these contradictions instead of indexing your real content.
Pro tip: Check for orphan pages — pages that exist on your site but are not linked from anywhere. These are the pages that benefit most from sitemap inclusion because Googlebot cannot discover them through internal links alone.
Step 5: Set Accurate Lastmod Dates
The <lastmod> tag tells Google when a URL was last updated. It is the only optional sitemap tag that Google actually uses — but only when it is accurate.
Google’s rule: They use <lastmod> only if it is “consistently and verifiably accurate,” per Google Search Central. Fake lastmod dates (updating the timestamp without changing the content) train Google to ignore your sitemap entirely.
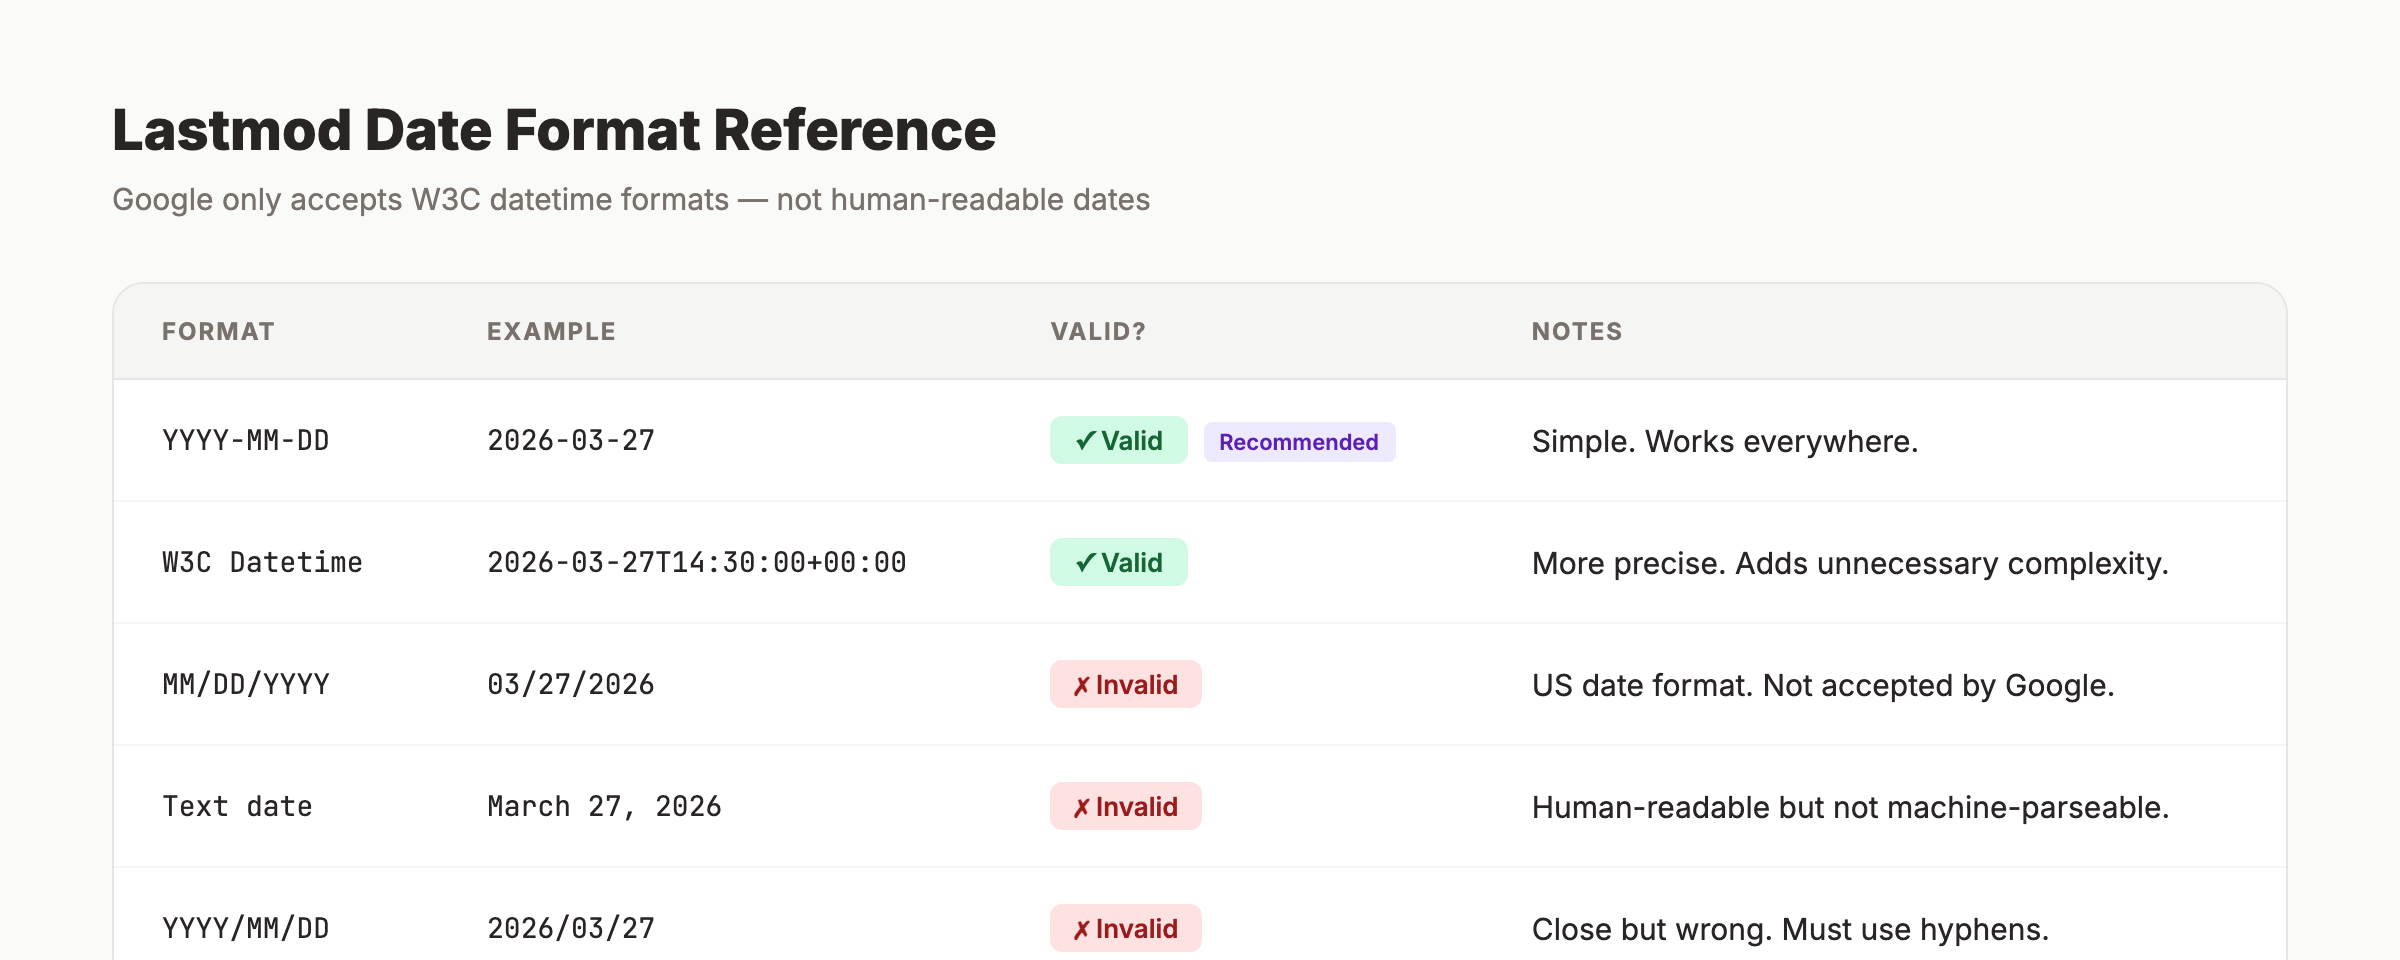
Date format requirements:
| Format | Example | Valid? |
|---|---|---|
| YYYY-MM-DD | 2026-03-27 | Yes (recommended) |
| YYYY-MM-DDThh:mm:ss+00:00 | 2026-03-27T14:30:00+00:00 | Yes (W3C format) |
| MM/DD/YYYY | 03/27/2026 | No |
| March 27, 2026 | March 27, 2026 | No |
Use YYYY-MM-DD for simplicity. The W3C datetime format is valid but adds unnecessary complexity for most sites.
Best practices:
- Only update
<lastmod>when you make a meaningful content change - Do not update it for minor CSS or template changes
- Match it to the actual content modification date, not the publish date
- If you update old blog posts, update the lastmod to reflect the revision date
Why this step matters: A reliable lastmod signal can speed up recrawling of updated content. An unreliable one teaches Google to distrust your sitemap data. According to a Botify study, fake lastmod timestamps are one of the top 5 sitemap mistakes that hurt crawl efficiency.
3,500+ blogs published. 92% average SEO score. See what Stacc can do for your site. Start for $1 →
Step 6: Validate Your Sitemap
A sitemap with syntax errors gets rejected. Google Search Console will report the errors, but it is faster to catch them before submission.
Validation checklist:
- File is valid XML (proper opening/closing tags, UTF-8 encoding)
- Every
<loc>contains a full absolute URL starting withhttps:// - All
<lastmod>dates useYYYY-MM-DDor W3C datetime format - No URLs return 4xx or 5xx status codes
- No URLs are blocked by
robots.txt - No URLs have a
noindexmeta tag - File size is under 50 MB uncompressed
- URL count is under 50,000 per file
- No duplicate URLs within the same sitemap
Free validation tools:
| Tool | What It Checks |
|---|---|
| Google Search Console | XML parsing, URL errors, index coverage |
| XML Sitemap Validator (xmlsitemapvalidator.com) | Schema compliance, URL format |
| Screaming Frog | URL status codes, redirects, noindex conflicts |
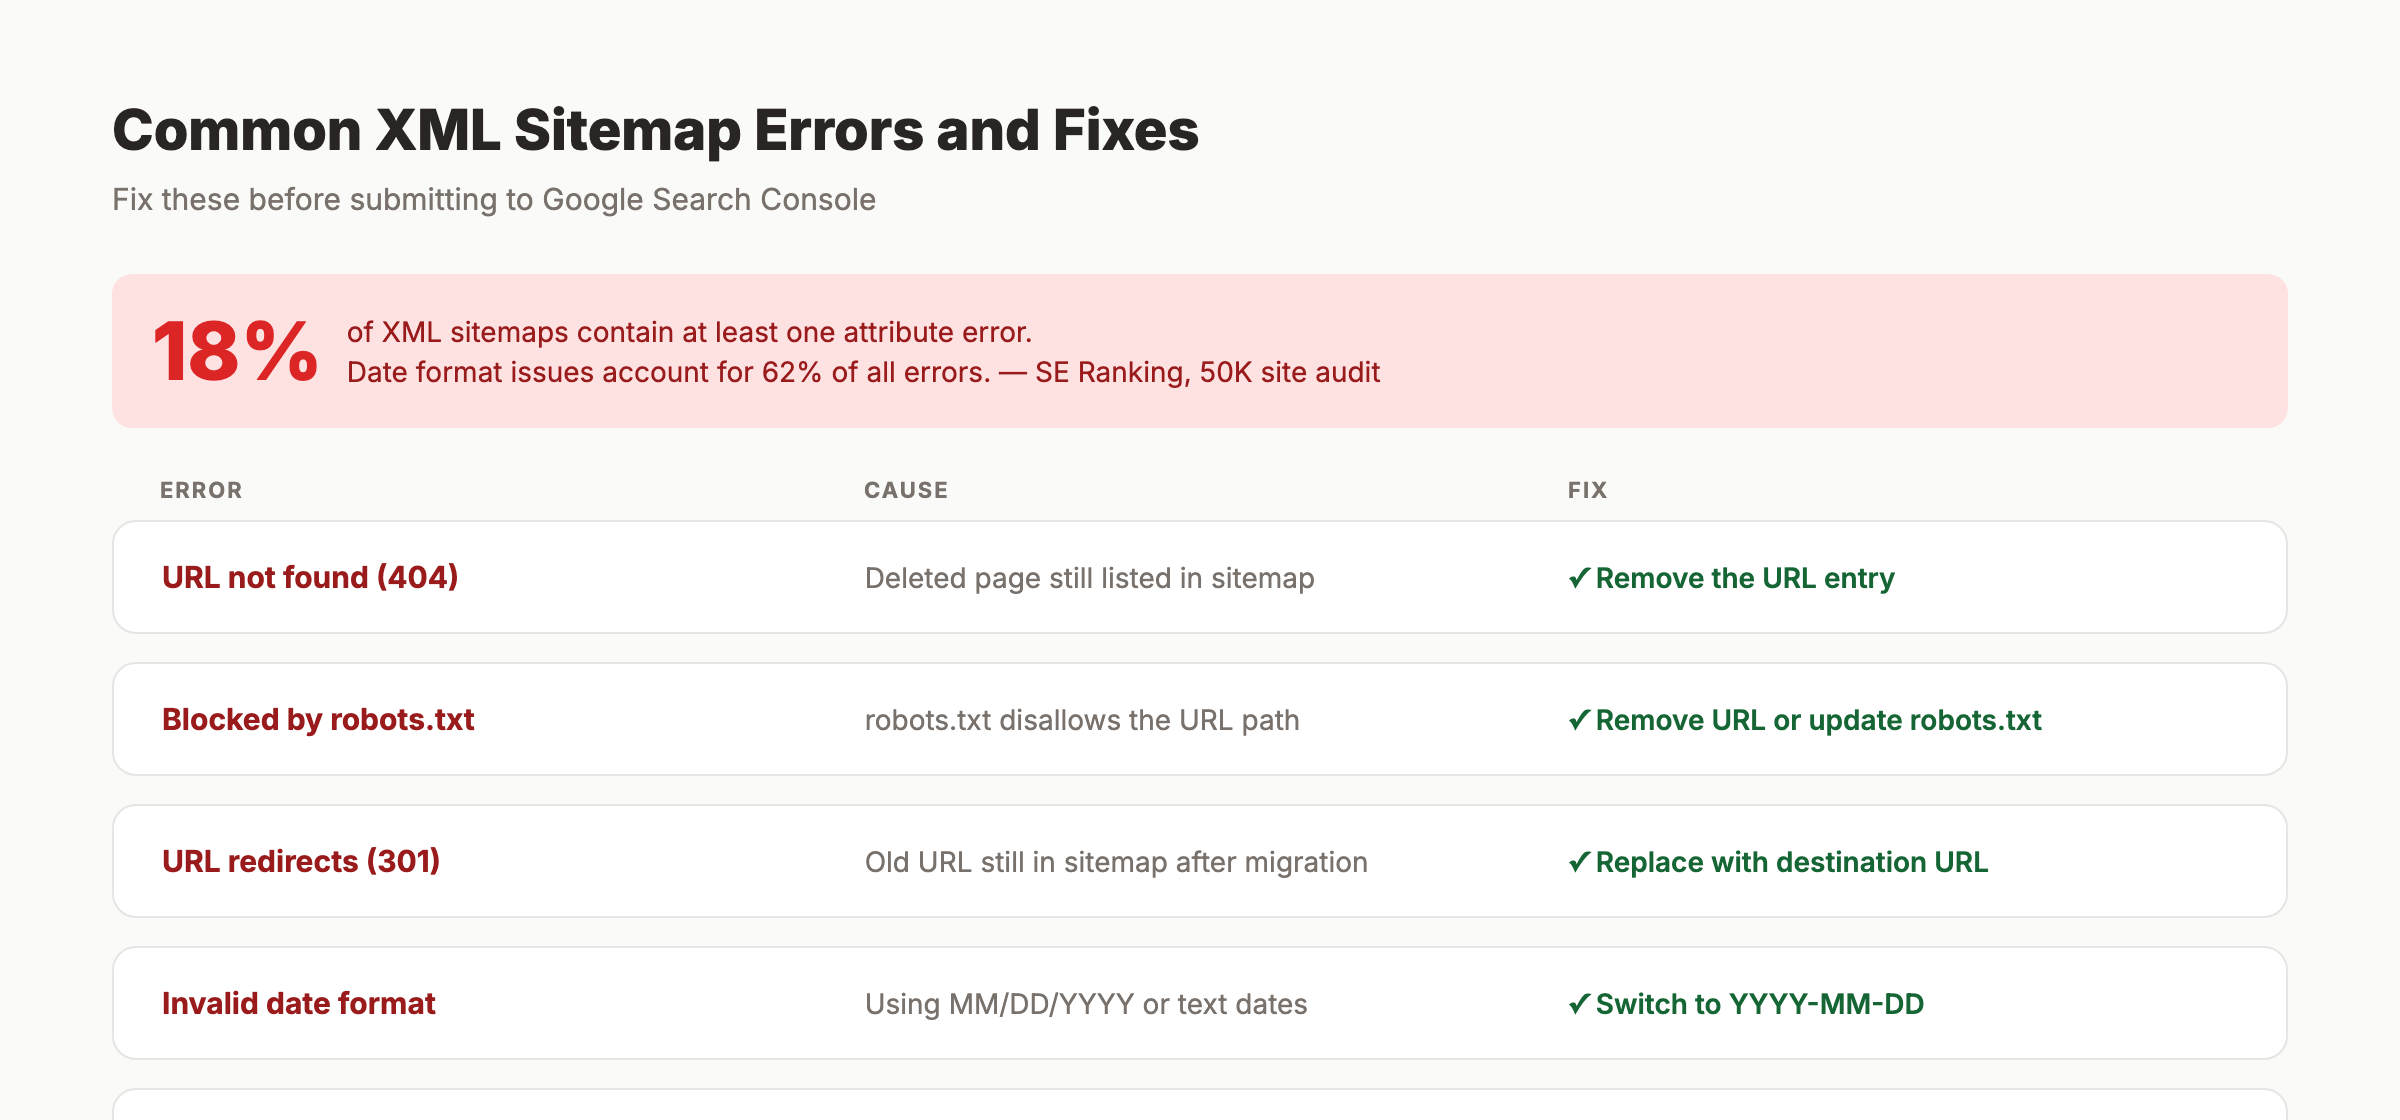
Common errors and fixes:
| Error | Cause | Fix |
|---|---|---|
| ”URL not found (404)“ | Deleted page still in sitemap | Remove the URL from the sitemap |
| ”URL is blocked by robots.txt” | robots.txt disallows the path | Either remove the URL or update robots.txt |
| ”URL redirects (301)“ | Old URL still in sitemap | Replace with the destination URL |
| ”Indexed, not submitted in sitemap” | Important page missing | Add the URL to your sitemap |
| ”Invalid date format” | Using MM/DD/YYYY or text dates | Switch to YYYY-MM-DD format |
Why this step matters: Google processes sitemaps in bulk. One fatal XML error can prevent the entire file from being parsed. A valid sitemap with 500 clean URLs is more effective than a broken sitemap with 5,000 entries that Google cannot read.
Step 7: Submit Your Sitemap to Google Search Console
Creating a sitemap is not enough. You need to submit it so Google knows where to find it.
Submit via Google Search Console
- Log into Google Search Console
- Select your property (website)
- Go to Sitemaps in the left sidebar
- Enter your sitemap URL (usually
sitemap.xmlorsitemap_index.xml) - Click Submit
Google will show the submission status, the number of URLs discovered, and any errors found.
Add to robots.txt
Open your robots.txt file and add a Sitemap directive at the bottom:
User-agent: *
Allow: /

Sitemap: https://yoursite.com/sitemap.xml
This ensures every search engine crawler — not just Google — can discover your sitemap. Bing, Yandex, and AI crawlers like GPTBot and ClaudeBot all read robots.txt directives.
Submit to Bing Webmaster Tools
- Log into Bing Webmaster Tools
- Go to Sitemaps
- Enter your sitemap URL and submit
Bing uses its own crawler, and submitting directly ensures faster discovery.
Why this step matters: Without submission, Google relies on discovering your sitemap through robots.txt or by following links. Direct submission is faster and gives you a dashboard to monitor crawl status, errors, and index coverage.
Pro tip: After submitting, check back in 24 to 48 hours. Google will report how many URLs were discovered versus how many were indexed. A large gap between “discovered” and “indexed” signals quality issues with the submitted URLs.
Stop writing. Start ranking. Stacc publishes 30 SEO articles per month for $99. Start for $1 →
Results: What to Expect
After completing these 7 steps, here is a realistic timeline:
- Within 1 hour: Your sitemap is live and submitted to Google Search Console
- Within 24 to 48 hours: Google acknowledges the sitemap and begins processing URLs
- Within 1 to 4 weeks: New and updated pages start appearing in Google search results
- Ongoing: Google recrawls your sitemap periodically based on how often it changes
A sitemap alone does not guarantee rankings. It guarantees discoverability. Your pages still need quality content, relevant keywords, and on-page SEO to rank.
The real impact shows over time. Sites that maintain clean, accurate sitemaps see fewer crawl errors, faster indexing of new content, and better use of their crawl budget.
Troubleshooting
Problem: Google Search Console shows “Sitemap could not be fetched.”
Solution: Check that the sitemap URL is accessible (returns 200 status). Verify it is not blocked by robots.txt. Ensure the URL uses HTTPS if your site uses HTTPS.
Problem: Most URLs show “Discovered — currently not indexed.”
Solution: This means Google found the URLs but chose not to index them. The issue is usually content quality or duplicate content, not the sitemap itself. Run a content audit to identify thin or duplicate pages.
Problem: WordPress generates two sitemaps (core + plugin).
Solution: Disable the WordPress core sitemap. Add this to your theme’s functions.php:
add_filter('wp_sitemaps_enabled', '__return_false');Then let your SEO plugin (Yoast or Rank Math) handle sitemap generation.
Problem: Your sitemap includes URLs that return 301 redirects.
Solution: Replace redirected URLs with their final destination URLs. If the destination is on a different domain, remove the entry entirely. Keeping 301 redirects in your sitemap wastes crawl budget.
XML Sitemap Best Practices Checklist
Use this checklist to audit your sitemap quarterly:
- Every URL returns a 200 status code
- No noindexed pages in the sitemap
- No redirected URLs in the sitemap
- All
<lastmod>dates are accurate - Sitemap is referenced in
robots.txt - Sitemap is submitted in Google Search Console
- File size is under 50 MB
- URL count is under 50,000 per file
- No duplicate URLs
- Sitemap updates when new content is published
- Old, deleted pages are removed promptly
FAQ
What is the difference between an XML sitemap and an HTML sitemap?
An XML sitemap is for search engines. It is a machine-readable file listing URLs for crawlers to process. An HTML sitemap is for humans. It is a webpage with links organized by category. Both serve different purposes. For SEO, the XML version is what matters.
How often should I update my XML sitemap?
Update it every time you publish, delete, or significantly modify a page. Most CMS platforms do this automatically. If you manage it manually, set a weekly or biweekly schedule depending on how often your site changes.
Will an XML sitemap improve my rankings?
Not directly. A sitemap helps Google discover and index your pages faster. Rankings depend on content quality, backlinks, E-E-A-T signals, and on-page optimization. But a page that is not indexed cannot rank at all.
Can I have multiple XML sitemaps?
Yes. Large sites use a sitemap index file that points to multiple child sitemaps. Each child sitemap can contain up to 50,000 URLs. Organize child sitemaps by content type: blog posts, product pages, category pages, and so on.
Do AI search engines use XML sitemaps?
AI crawlers like GPTBot (ChatGPT), ClaudeBot (Claude), and PerplexityBot read robots.txt and follow sitemap references. A clean sitemap helps AI search engines discover your content, which increases your chances of being cited in AI-generated answers. For even better AI discoverability, consider adding an llms.txt file.
How do I create a sitemap for a JavaScript-heavy site?
JavaScript-rendered sites are harder for crawlers to parse. A Botify study found that Google relies more heavily on sitemaps when it cannot render JavaScript efficiently. For these sites, generate a static sitemap using your build tool (Next.js, Nuxt, Gatsby, and Astro all have sitemap plugins) rather than relying on crawler discovery.
Rank everywhere. Do nothing. Blog SEO, Local SEO, and Social on autopilot. Start for $1 →
Written and published by Stacc. We publish 3,500+ articles per month across 70+ industries. All data verified against public sources as of March 2026.