Site Migration SEO: 8 Steps to Protect Rankings
Follow this 8-step site migration SEO checklist to protect your rankings and traffic. Covers audits, redirects, and post-launch monitoring. Updated 2026.
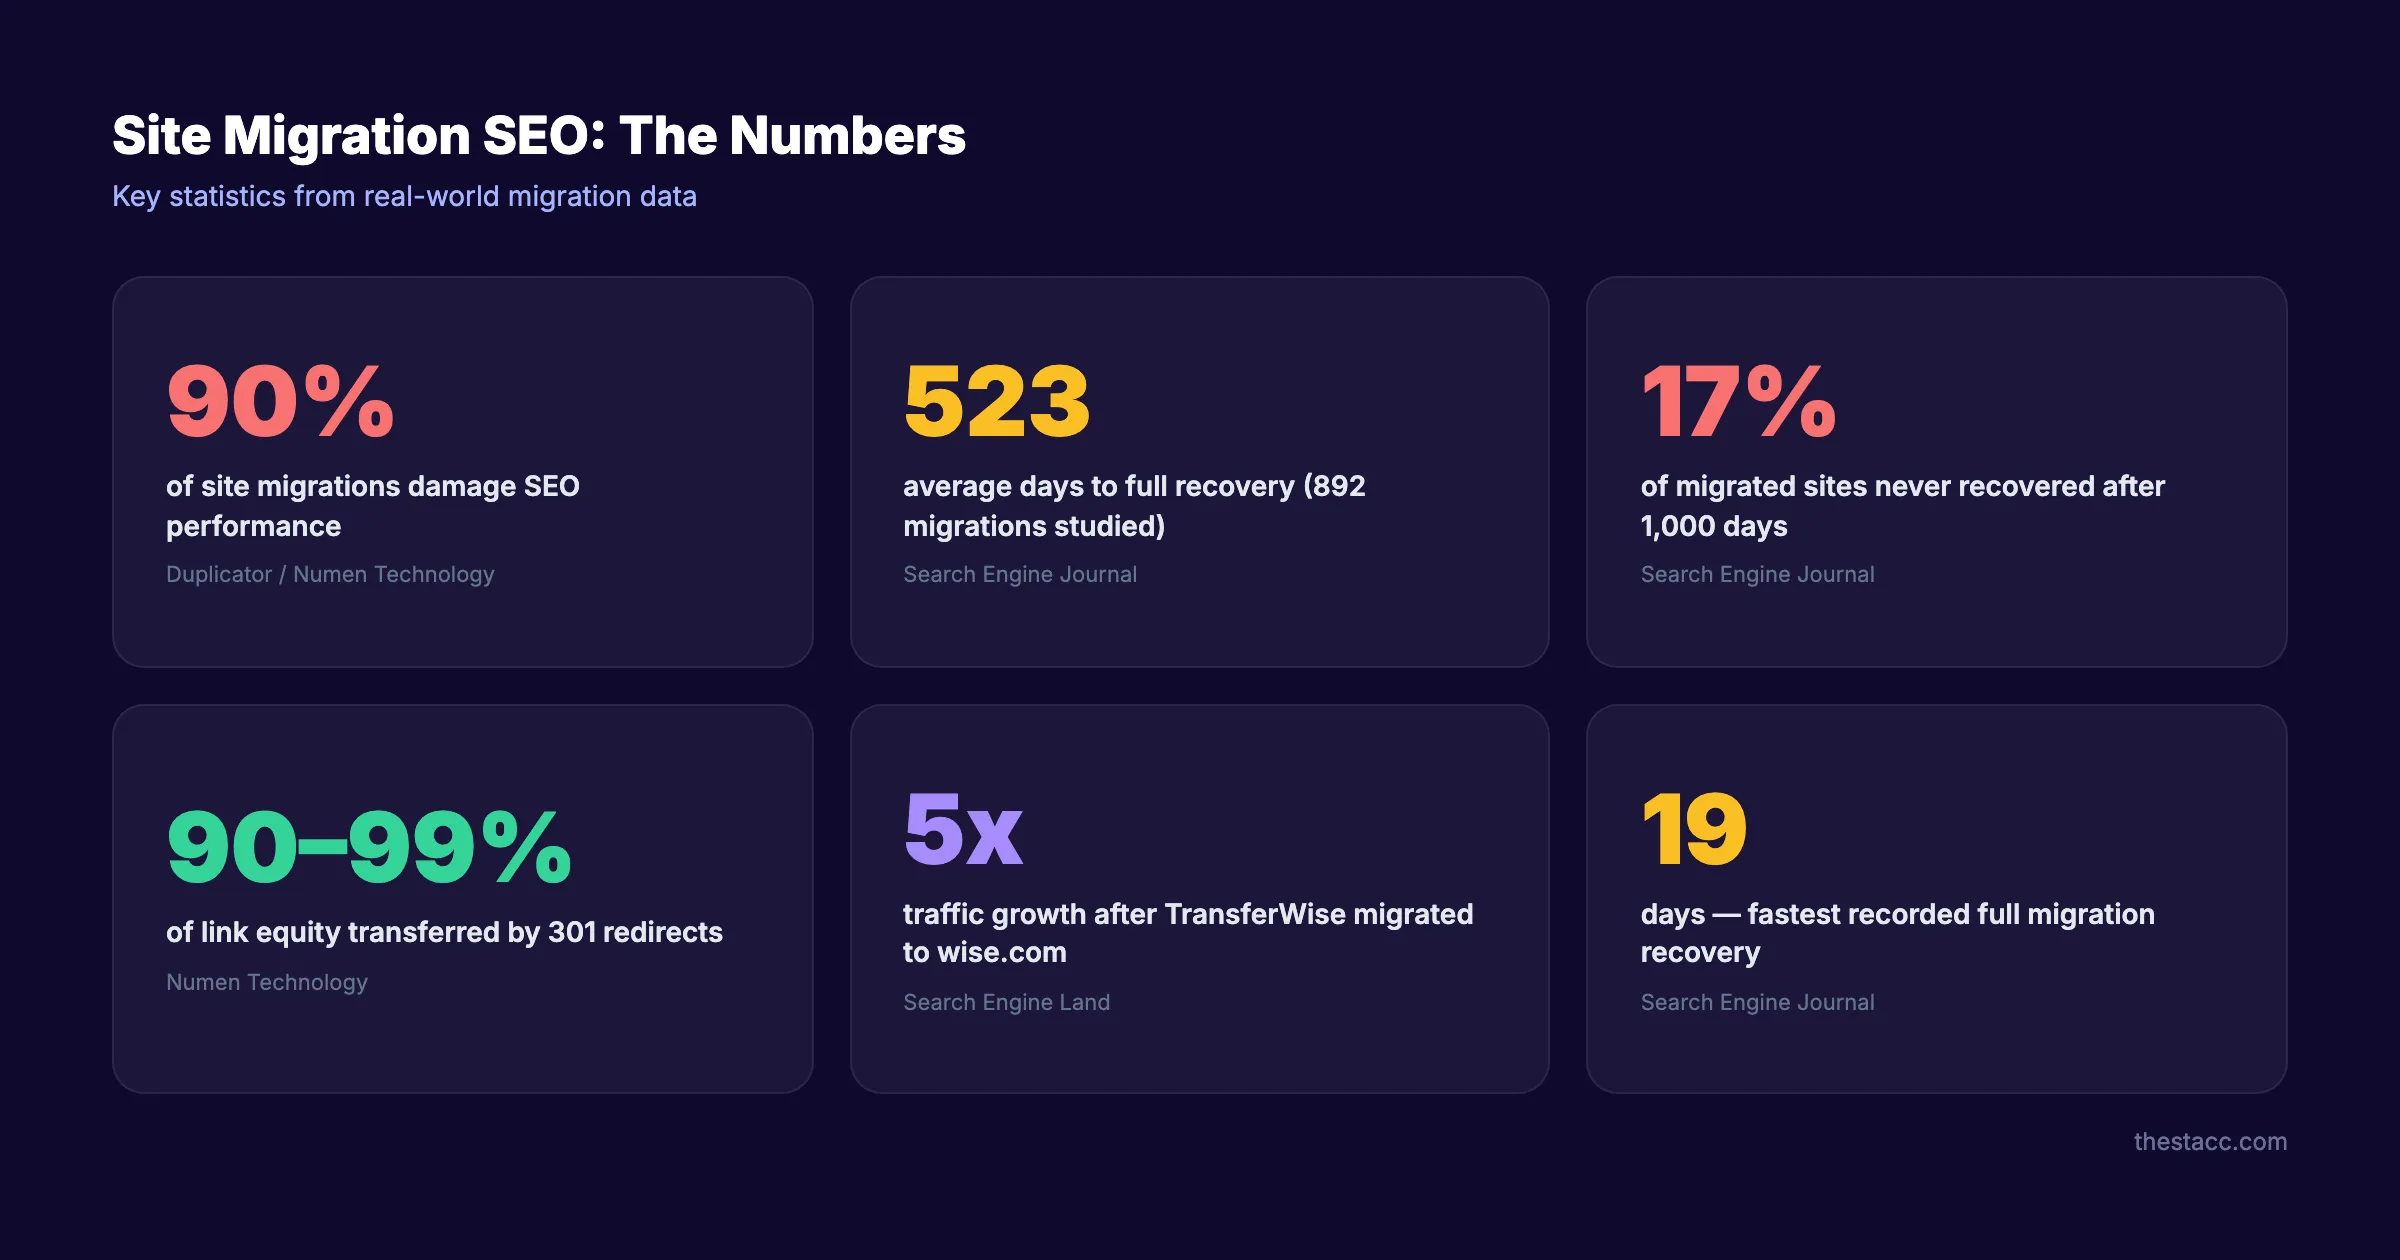
90% of site migrations damage SEO. That is not a typo.
A study of 892 migrations found the average recovery time was 523 days. 17% of those sites never recovered at all. One UK retailer lost $5 million in the first month from a botched migration.
The pattern is always the same. Businesses migrate for good reasons. New design, new CMS, new domain. But they treat SEO as an afterthought. Rankings drop 30 to 60%. Leads dry up. Revenue takes a hit that lasts months.
This does not have to happen. A well-planned site migration SEO strategy protects your traffic. It can even improve rankings long term. TransferWise migrated to wise.com and grew from 32 million to 205 million monthly visits within 2 years.
We have published 3,500+ SEO articles across 70+ industries. Many of our clients go through site migrations. This is the exact 8-step process that protects rankings every time.
Here is what you will learn:
- How to audit and benchmark your site before touching anything
- How to build a redirect map that transfers link equity
- How to launch without losing indexed pages
- How to monitor post-migration and fix issues fast
- The 3 most common mistakes that cause permanent traffic loss
What You Will Need
Time required: 2 to 6 weeks (depending on site size)
Difficulty: Intermediate
What you will need:
- Google Search Console access
- A crawling tool (Screaming Frog, Sitebulb, or Ahrefs Site Audit)
- Spreadsheet software for URL mapping
- Staging environment on the new platform
- Access to your DNS provider
Step 1: Audit and Benchmark Your Current Site
Before you change anything, record everything. You cannot measure what you did not track. This baseline becomes your recovery benchmark after launch.
Specifically:
- Export your full organic traffic data from Google Analytics (last 12 months)
- Record your top 50 ranking keywords and their positions in Google Search Console
- Note your current Domain Authority or Domain Rating
- Screenshot your Core Web Vitals scores
- Count your total indexed pages (use
site:yourdomain.comin Google) - Document your current backlink profile (total referring domains and top links)
Save this data in a dedicated folder. Label it “Pre-Migration Baseline” with the date. You will reference it for months after launch.
Run a full technical SEO audit at this stage. Fix critical issues before migration. Migrating a broken site carries those problems to the new one.
Why this step matters: Without a baseline, you cannot distinguish migration damage from pre-existing issues. Every decision you make post-launch depends on this data.
Pro tip: Export your Google Search Console data weekly for 4 weeks before migration. This gives you a rolling average that accounts for normal traffic fluctuations.
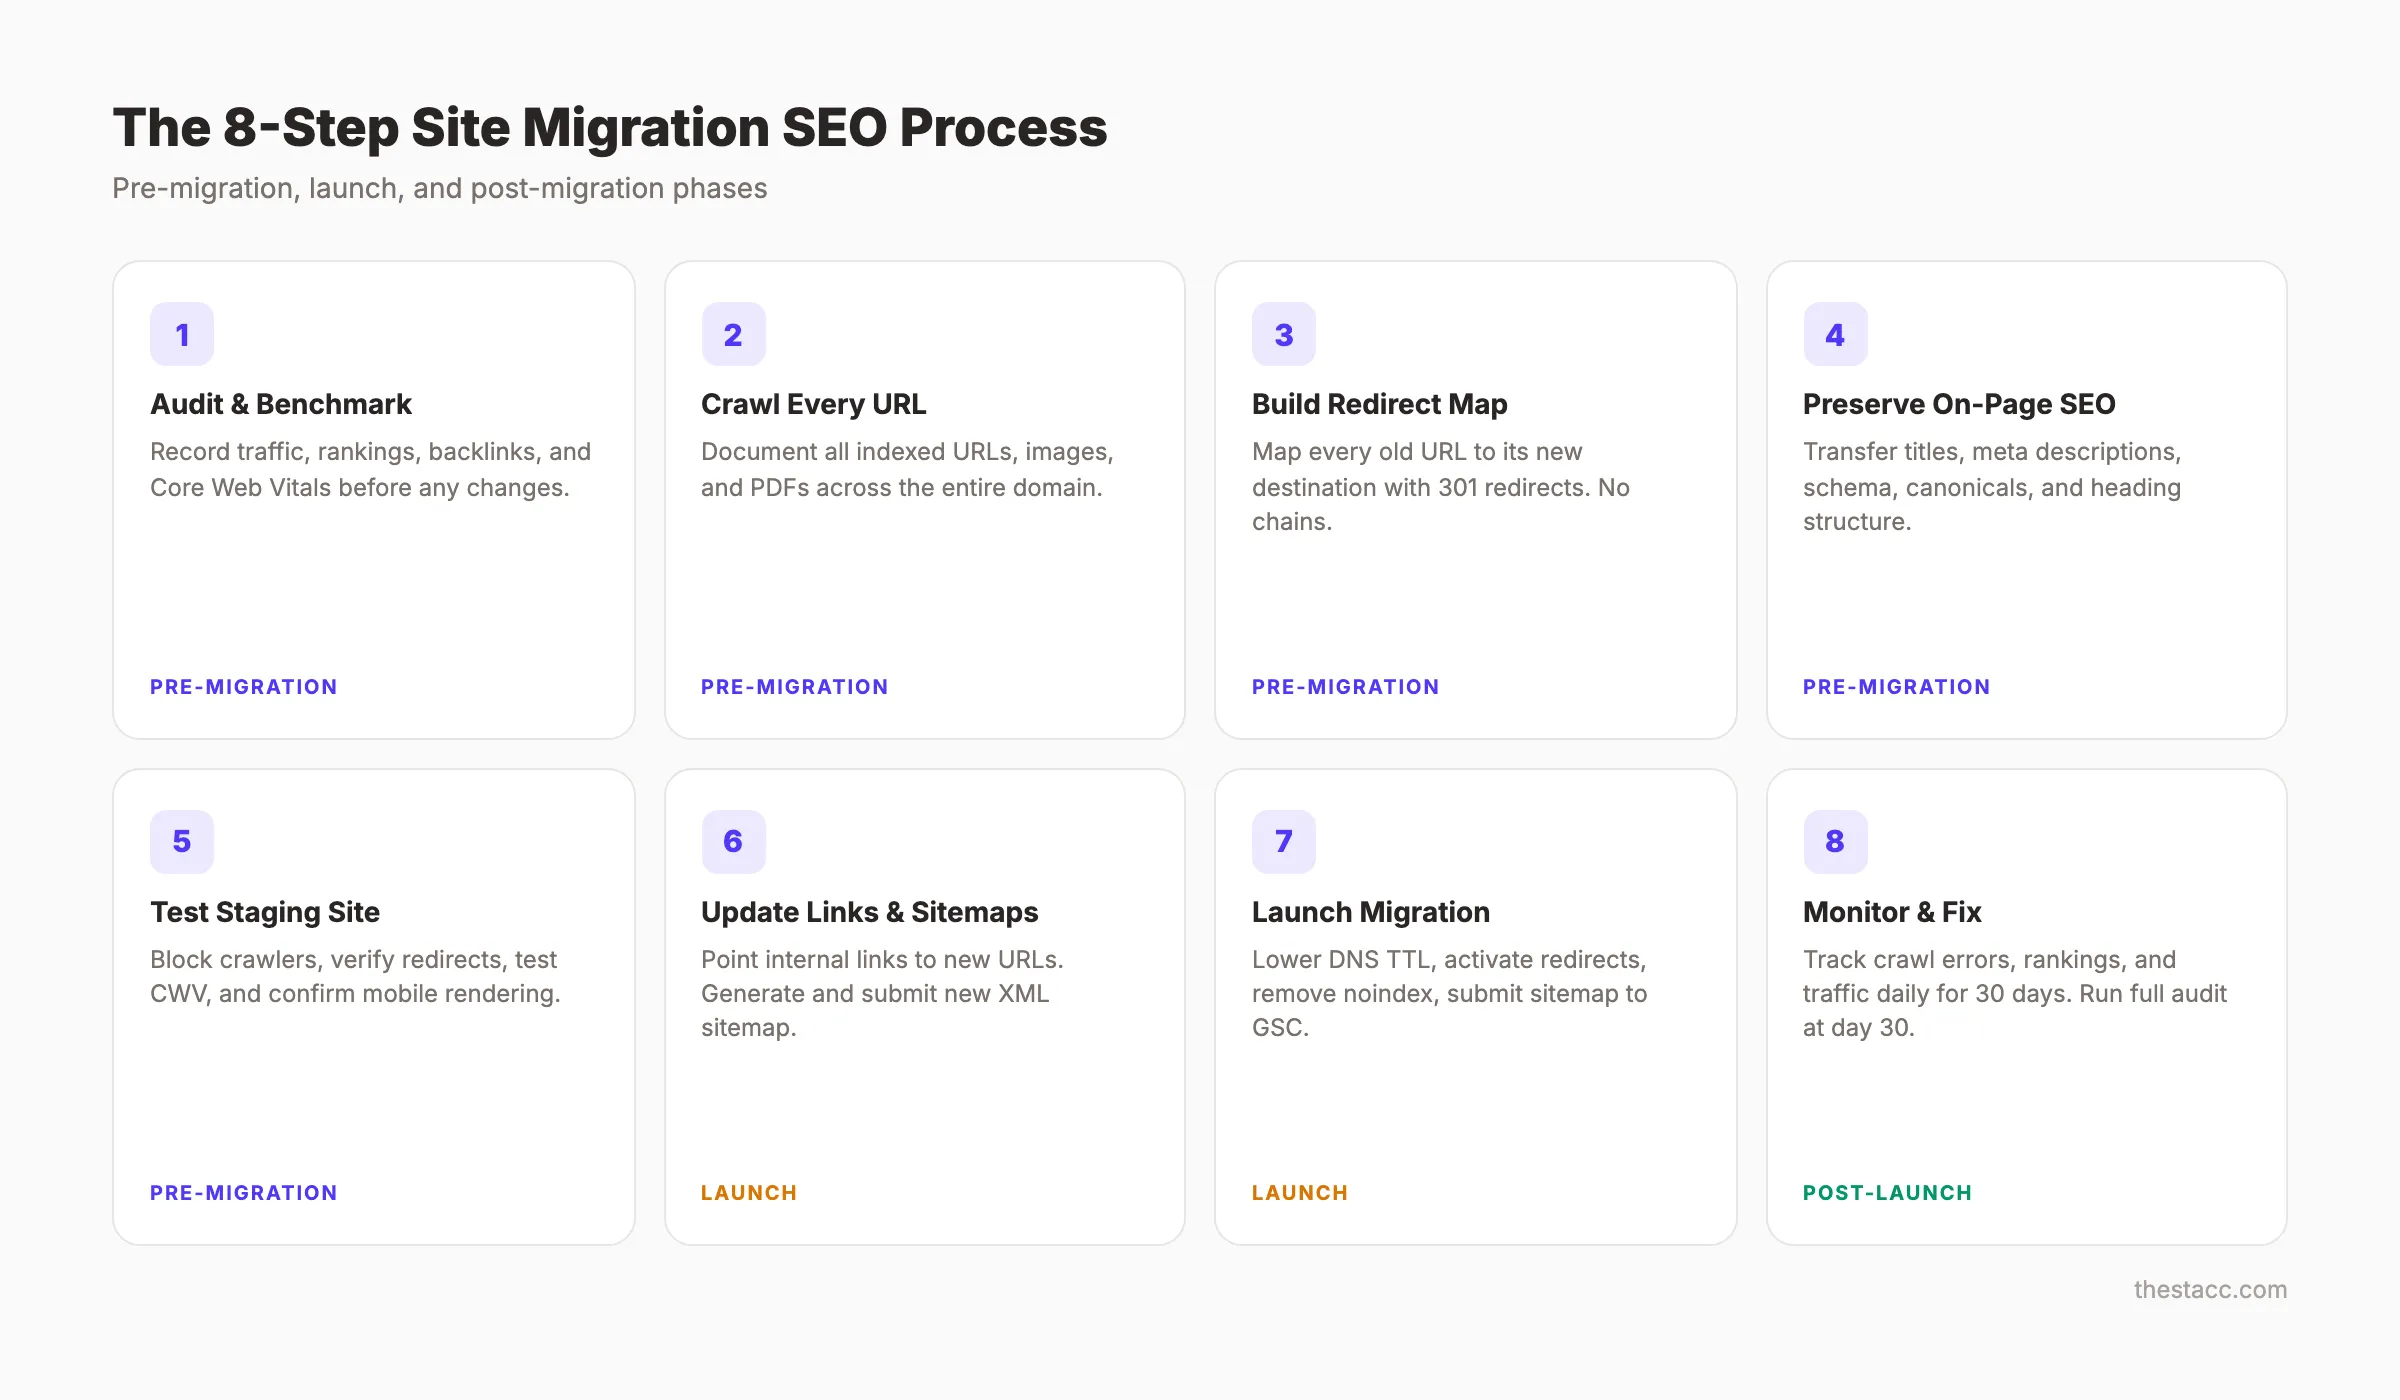
Step 2: Crawl and Document Every URL
Crawl your entire existing site. Capture every URL that Google knows about. This includes pages, images, PDFs, and any other indexed assets.
Specifically:
- Run Screaming Frog or Sitebulb on your full domain
- Export the complete URL list with status codes, titles, and meta descriptions
- Cross-reference with Google Search Console’s indexed pages report
- Check your XML sitemap for URLs not found in the crawl
- Include image URLs if you rely on Google Image Search traffic
- Flag any URLs returning 404 or 302 status codes
Your final list should match what Google has indexed. Not what your CMS shows. Not what your navigation links to. What Google actually knows about.
This crawl becomes the foundation of your redirect map in the next step. Miss a URL here and you create a broken link after launch.
Why this step matters: According to Semrush’s migration checklist, missed URLs are the number one cause of post-migration traffic drops. Every URL without a redirect becomes a dead end for Google and your visitors.
Step 3: Build a Complete Redirect Map
The redirect map is the single most important document in your migration. It tells Google where every old URL now lives. Get this wrong and you lose link equity, rankings, and traffic.
Specifically:
- Create a spreadsheet with columns: Old URL, New URL, Status Code, Priority
- Map every old URL to its equivalent new URL
- Use 301 redirects for permanent moves (they transfer 90 to 99% of link equity)
- Never use 302 redirects for permanent migrations
- Identify pages with no direct equivalent and redirect to the closest relevant page
- Flag your top 20 traffic pages for manual verification
Redirect rules:
| Scenario | Redirect To |
|---|---|
| Page exists on new site | Exact new URL (1:1 match) |
| Page merged with another | Combined page URL |
| Page removed permanently | Most relevant parent page |
| Category restructured | New category page |
| Domain change only | Same path on new domain |
Avoid redirect chains at all costs. An old URL should reach its final destination in one hop. Chains slow crawling and leak link equity at each step.
Why this step matters: 301 redirects transfer 90 to 99% of link equity to the new URL. Without them, every inbound link pointing to your old URLs sends authority into a void. That UK retailer lost $5 million because their redirect implementation failed.
Pro tip: Sort your redirect map by organic traffic (highest first). Verify the top 50 URLs manually. These pages carry the most SEO value.
Step 4: Preserve On-Page SEO Elements
Your new site needs to carry forward every on-page signal that Google uses to rank your pages. A fresh design does not mean starting your on-page SEO from zero.
Specifically:
- Transfer all title tags and meta descriptions to corresponding new pages
- Keep your H1 and H2 heading structure intact (or improve it)
- Preserve schema markup and structured data on every page
- Maintain canonical tags pointing to the correct new URLs
- Transfer alt text for all images
- Keep your internal linking structure intact
Do not let a designer or developer strip metadata during the redesign. This happens constantly. The new site looks great but ranks for nothing because someone deleted 200 title tags.
Compare your pre-migration crawl data (Step 2) with the staging site. Flag any page where the title, meta description, or H1 changed unintentionally.
Why this step matters: Google uses title tags, headings, and structured data to understand page content. Changing these signals during migration forces Google to re-evaluate every page. That re-evaluation causes temporary and sometimes permanent ranking drops.
Stop writing. Start ranking. Stacc publishes 30 SEO articles per month for $99. Your migration protects existing rankings. Stacc builds new ones. Start for $1 →
Step 5: Set Up and Test the Staging Environment
Your staging site is where you catch problems before they reach Google. Never skip this step. Never rush it.
Specifically:
- Block all search engine crawlers on the staging site (use robots.txt disallow or password protection)
- Add
noindexmeta tags to every staging page as a safety net - Verify all redirects work by testing a sample of 50 to 100 URLs
- Check that all forms, tracking codes, and third-party scripts function
- Test Core Web Vitals on the new platform
- Verify mobile rendering across 3 or more devices
The staging environment must mirror your production setup exactly. Different server configurations between staging and production cause redirects to break on launch day.
Run your crawling tool against the staging site. Compare the results with your pre-migration crawl. Every page on the old site should have a matching page or redirect on the new one.
Why this step matters: A staging site that accidentally gets indexed by Google creates duplicate content across your entire domain. One missed noindex tag can take weeks to clean up. Test everything here so launch day has zero surprises.
Step 6: Update Internal Links and Sitemaps
Redirects handle external links and bookmarks. But your own internal links should point directly to new URLs. Not through redirects.
Specifically:
- Update every internal link in your content to use the new URL structure
- Generate and submit a new XML sitemap with all new URLs
- Remove any references to old URLs in navigation, footer, and sidebar
- Update canonical tags to reference new URLs (not old ones)
- If changing domains, update your hreflang tags for international pages
- Check embedded media, PDFs, and downloadable assets for old URL references
Internal links that go through redirects still work. But they add unnecessary server load and slow crawl budget processing. Google prefers clean, direct links.
Submit your new sitemap in Google Search Console immediately after launch. If you changed domains, use the Change of Address tool in GSC.
Why this step matters: Google discovers and crawls your pages through internal links and sitemaps. Outdated links force Googlebot through redirect chains. Clean internal links help Google index your new site structure faster.
Step 7: Launch the Migration
Launch day is execution day. Not planning day. Every decision should already be made.
Specifically:
- Lower your DNS TTL to 300 seconds 48 hours before launch (speeds propagation)
- Launch during your lowest-traffic window (typically Tuesday or Wednesday, early morning)
- Activate all 301 redirects simultaneously
- Remove
noindextags and robots.txt blocks from the production site - Submit your new XML sitemap in Google Search Console
- If migrating domains, submit a Change of Address request in GSC
- Verify Google Analytics and all tracking scripts fire correctly
Do not launch on a Friday. If something breaks, you lose an entire weekend of traffic before anyone can fix it.
Test 20 critical pages manually within the first hour. Check that redirects resolve, pages load, and tracking records visits.
Why this step matters: A clean launch prevents the 30 to 60% traffic drops that poorly executed migrations cause. According to Search Engine Land, TransferWise experienced only a temporary dip before growing traffic 5x after their domain migration to wise.com.
Your SEO team. $99 per month. 30 optimized articles, published automatically. While you focus on your migration, Stacc keeps your content pipeline running. Start for $1 →
Step 8: Monitor and Fix Post-Launch Issues
The migration does not end at launch. The first 30 days determine whether you recover fully or bleed traffic for months.
Specifically:
- Check Google Search Console daily for crawl errors, 404s, and indexing issues
- Monitor organic traffic in Google Analytics (compare to your pre-migration baseline)
- Track your top 50 keyword rankings daily for the first 2 weeks
- Use Screaming Frog to recrawl the live site and verify all redirects resolve
- Watch for redirect chains (any URL that redirects more than once)
- Check your backlink profile to ensure referring domains point to working pages
- Submit individual URLs for re-indexing if critical pages drop from the index
- Run a full SEO audit at the 30-day mark
Expect some fluctuation in the first 2 weeks. Rankings often dip before stabilizing. This is normal. Panic becomes warranted only if traffic drops exceed 40% after 4 weeks.
Why this step matters: The average site migration takes 523 days to fully recover. Sites that monitor aggressively and fix issues in the first 30 days recover in weeks, not years. The difference is speed of response.
Pro tip: Set up automated alerts in Google Search Console for crawl error spikes. This gives you same-day notification when something breaks.
Results: What to Expect
After completing these 8 steps, here is what happens:
- Week 1 to 2: Minor ranking fluctuations. Google recrawls and re-evaluates your pages. Some keywords dip temporarily.
- Week 3 to 4: Rankings begin stabilizing. Most pages return to pre-migration positions. Fix any remaining 404s or redirect issues.
- Month 2 to 3: Full recovery for well-executed migrations. Top pages regain or exceed previous rankings.
- Month 3 to 6: Potential ranking improvements if the new site has better Core Web Vitals, cleaner architecture, or stronger content.
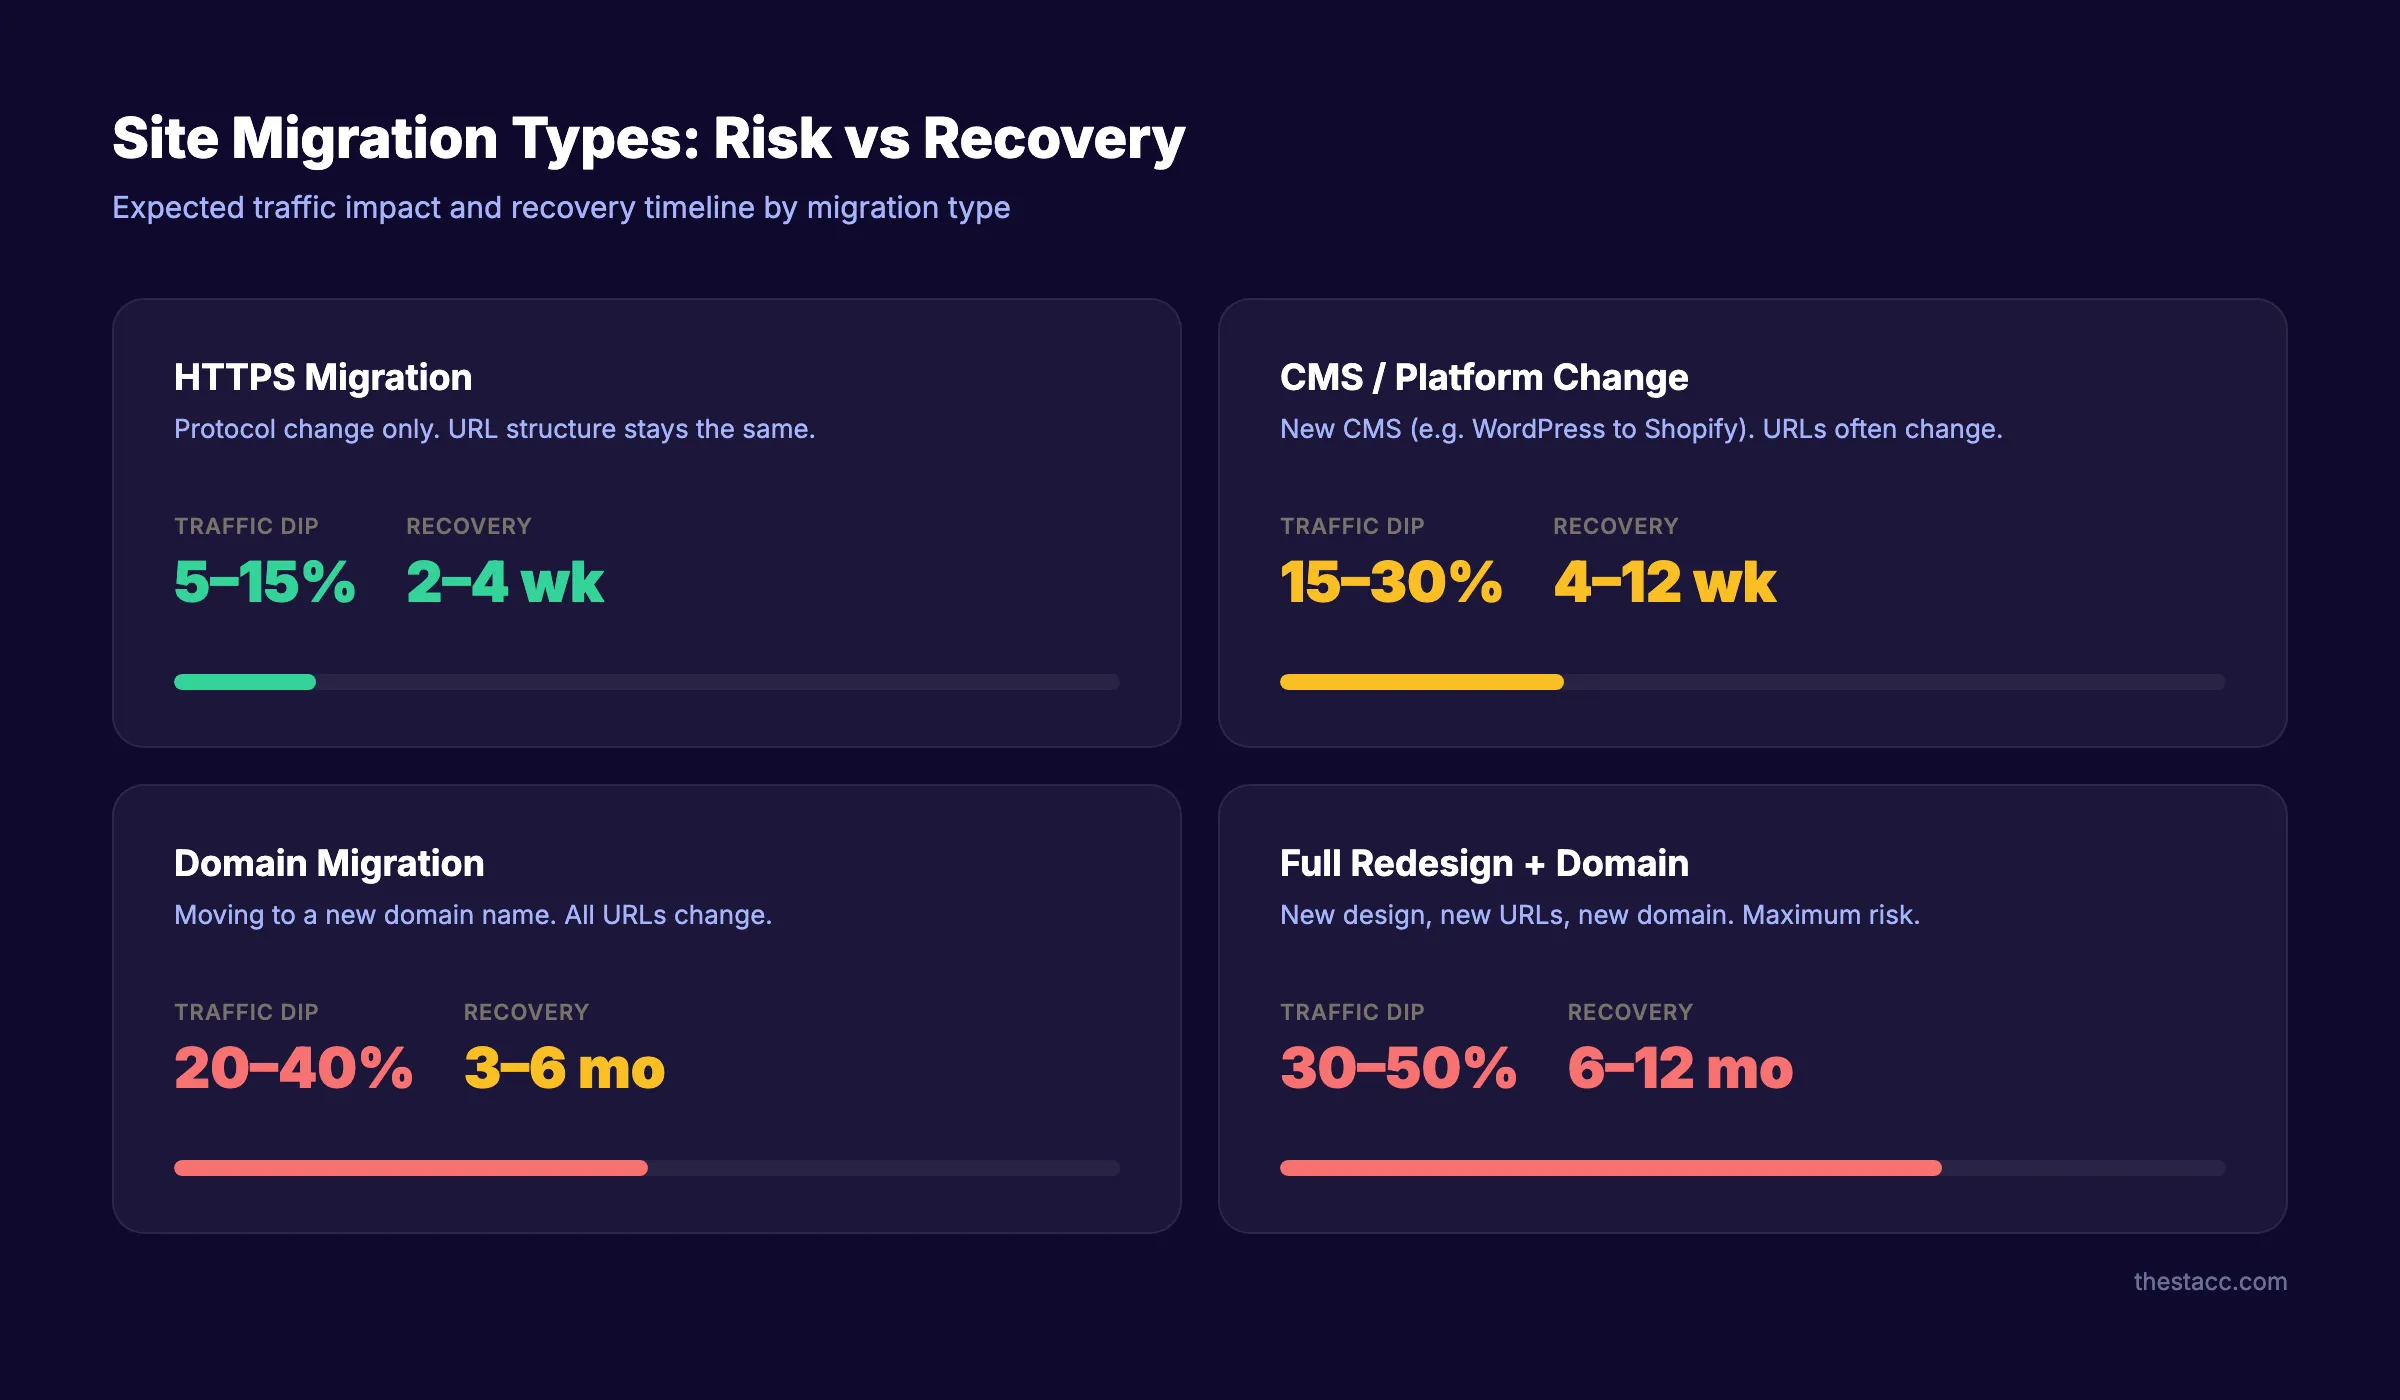
| Migration Type | Expected Traffic Dip | Recovery Timeline |
|---|---|---|
| HTTPS migration | 5 to 15% | 2 to 4 weeks |
| CMS or platform change | 15 to 30% | 4 to 12 weeks |
| Domain migration | 20 to 40% | 3 to 6 months |
| Full redesign + domain change | 30 to 50% | 6 to 12 months |
Common Site Migration SEO Mistakes
Most migration failures come from the same handful of errors. Avoid these and you eliminate 80% of the risk.
Mistake 1: No pre-migration baseline. Without recorded traffic, ranking, and backlink data, you cannot measure what you lost. Or prove what you preserved. Always complete Step 1 before anything else.
Mistake 2: Using 302 redirects instead of 301s. This is the single most expensive technical mistake. A 302 tells Google the move is temporary. Google does not transfer full link equity through 302 redirects. Every 302 should be a 301 redirect. Check your redirect implementation twice.
Mistake 3: Launching without testing redirects. Teams rush to launch day and skip staging verification. Then 500 redirects fail silently. The result is hundreds of broken links that Google discovers before you do. Test a minimum of 100 URLs before going live.
Mistake 4: Forgetting about images and PDFs. Most redirect maps only cover HTML pages. But Google also indexes images, PDFs, and other media. If those URLs change without redirects, you lose Google Image Search traffic and any link equity pointing to those assets.
Mistake 5: Changing title tags and meta descriptions during redesign. Designers and developers often rewrite or remove meta data during a site redesign. A changed title tag forces Google to re-evaluate the page. Even if the URL stays the same, a new title can drop rankings for weeks. Preserve your on-page SEO elements exactly as they were.
Mistake 6: No post-launch monitoring plan. Launching the migration is not the finish line. It is the starting line. Sites that do not monitor daily for the first 30 days miss critical errors. A crawl error spike on day 3 is fixable. The same error discovered on day 30 means a month of lost traffic.
Mistake 7: Redirect chains. URL A redirects to URL B, which redirects to URL C. Each hop leaks link equity and slows crawl budget processing. Every redirect should resolve in one hop. Audit your redirect map for chains before launch.
Troubleshooting
Problem: Traffic dropped more than 40% after 2 weeks. Solution: Check Google Search Console for a spike in 404 errors. Verify your redirect map covers all high-traffic pages. Run a crawl to find broken redirects.
Problem: Google is not indexing the new pages.
Solution: Confirm you removed all noindex tags and robots.txt blocks. Submit your new sitemap. Request indexing for your top 20 pages manually in GSC.
Problem: Rankings recovered but traffic did not. Solution: Compare your new title tags and meta descriptions to the old ones. A changed title tag can drop click-through rates even if rankings stay the same.
FAQ
How long does it take for SEO to recover after a site migration?
Recovery depends on migration type and execution quality. HTTPS migrations recover in 2 to 4 weeks. CMS changes take 4 to 12 weeks. Domain migrations take 3 to 6 months. A study of 892 migrations found the average recovery was 523 days. Well-planned migrations recover in weeks.
Does changing your website design affect SEO?
A design change alone does not hurt SEO if you preserve title tags, meta descriptions, headings, internal links, and URL structure. Problems arise when redesigns accidentally change URLs, remove content, or strip metadata. Follow the 8 steps in this guide to prevent that.
How much traffic do you lose during a site migration?
Most migrations cause a 10 to 40% temporary traffic dip. The exact amount depends on migration scope. HTTPS changes cause the smallest dips (5 to 15%). Full domain changes with redesigns cause the largest (30 to 50%). Proper redirect mapping and monitoring minimize the loss.
What is the difference between a 301 and 302 redirect for migration?
A 301 redirect tells Google the move is permanent. It transfers 90 to 99% of link equity. A 302 tells Google the move is temporary. It does not transfer full link equity. Always use 301 redirects for site migrations.
Should I hire an SEO specialist for a site migration?
For sites with more than 500 indexed pages, significant organic traffic, or complex URL structures, an SEO specialist adds measurable value. The cost of a specialist is far less than the cost of losing 6 months of organic traffic. For smaller sites with simple URL structures, this guide covers what you need.
What tools do I need for site migration SEO?
At minimum, you need Google Search Console (free), a crawling tool like Screaming Frog (free for up to 500 URLs), and a spreadsheet for redirect mapping. For larger migrations, add Ahrefs or Semrush for backlink monitoring and an SEO audit tool for post-launch verification.
Can a site migration actually improve SEO?
Yes. Migrations to faster hosting, cleaner URL structures, or better mobile experiences often improve rankings after the initial recovery period. TransferWise grew from 32 million to 205 million monthly visits after migrating to wise.com. The key is proper execution.
3,500+ blogs published. 92% average SEO score. See what Stacc can do for your site while you handle the migration. Start for $1 →
Site migration is high-stakes work. But it is not a gamble when you follow a proven process. Audit, map, redirect, test, launch, monitor. Do each step thoroughly and your rankings survive the transition.
Related Tools & Resources
Free SEO Tools:
Best Lists:

Written by
Siddharth GangalSiddharth is the founder of theStacc and Arka360, and a graduate of IIT Mandi. He spent years watching great businesses lose organic traffic to competitors who simply published more. So he built a system to fix that. He writes about SEO, content at scale, and the tactics that actually move rankings.
30 SEO blog articles published every month
Keyword-optimized, scheduled, and live on your site. Automatically.
30-day trial · Cancel anytime
theStacc
Stop writing SEO content manually
30 blog articles, 30 GBP posts, and social media content. Published every month. Automatically.
Try for free$1 for 3 days · Cancel anytime