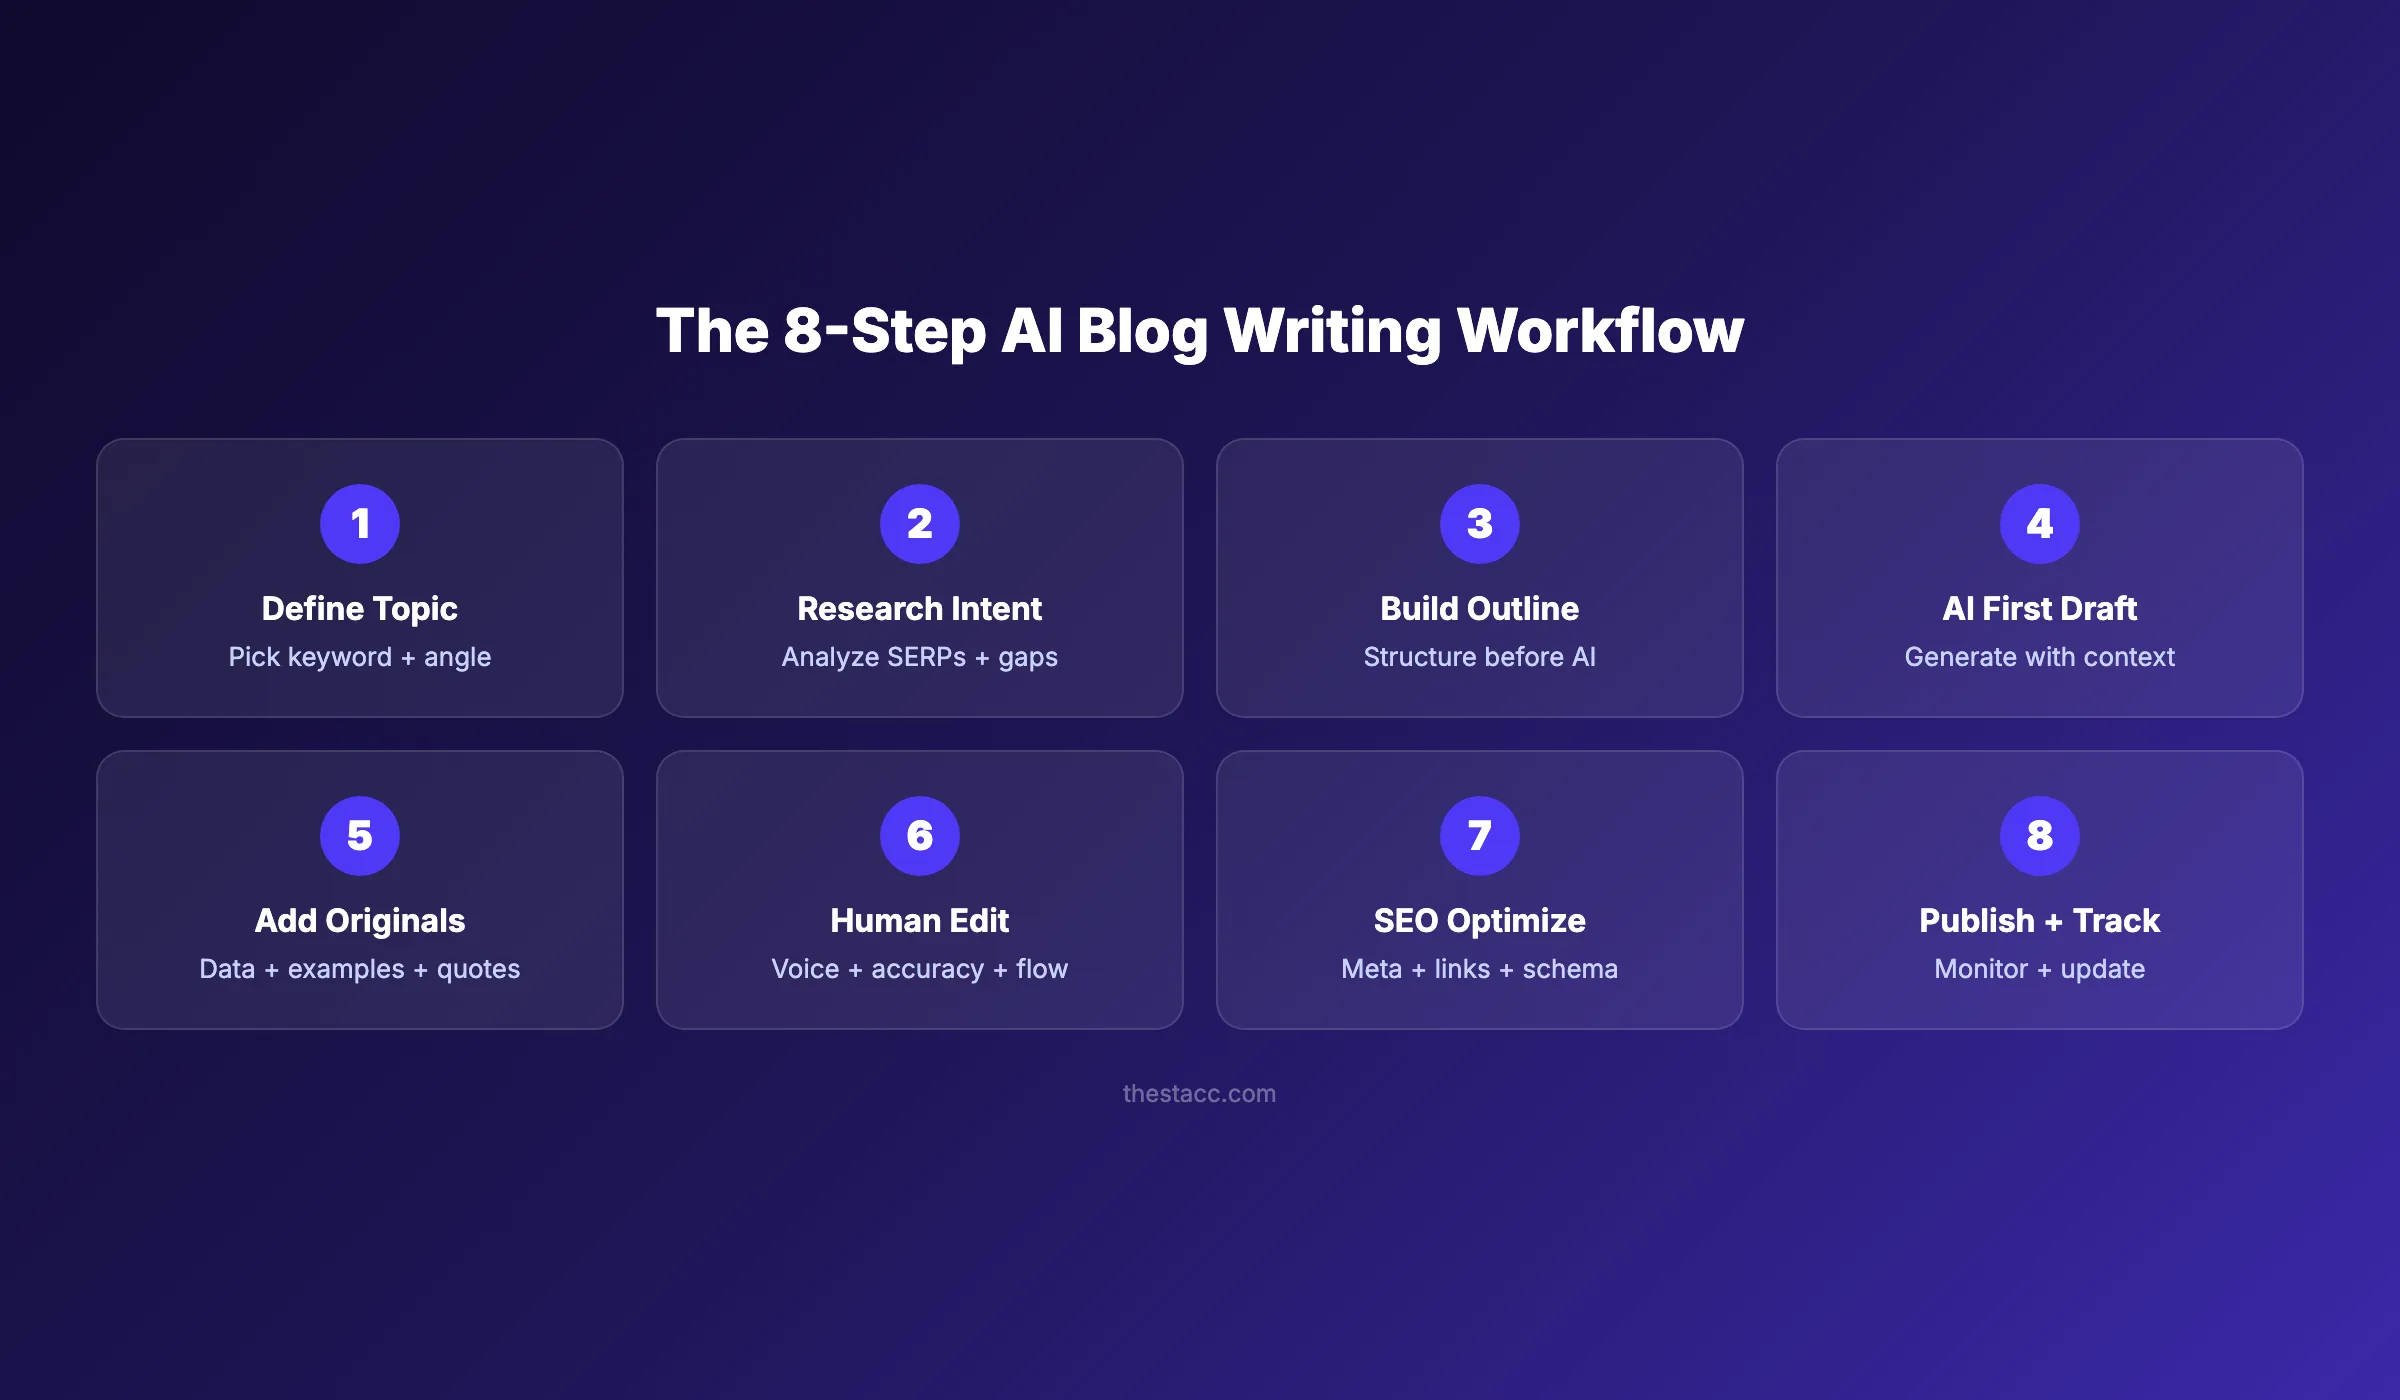
How to Use AI to Write Blog Posts in 8 Steps
Learn how to use AI to write blog posts that rank. 8 steps covering outlines, prompts, editing, and SEO. Used to publish 3,500+ blogs.
Most businesses that use AI to write blog posts end up with generic filler that Google ignores. They paste a topic into ChatGPT, copy the output, and publish. The result is content that sounds like every other AI post on the internet.
That approach wastes time and damages trust with readers. Google does not penalize AI content. But it does penalize thin, unhelpful content. And that is exactly what unedited AI drafts produce.
This guide shows you the right way to use AI for blog writing. You will learn an 8-step process that turns AI from a shortcut into a publishing system.
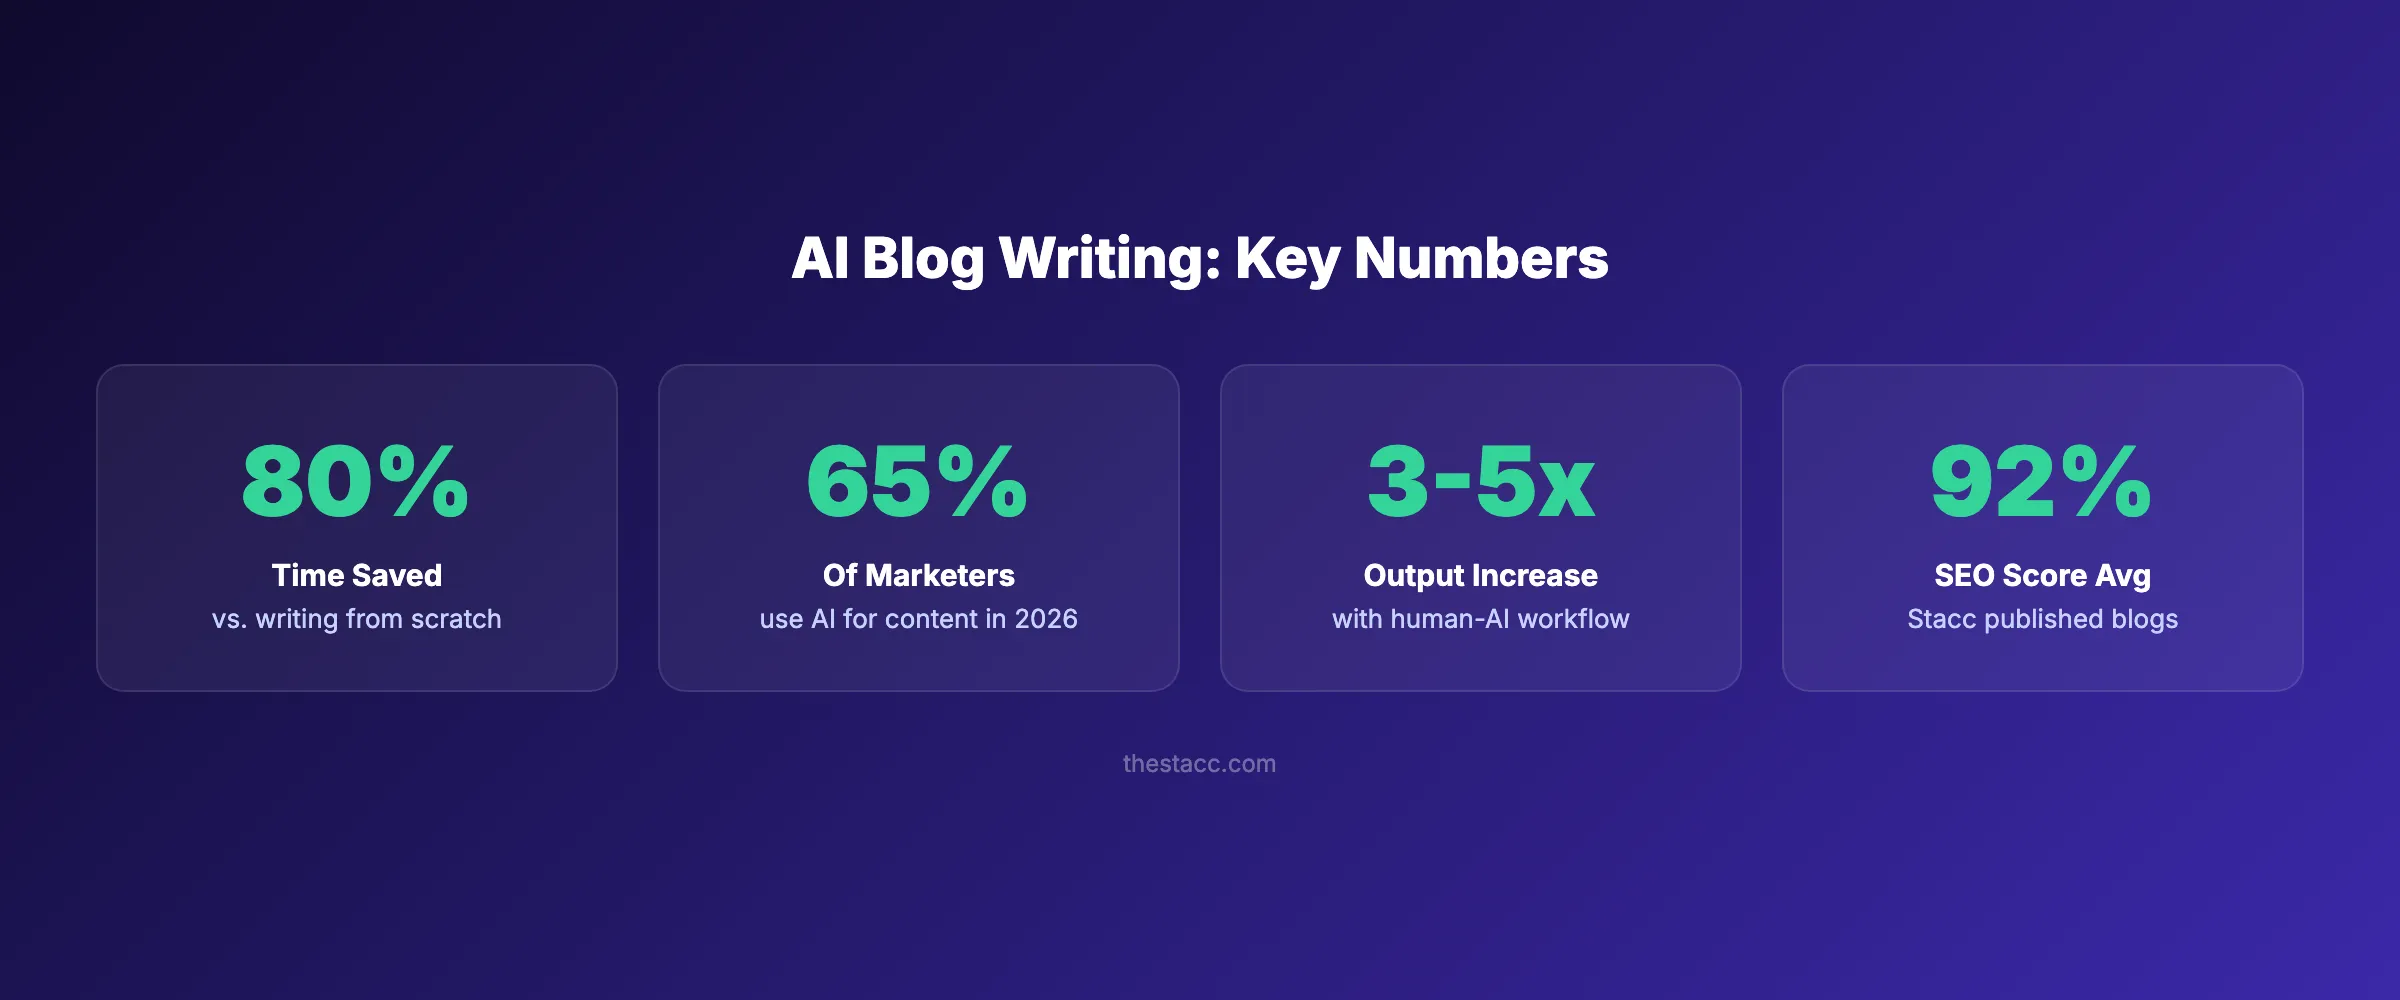
We publish 3,500+ blog posts across 70+ industries at Stacc. AI plays a role in our workflow. But it is never the entire workflow. The human steps matter more than the AI steps.
Here is what you will learn:
- How to pick topics and keywords before touching AI
- How to build outlines that produce better AI output
- The exact prompt structure that avoids generic content
- How to edit AI drafts for voice, accuracy, and SEO
- How to optimize and publish posts that actually rank
Step 1: Define Your Topic and Target Keyword
AI cannot pick your topic for you. That decision requires understanding your audience, your business goals, and what your competitors already cover.
Start with keyword research. Use a tool like Google Keyword Planner, Ahrefs, or Semrush to find terms with search volume and reasonable difficulty.
Specifically:
- Pick 1 primary keyword with monthly search volume above 100
- Identify 3 to 5 secondary keywords related to the main term
- Check the top 10 results for your keyword to gauge competition
- Choose an angle that existing content misses
A good topic sits at the intersection of what your audience searches for and what your business can speak to with authority. A bad topic is one you picked because AI suggested it.
Why this step matters: Skipping keyword research means you write content nobody searches for. AI will happily write 2,000 words about a topic with zero demand. That is wasted effort.
Pro tip: Look at the “People Also Ask” section in Google for your keyword. These questions reveal secondary topics and FAQ ideas you can work into your blog post outline.
Step 2: Research Search Intent and Competitors
Knowing your keyword is not enough. You need to understand why someone types that query into Google.
Search intent falls into 4 categories: informational, navigational, commercial, and transactional. Most blog posts target informational or commercial intent.
Open an incognito browser and search your primary keyword. Study the top 5 results.
Specifically:
- Note the content format (listicle, how-to, guide, comparison)
- Count the word length of top-ranking posts
- Record every H2 heading to see what sections they cover
- Identify gaps where top posts lack depth or miss subtopics
| Intent Type | Signal | Blog Format |
|---|---|---|
| Informational | ”how to,” “what is,” “guide” | Step-by-step, explainer |
| Commercial | ”best,” “top,” “review” | Listicle, comparison |
| Navigational | Brand name + feature | Product page, tutorial |
| Transactional | ”buy,” “pricing,” “sign up” | Landing page, not blog |
Your AI prompt will produce better results when you feed it competitor insights. Tell the AI what angles to cover and what to skip. That context is the difference between generic output and useful content.
Why this step matters: AI does not browse Google for you. Without competitor research, your AI draft will rehash surface-level talking points that already saturate page 1. Understanding search intent gives your content a real chance to rank.
Step 3: Build a Detailed Outline Before Prompting AI
This is the step most people skip. It is also the step that determines whether your AI content ranks or flops.
Most AI blog content fails because people skip the outline step. They give AI a topic and expect a structured, strategic article. That is not how it works.
Your outline is your blueprint. It tells the AI exactly what to write, in what order, and at what depth.
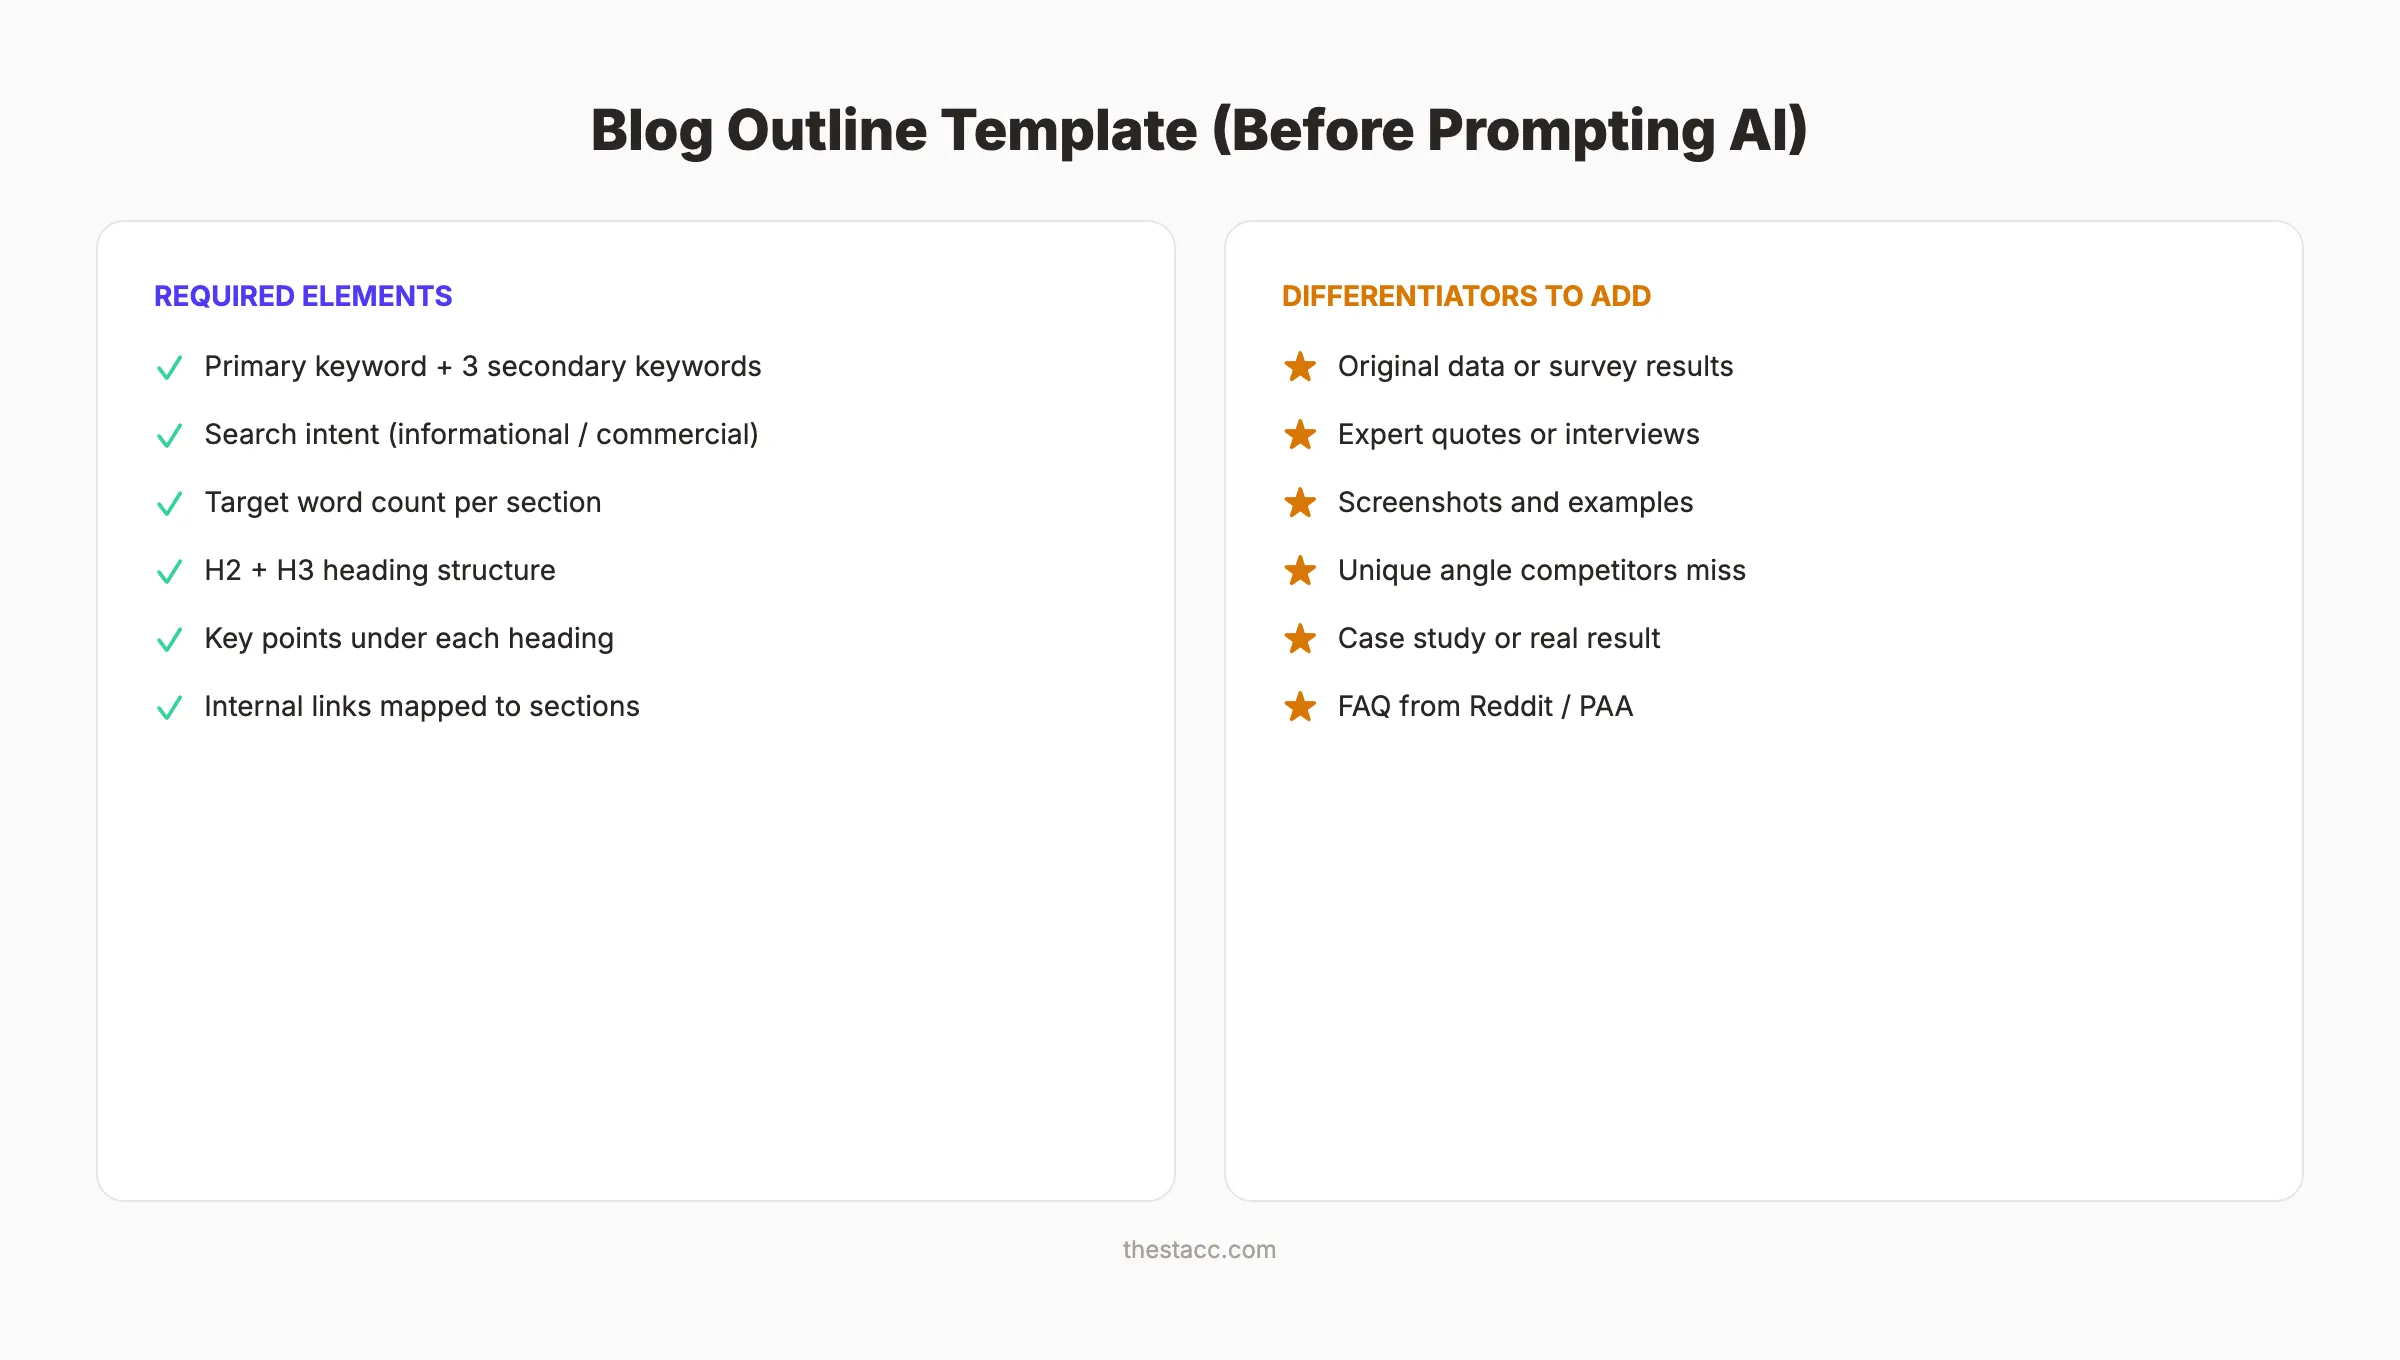
Specifically:
- Write every H2 and H3 heading yourself
- Assign a target word count to each section (200 to 400 words)
- List 2 to 3 key points under each heading
- Note where to place internal links, stats, and examples
- Map your internal linking strategy before writing
A strong outline for a 3,000-word post takes 20 to 30 minutes. That time investment cuts your editing time in half and doubles the quality of the AI output.
Why this step matters: An outline gives AI constraints. Constraints produce focused content. Without them, AI wanders into filler paragraphs and generic advice. Your outline is the single biggest factor in content quality.
Pro tip: Use your competitor research from Step 2 to build the outline. If all top results cover “keyword difficulty” but none cover “keyword intent mapping,” add that section. Your outline should match competitors on coverage and beat them on depth. Review our guide on blog post structure for SEO for proven heading frameworks.
Step 4: Write Your First Draft with AI
Now you are ready to prompt. But how you prompt determines everything.
Do not paste your entire outline into AI and say “write this blog post.” That produces a wall of generic text. Instead, prompt section by section.
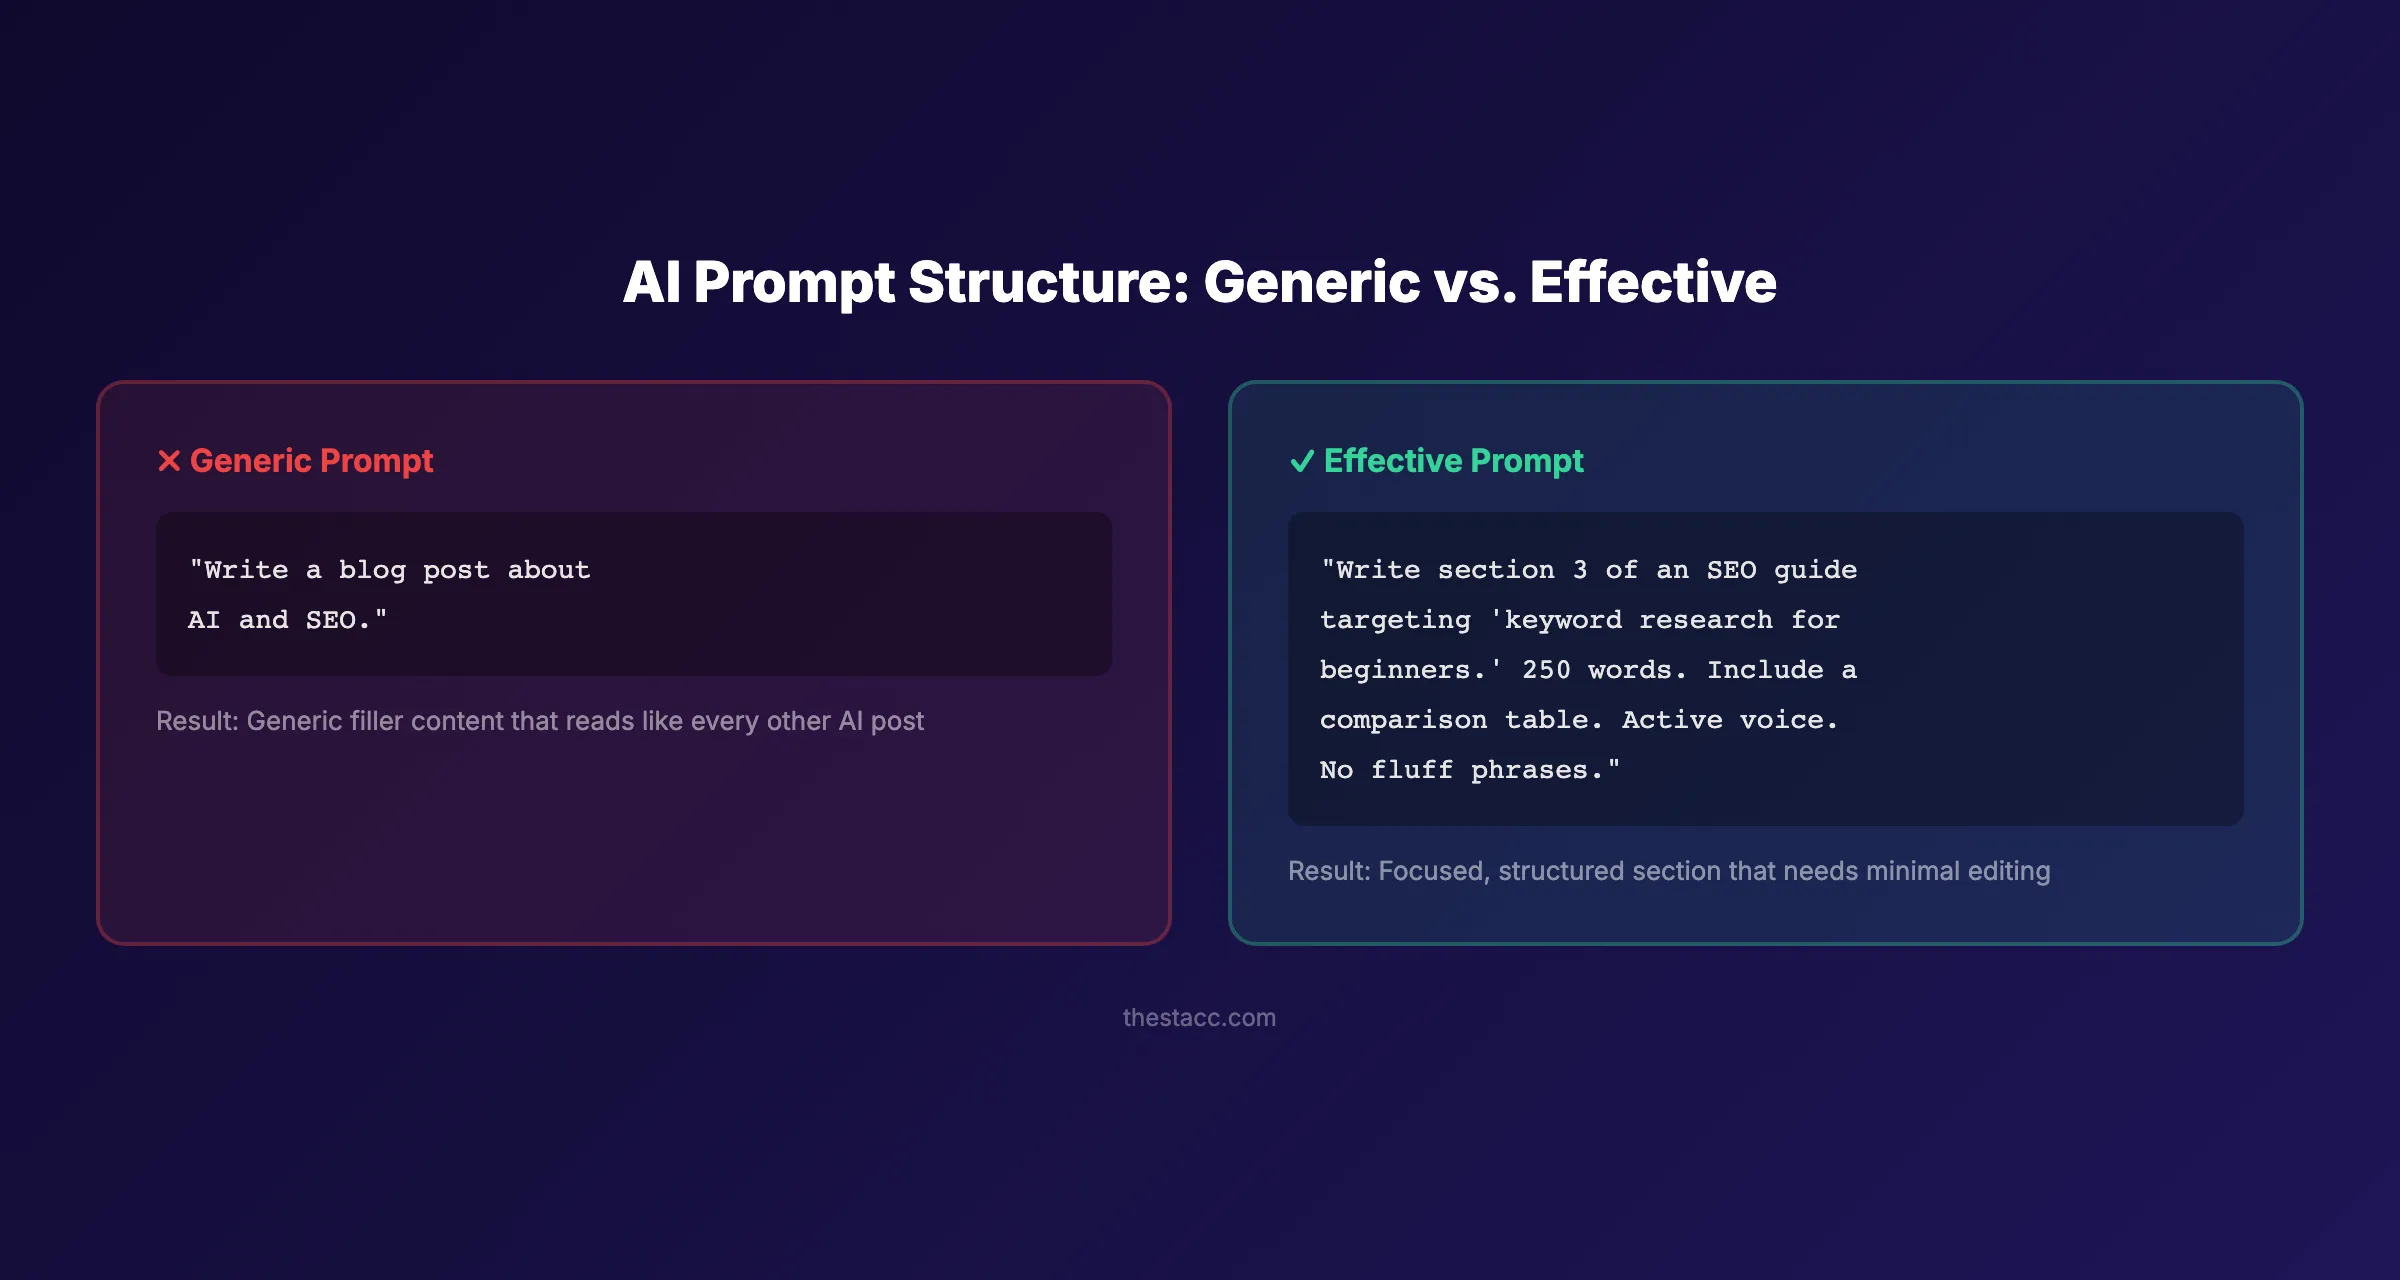
Specifically:
- Feed the AI one section at a time (1 H2 with its H3s)
- Include your target keyword, word count, and tone instructions
- Specify the format you want (paragraph, list, table, checklist)
- Provide context from your research (“top competitors cover X, but miss Y”)
Here is an effective prompt structure:
| Prompt Element | Example |
|---|---|
| Role | ”You are an SEO content writer for a marketing blog” |
| Section | ”Write section 3: How to Build an Outline” |
| Word count | ”250 to 300 words” |
| Format | ”Include a bulleted list and one comparison table” |
| Constraints | ”Active voice. No filler phrases. Numerals for numbers.” |
| Context | ”This targets beginners who have never used AI for writing” |
This approach takes slightly longer than a single prompt. But the output requires 70% less editing. That is a net time savings.
Why this step matters: A single mega-prompt produces content that loses focus by paragraph 3. Section-by-section prompting keeps each part tight, on-topic, and aligned with your outline.
AI handles the first draft. You handle everything else. Stacc publishes 30+ blog posts per month using a human-AI workflow that ranks. Start for $1 →
Step 5: Add Original Data, Examples, and Quotes
Here is where your content stops being “AI content” and starts being your content.
AI cannot create original data. It cannot share your experience. It cannot interview your customers. These elements are what separate content that ranks from content that sits on page 5.
Google’s guidelines on AI content are clear. The search engine rewards content that demonstrates experience, expertise, authoritativeness, and trustworthiness (E-E-A-T). Original insights are the fastest path to E-E-A-T.
Specifically:
- Replace generic claims with specific numbers (“increased traffic by 43%” instead of “improved results”)
- Add screenshots from real tools, dashboards, or results
- Include quotes from industry experts or team members
- Reference studies and surveys with links to the source
- Share a mini case study or real-world example
The exception is purely educational content where original data does not apply. Even then, reference specific external studies instead of vague claims.
Every 500 words should contain at least 1 original element that AI did not generate. That is the threshold where content shifts from “AI-written” to “AI-assisted.”
Here are original elements you can add that AI cannot produce:
| Element Type | Example | Where to Use |
|---|---|---|
| Internal data | ”Our clients saw a 37% increase in traffic” | Introduction, results sections |
| Screenshot | Tool dashboard showing real metrics | How-to steps, tutorials |
| Expert quote | Interview snippet from a team member | Authority-building sections |
| Case study | Before-and-after result from a real project | Midway through the post |
| Survey data | ”We surveyed 200 marketers and found…” | Data-heavy claims |
These are the elements that earn backlinks and get cited in AI search results. Generic content that any AI can produce does not attract links or citations.
Why this step matters: Readers can feel generic content. So can Google. Original data builds trust, earns backlinks, and makes your content citeable. According to HubSpot research, content with original data gets 6x more backlinks than content without it.
Step 6: Edit for Voice, Accuracy, and Flow
Editing is not optional. It is where 80% of the value gets created.
Raw AI drafts have predictable problems. They repeat phrases. They use passive voice. They hedge with words like “might” and “could potentially.” They include filler phrases like “it is worth noting” and “when it comes to.”
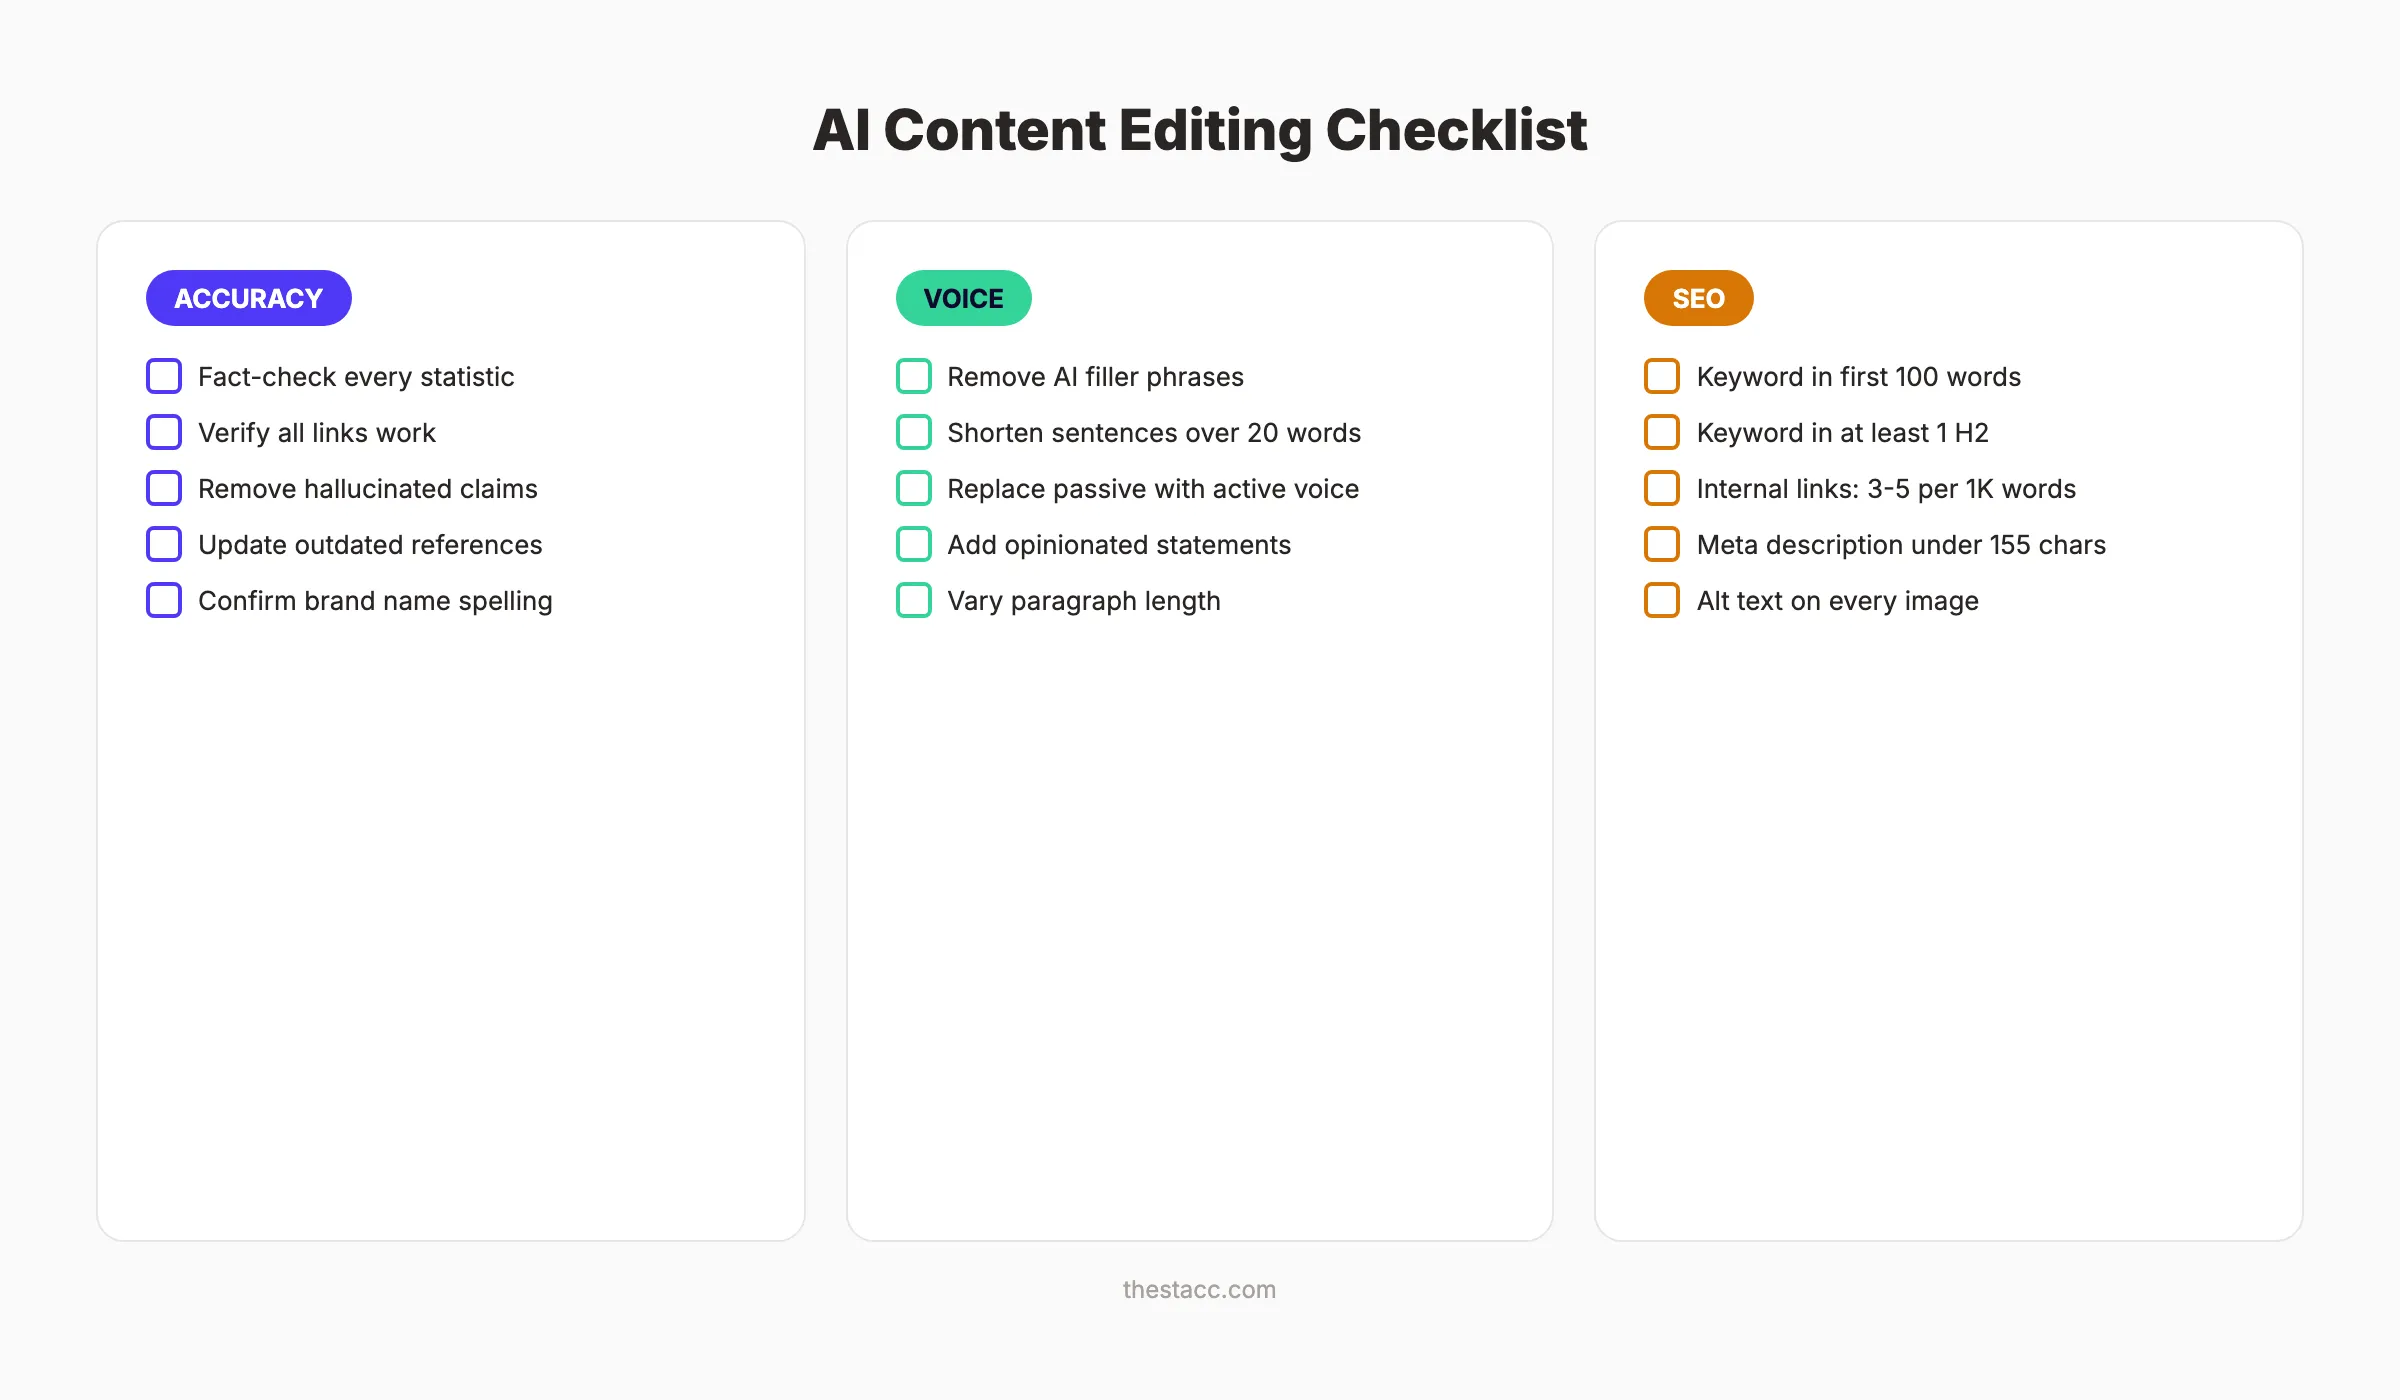
Run every AI draft through this 3-pass editing process:
Pass 1. Accuracy Check:
- Fact-check every statistic and claim
- Verify all external links load correctly
- Remove any hallucinated references (AI invents sources)
- Confirm product names, prices, and features are current
Pass 2. Voice Check:
- Delete filler phrases (“It is important to note,” “In order to”)
- Shorten sentences over 20 words
- Replace passive voice with active voice
- Add 2 to 3 opinionated statements per 1,000 words
- Vary sentence lengths (mix 5-word and 18-word sentences)
Pass 3. Flow Check:
- Read the entire post out loud
- Fix awkward transitions between sections
- Remove repeated points across sections
- Ensure each paragraph has 1 to 3 sentences maximum
This is the same editing process we use for every blog post published through Stacc. AI saves time on the first draft. Editing makes the draft worth publishing. Learn more about writing SEO blog posts that meet quality standards.
Why this step matters: Unedited AI content reads like unedited AI content. Readers bounce. Google notices the bounce rate. Rankings drop. The 30 minutes you spend editing saves months of waiting for traffic that never comes.
Step 7: Optimize for On-Page SEO
A well-written post without SEO optimization is a car without fuel. It looks good but does not go anywhere.
On-page SEO is the process of optimizing individual page elements so search engines understand your content. AI can help write the content. But you need to verify every SEO element manually.

Specifically:
- Place your primary keyword in the title tag (under 60 characters)
- Write a meta description between 145 and 155 characters with the keyword
- Include the primary keyword in the first 100 words
- Use keyword variations in at least 2 H2 headings
- Add 3 to 5 internal links per 1,000 words
- Link to 2 to 3 authoritative external sources
- Add descriptive alt text to every image
| SEO Element | Target | Common AI Mistake |
|---|---|---|
| Title tag | Under 60 chars with keyword | Too long, keyword missing |
| Meta description | 145-155 chars | Generic, no call to action |
| H2 headings | Keyword variations | All headings are questions |
| Internal links | 3-5 per 1,000 words | Zero internal links |
| Image alt text | Descriptive with keyword | ”image1.png” or blank |
AI typically generates content with zero internal links and no meta description. These are elements you must add yourself.
For a deeper walkthrough, read our complete on-page SEO guide. It covers every element in detail, including schema markup for blog posts.
Why this step matters: On-page SEO signals tell Google what your page is about and how it relates to other content on your site. Missing these signals means Google may never surface your post for the right queries. SEO is not an afterthought. It is a requirement.
We handle on-page SEO for every post we publish. Stacc blogs average a 92% SEO score across 3,500+ published articles. Start for $1 →
Step 8: Publish, Monitor, and Update
Publishing is not the finish line. It is the starting line.
After you hit publish, your post enters a 30 to 90 day evaluation period. Google crawls, indexes, and tests your content against competitors. What you do during this window matters.
Specifically:
- Submit your URL in Google Search Console for faster indexing
- Monitor impressions and clicks in the first 2 weeks
- Track your target keyword position daily for 30 days
- Check for technical issues: mobile rendering, page speed, broken links
After 90 days, review performance:
- Ranking in positions 4 to 10? Update the content. Add 300 to 500 words, freshen stats, and improve the intro. Read our guide on updating old blog posts for the exact process.
- Ranking in positions 11 to 20? Strengthen internal links. Add the URL to 3 to 5 existing blog posts with relevant anchor text.
- Not ranking at all? Review search intent alignment. Your content format may not match what Google wants for that query.
The Content Compound Effect means every published post builds on the last. A single post may not move the needle. But 30 posts per month, consistently published and updated, create compounding organic traffic that grows month over month.
Why this step matters: SEO is not a one-time effort. Content that gets published and forgotten decays. Content that gets monitored and updated climbs. The difference between page 1 and page 3 is often a single content refresh.
Results: What to Expect
After completing these 8 steps, expect the following:
- Week 1: Your post is indexed and starts appearing in search results for long-tail variations
- 30 to 60 days: Initial ranking movement for your primary keyword, typically positions 15 to 30
- 60 to 90 days: Rankings stabilize. Posts targeting low to medium difficulty keywords may reach page 1
- 90+ days: Traffic compounds as Google trusts your domain authority and internal link structure strengthens
Be realistic. A single AI-assisted blog post will not transform your traffic overnight. But a consistent system , 20 to 30 posts per month, each following this 8-step process. Builds organic traffic that compounds.
The businesses that win with AI content are not the ones using the fanciest tools. They are the ones following a consistent process. Topic research, outlining, prompting, editing, optimizing, publishing, and updating. That cycle is what builds topical authority over time.
At Stacc, our clients see meaningful ranking improvements within 3 to 6 months of consistent publishing. The process works when you commit to it.
Troubleshooting Common AI Blog Writing Problems
Problem: AI output sounds generic and repetitive. Solution: Add more context to your prompts. Include competitor insights, your brand voice guidelines, and specific formatting requirements. Prompt section by section instead of all at once.
Problem: Google is not indexing your posts. Solution: Submit your URL through Google Search Console. Check that your sitemap is updated and your robots.txt is not blocking the page.
Problem: Content ranks initially then drops. Solution: Run a content audit. Check for keyword cannibalization where multiple posts target the same keyword. Consolidate or differentiate overlapping content.
Frequently Asked Questions
Does Google penalize AI-generated blog posts?
No. Google has stated that appropriate use of AI is not against their guidelines. Google evaluates content quality, not how it was produced. The penalty comes from publishing thin, unhelpful content. Whether written by AI or a human.
How much of a blog post should AI write versus a human?
AI works best for first drafts and structural writing. Plan for AI to handle 50 to 60% of the raw word count. The remaining 40 to 50% comes from human editing, original data, examples, and SEO optimization. The ratio varies by topic complexity and your expertise level.
What is the best AI tool for writing blog posts?
The tool matters less than the process. ChatGPT, Claude, and Gemini all produce usable first drafts when prompted correctly. The quality difference comes from your outline, your editing, and your SEO optimization. Not the AI model. See our list of the best AI blog writing tools for detailed comparisons.
Can I publish AI content without editing it?
You can, but you should not. Unedited AI content contains filler phrases, passive voice, factual errors, and zero original insight. It reads like AI content and performs like AI content. Poorly. Every post needs at least 30 minutes of human editing to meet quality standards.
How many AI blog posts should I publish per month?
Consistency beats volume. But data shows that businesses publishing 16+ blog posts per month get 3.5x more traffic than those publishing 4 or fewer, according to HubSpot research. We recommend 20 to 30 posts per month. Our guide on creating a content calendar walks through the planning process.
Will AI-written content rank as well as human-written content?
AI-assisted content. Meaning AI drafts with heavy human editing, original data, and proper SEO. Ranks just as well as fully human-written content. The key word is “assisted.” Fully automated, unedited AI content consistently underperforms because it lacks the originality and depth that Google rewards.
Your blog does not need a full-time writer to publish consistently. It needs a repeatable process. These 8 steps turn AI into a production system, not a content crutch. Start with Step 1 today and build from there.
Stacc publishes 30+ SEO blog posts per month for businesses across 70+ industries. No writers needed. No content calendar headaches. Just results. Start for $1 →
Related Tools & Resources
Free SEO Tools:
Best Lists:

Written by
Siddharth GangalSiddharth is the founder of theStacc and Arka360, and a graduate of IIT Mandi. He spent years watching great businesses lose organic traffic to competitors who simply published more. So he built a system to fix that. He writes about SEO, content at scale, and the tactics that actually move rankings.
30 SEO blog articles published every month
Keyword-optimized, scheduled, and live on your site. Automatically.
30-day trial · Cancel anytime
theStacc
Stop writing SEO content manually
30 blog articles, 30 GBP posts, and social media content. Published every month. Automatically.
Start Your $1 Trial$1 for 3 days · Cancel anytime